Kernel basics, building and patching

Basics
The Linux kernel is the operating system kernel used by the Linux family of Unix-like operating systems. It is one of the most prominent examples of free and open source software.
The Linux kernel is released under the GNU General Public License version 2 (GPLv2) (plus some firmware images with various non-free licenses), and is developed by contributors worldwide. Day-to-day development discussions take place on the Linux kernel mailing list.
The Linux kernel was initially conceived and created by Finnish computer science student Linus Torvalds in 1991. Linux rapidly accumulated developers and users who adapted code from other free software projects for use with the new operating system. The Linux kernel has received contributions from thousands of programmers. Many Linux distributions have been released based upon the Linux kernel.
After that, many people contributed code to the project. Early on, the MINIX community contributed code and ideas to the Linux kernel. At the time, the GNU Project had created many of the components required for a free operating system, but its own kernel, GNU Hurd, was incomplete and unavailable. The BSD operating system had not yet freed itself from legal encumbrances. Despite the limited functionality of the early versions, Linux rapidly accumulated developers and users.
By September 1991, Linux version 0.01 was released on the FTP server (ftp.funet.fi) of the Finnish University and Research Network (FUNET). It had 10,239 lines of code. In October 1991, Linux version 0.02 was released.
In December 1991, Linux 0.11 was released. This version was the first to be self-hosted - Linux 0.11 could be compiled by a computer running Linux 0.11. When he released version 0.12 in February 1992, Torvalds adopted the GNU General Public License (GPL) over his previous self-drafted license, which had not permitted commercial redistribution.
A newsgroup known as alt.os.linux was started, and on 19 January 1992, the first post to alt.os.linux was made. On 31 March 1992, alt.os.linux became comp.os.linux.
The X Window System was soon ported to Linux. In March 1992, Linux version 0.95 was the first to be capable of running X. This large version number jump (from 0.1x to 0.9x) was due to a feeling that a version 1.0 with no major missing pieces was imminent. However, this proved to be somewhat overoptimistic, and from 1993 to early 1994, 15 development versions of version 0.99 appeared.
On 14 March 1994, Linux 1.0.0 was released, with 176,250 lines of code. In March 1995, Linux 1.2.0 was released (310,950 lines of code).
Version 2 of Linux, released on 9 June 1996, was followed by additional major versions under the version 2 header:
25 January 1999 - Linux 2.2.0 was released (1,800,847 lines of code).
18 December 1999 - IBM mainframe patches for 2.2.13 were published, allowing Linux to be used on enterprise-class machines.
4 January 2001 - Linux 2.4.0 was released (3,377,902 lines of code).
17 December 2003 - Linux 2.6.0 was released (5,929,913 lines of code).
Starting in 2004, the release process changed and new kernels started coming out on a regular schedule every 2-3 months, numbered 2.6.0, 2.6.1, up through 2.6.39.
On 21 July 2011 Linus Torvalds announced the release of Linux 3.0: "Gone are the 2.6.
As of 2012, the Linux 3.2 release had 14,998,651 lines of code.
Linux supports true preemptive multitasking (both in user mode and kernel mode), virtual memory, shared libraries, demand loading, shared copy-on-write executables, memory management, the Internet protocol suite, and threading.
Architecture
Linux kernel map
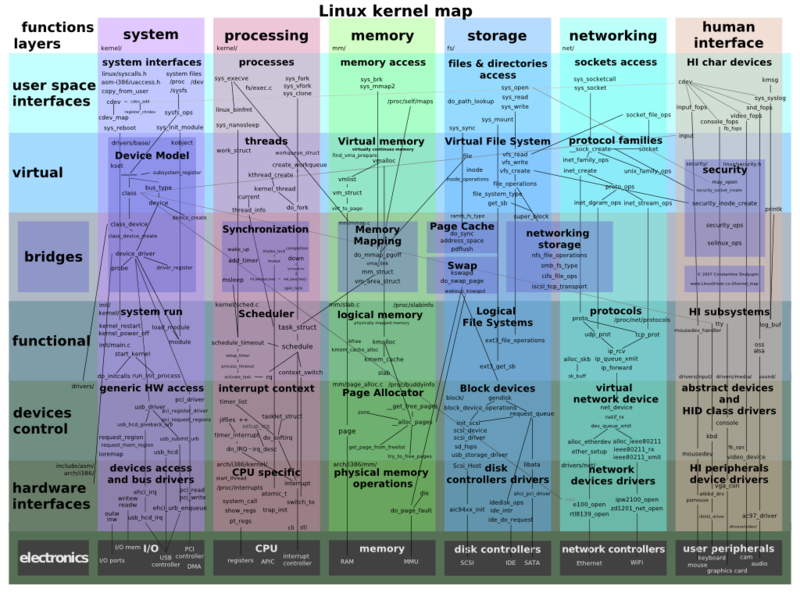
Linux is a monolithic kernel. Device drivers and kernel extensions run in kernel space (ring 0 in many CPU architectures), with full access to the hardware, although some exceptions run in user space, for example filesystems based on FUSE. The graphics system most people use with Linux doesn't run in the kernel, in contrast to that found in Microsoft Windows. Unlike standard monolithic kernels, device drivers are easily configured as modules, and loaded or unloaded while running the system. Also unlike standard monolithic kernels, device drivers can be pre-empted under certain conditions. This latter feature was added to handle hardware interrupts correctly, and to improve support for symmetric multiprocessing.[citation needed]
The hardware is also incorporated into the file hierarchy. Device drivers interface to user applications via an entry in the /dev directory. Process information as well is mapped to the file system through the /proc directory.
Preemption
The Linux kernel provides preemptive scheduling under certain conditions. Until kernel version 2.4, only processes were preemptive, i.e. in addition to time quantum expiration, an execution of current process in user mode would be interrupted if higher dynamic priority processes entered TASK_RUNNING state. Towards Linux 2.6, an ability to interrupt a task executing kernel code was added, although with that not all sections of the kernel code can be preempted. The Linux kernel contains different scheduler classes. By default the kernel uses a scheduler mechanism called the Completely Fair Scheduler introduced in the 2.6.23 version of the kernel. Internally this default-scheduler class is also known as SCHED_OTHER, but the kernel also contains two real-time scheduling classes named SCHED_FIFO (realtime first-in-first-out) and SCHED_RR (realtime round-robin) both of which takes precedence over the default class. Through the use of the real-time Linux patch (PREEMPT_RT), support for full preemption of critical sections, interrupt handlers and "interrupt disable" code sequences can be supported. Partial mainline integration of real-time Linux already brings some functionality to Linux mainline. Preemption improves latency, increases responsiveness, and makes Linux more suitable for desktop and real-time applications. Older versions of the kernel had a so-called big kernel lock for synchronization across the entire kernel. This was finally removed by Arnd Bergmann in 2011.
Major subsystems of the Linux kernel
Now let's look at some of the major components of the Linux kernel using the breakdown shown in Figure 3 as a guide.
System call interface
The SCI is a thin layer that provides the means to perform function calls from user space into the kernel. As discussed previously, this interface can be architecture dependent, even within the same processor family. The SCI is actually an interesting function-call multiplexing and demultiplexing service. You can find the SCI implementation in ./linux/kernel, as well as architecture-dependent portions in ./linux/arch. More details for this component are available in the Resources section.
Process management
What is a kernel?
A kernel is really nothing more than a resource manager. Whether the resource being managed is a process, memory, or hardware device, the kernel manages and arbitrates access to the resource between multiple competing users (both in the kernel and in user space).
Process management is focused on the execution of processes. In the kernel, these are called threads and represent an individual virtualization of the processor (thread code, data, stack, and CPU registers). In user space, the term process is typically used, though the Linux implementation does not separate the two concepts (processes and threads). The kernel provides an application program interface (API) through the SCI to create a new process (fork, exec, or Portable Operating System Interface [POSIX] functions), stop a process (kill, exit), and communicate and synchronize between them (signal, or POSIX mechanisms).
Also in process management is the need to share the CPU between the active threads. The kernel implements a novel scheduling algorithm that operates in constant time, regardless of the number of threads vying for the CPU. This is called the O(1) scheduler, denoting that the same amount of time is taken to schedule one thread as it is to schedule many. The O(1) scheduler also supports multiple processors (called Symmetric MultiProcessing, or SMP). You can find the process management sources in ./linux/kernel and architecture-dependent sources in ./linux/arch). You can learn more about this algorithm in the Resources section.
Memory management
Another important resource that's managed by the kernel is memory. For efficiency, given the way that the hardware manages virtual memory, memory is managed in what are called pages (4KB in size for most architectures). Linux includes the means to manage the available memory, as well as the hardware mechanisms for physical and virtual mappings.
But memory management is much more than managing 4KB buffers. Linux provides abstractions over 4KB buffers, such as the slab allocator. This memory management scheme uses 4KB buffers as its base, but then allocates structures from within, keeping track of which pages are full, partially used, and empty. This allows the scheme to dynamically grow and shrink based on the needs of the greater system.
Supporting multiple users of memory, there are times when the available memory can be exhausted. For this reason, pages can be moved out of memory and onto the disk. This process is called swapping because the pages are swapped from memory onto the hard disk. You can find the memory management sources in ./linux/mm.
Virtual file system
The virtual file system (VFS) is an interesting aspect of the Linux kernel because it provides a common interface abstraction for file systems. The VFS provides a switching layer between the SCI and the file systems supported by the kernel (see Figure 4).
At the top of the VFS is a common API abstraction of functions such as open, close, read, and write. At the bottom of the VFS are the file system abstractions that define how the upper-layer functions are implemented. These are plug-ins for the given file system (of which over 50 exist). You can find the file system sources in ./linux/fs.
Below the file system layer is the buffer cache, which provides a common set of functions to the file system layer (independent of any particular file system). This caching layer optimizes access to the physical devices by keeping data around for a short time (or speculatively read ahead so that the data is available when needed). Below the buffer cache are the device drivers, which implement the interface for the particular physical device.
Network stack
The network stack, by design, follows a layered architecture modeled after the protocols themselves. Recall that the Internet Protocol (IP) is the core network layer protocol that sits below the transport protocol (most commonly the Transmission Control Protocol, or TCP). Above TCP is the sockets layer, which is invoked through the SCI.
The sockets layer is the standard API to the networking subsystem and provides a user interface to a variety of networking protocols. From raw frame access to IP protocol data units (PDUs) and up to TCP and the User Datagram Protocol (UDP), the sockets layer provides a standardized way to manage connections and move data between endpoints. You can find the networking sources in the kernel at ./linux/net.
Device drivers
The vast majority of the source code in the Linux kernel exists in device drivers that make a particular hardware device usable. The Linux source tree provides a drivers subdirectory that is further divided by the various devices that are supported, such as Bluetooth, I2C, serial, and so on. You can find the device driver sources in ./linux/drivers.
Architecture-dependent code
While much of Linux is independent of the architecture on which it runs, there are elements that must consider the architecture for normal operation and for efficiency. The ./linux/arch subdirectory defines the architecture-dependent portion of the kernel source contained in a number of subdirectories that are specific to the architecture (collectively forming the BSP). For a typical desktop, the i386 directory is used. Each architecture subdirectory contains a number of other subdirectories that focus on a particular aspect of the kernel, such as boot, kernel, memory management, and others. You can find the architecture-dependent code in ./linux/arch.
Building A Linux Kernel
1. Configuring the Kernel
To build a new kenel or modify an existing kernel such as modifying process scheduler or writing a new file system, you need to get a Linux kernel source. In current fossil client installation, the kernel source is located under /usr/src/linux-2.2.14.SuSE. Please, do NOT work directly on this directory. Rather, login as a normal user (not root) and copy the source directory to your home or /tmp directory as follow (the example assumes that your login name is USER):
-
> cp -a /usr/src/linux-2.2.14.SuSE ~USER/
Note that you need to add yourself to group "root" (in /etc/group) to have permission to copy the Linux sources. The permission on "/usr/src/" is changed so that normal users (such as "guest") cannot read the Linux source that you might have modified directly on (instead of coping the source to your directory and modify it).
The next step after coping the source to your own user directory is to make soft link from "/usr/src/linux" to the linux source you have copied, and make sure that the linux source you have copied is not readable by random users:
> sudo rm -f /usr/src/linux
> sudo ln -s ~USER/linux-2.2.14.SuSE /usr/src/linux
> sudo chown -R USER:root ~USER/linux-2.2.14.SuSE
> chmod -R o-rwx ~USER/linux-2.2.14.SuSE
After copying the linux source to your directory, make changes to the source as required for class projects. For example, for cs3013 proj0 you will not need to make any kernel modification. For cs4513 proj0, you will need to slightly modify kernel source to install a new file system given. In general, before you configure and compile and after you copy and modify a kernel, it is good habit to run "make clean" to make sure you have no stale .o files lying around:
-
> cd ~USER/linux-2.2.14.SuSE
> make clean
You can also run "make mrproper" to make sure you have no stale .o files and dependencies lying around. However, be carefull. This will also delete ".config" file that has the current kernel configuration options. If you want to keep the current configuration, one hack is to rename ".config" before runing "make mrproper" and rename the configuration file back to ".config". If you have copied the current fossil client linux source (/usr/src/linux-2.2.14.SuSE), it is not necessary to run "make mrproper".
Next thing to do is configuring the kernel. Run "make config" to configure the basic kernel. Alternate configuration commands are:
-
"make menuconfig" Text based color menus, radiolists & dialogs.
"make xconfig" X windows based configuration tool.
Do not skip this step even if you are only upgrading one minor version. If you do not want to change the current fossil client default kernel configuration, just "save" and "exit". Finally, do a "make dep" to set up all the dependencies correctly. Now you are ready to compile the kernel you just configured.
2. Compiling the Kernel
After configuring the kernel, do a "make zImage" to create a compressed kernel image. If you want to make a boot disk (without root filesystem or LILO), insert a floppy in your A: drive, and do a "make zdisk". If your kernel is too large for "make zImage", use "make bzImage" instead. For the default fossil client kernel settings, you are required to use "bzImage", since it will complain about the size of kernel you are trying to build, if you use "zImage" option.
If you configured any of the parts of the kernel as `modules', you will have to do "make modules" followed by "make modules_install". Note that "make modules_install" requires "root" permission, and doing it will delete the currently installed kernel modules located under /lib/modules/2.2.14. It is strongly recommended to backup /lib/modules/2.2.14 before installing your own modules. For example:
> sudo make modules
> sudo mv /lib/modules/2.2.14 /lib/modules/2.2.14.original
> sudo make modules_install
Read Documentation/modules.txt for more information. For example, an explanation of how to use the modules is included there. At this point, you should have your kernel image under "~USER/linux-2.2.14/arch/i386/boot/" directory (zImage or bzImage)
3. Installing the Kernel
After compilation, you need to move the kernel image you have compiled to "/boot/" directory. Please, do not delete the currently kernel image (/boot/vmlinuz), since if anything goes wrong, you cannot boot again. In the rest of this example, it is assume that your new kernel image is "bzImage".
> sudo cp ~USER/linux-2.2.14/arch/i386/boot/bzImage /boot/testimg
Now you need to modify /etc/lilo.conf to give LILO (Linux Loader) the location of your new kernel image. The current /etc/lilo.conf will look like:
...
image = /boot/vmlinuz
root = /dev/hda5
label = linux
append = "idebus=66"
Append the following to the end of /etc/lilo.conf:
-
image = /boot/testimg
root = /dev/hda5
label = test
append = "idebus=66"
Note that you will also use "sudo" to modify /etc/lilo.conf. After modifying /etc/lilo.conf, run lilo:
-
> sudo lilo
This will reinstall LILO, so that when you reboot you can choose your kernel image to boot the system. Now, it's time to reboot your system. Run one of the following command with your fingers crossed ^^:
-
> sudo reboot
> sudo shutdown -r now
Make sure nobody logged into your machine before rebooting your system ("who" will show you people currently logged in). When rebooting, type in "test" at "LILO boot:" prompt to boot your kernel (hit TAB to list available boot options).
For more information and issues on building linux kernel, refer to /usr/src/linux-2.2.14/README and /usr/doc/howto/en/html/Kernel-HOWTO.html.
4. Clean Linux Source and Config File
A clean Linux 2.2.14 kernel source and a copy of the default fossil client kernel configuration file is also available under "/home/public/src/" directory at the fossil server. Here is how to untar (with gunzip) the kernel source.
-
(copy to your machine using "scp")
> tar -xzf linux-2.2.14.SuSE.tgz
If you feel you did someting wrong with your own kernel configuration and would like to start from the fossil client default one again, you can use the configuration file named "fossil-kernel.config" on the fossil server under "/home/public/src/". However, it needs to be renamed to ".config" after coping it to your linux directory.
Patching the kernel
Applying a patch
Incremental upgrades of the kernel are distributed as patches. For example, if you have version 1.1.45, and you notice that there's a `patch46.gz' out there for it, it means you can upgrade to version 1.1.46 through application of the patch. You might want to make a backup of the source tree first (`make clean' and then `cd /usr/src; tar zcvf old-tree.tar.gz linux' will make a compressed tar archive for you.).
So, continuing with the example above, let's suppose that you have `patch46.gz' in /usr/src. cdto /usr/srcand do a `zcat patch46.gz | patch -p0' (or `patch -p0 < patch46' if the patch isn't compressed). You'll see things whizz by (or flutter by, if your system is that slow) telling you that it is trying to apply hunks, and whether it succeeds or not. Usually, this action goes by too quickly for you to read, and you're not too sure whether it worked or not, so you might want to use the -sflag to patch, which tells patchto only report error messages (you don't get as much of the ``hey, my computer is actually doing something for a change!'' feeling, but you may prefer this..). To look for parts which might not have gone smoothly, cd to /usr/src/linuxand look for files with a .rejextension. Some versions of patch(older versions which may have been compiled with on an inferior filesystem) leave the rejects with a #extension. You can use `find' to look for you;
find . -name '*.rej' -print
prints all files who live in the current directory or any subdirectories with a .rejextension to the standard output.
If everything went right, do a `make clean', `config', and `dep' as described in sections 3 and 4.
There are quite a few options to the patchcommand. As mentioned above, patch -swill suppress all messages except the errors. If you keep your kernel source in some other place than /usr/src/linux, patch -p1(in that directory) will patch things cleanly. Other patchoptions are well-documented in the manual page.
If something goes wrong
(Note: this section refers mostly to quite old kernels)
The most frequent problem that used to arise was when a patch modified a file called `config.in' and it didn't look quite right, because you changed the options to suit your machine. This has been taken care of, but one still might encounter it with an older release. To fix it, look at the config.in.rejfile, and see what remains of the original patch. The changes will typically be marked with `+' and `-' at the beginning of the line. Look at the lines surrounding it, and remember if they were set to `y' or `n'. Now, edit config.in, and change `y' to `n' and `n' to `y' when appropriate. Do a
patch -p0 < config.in.rej
and if it reports that it succeeded (no fails), then you can continue on with a configuration and compilation. The file will remain, but you can get delete it.
If you encounter further problems, you might have installed a patch out of order. If patch says `previously applied patch detected: Assume
-R?', you are probably trying to apply a patch which is below your current version number; if you answer `y', it will attempt to degrade your source, and will most likely fail; thus, you will need to get a whole new source tree (which might not have been such a bad idea in the first place).
To back out (unapply) a patch, use `patch -R' on the original patch.
The best thing to do when patches really turn out wrong is to start over again with a clean, out-of-the-box source tree (for example, from one of the linux-x.y.z.tar.gzfiles), and start again.
Getting rid of the .orig files
After just a few patches, the .origfiles will start to pile up. For example, one 1.1.51 tree I had was once last cleaned out at 1.1.48. Removing the .orig files saved over a half a meg.
find . -name '*.orig' -exec rm -f {} ';'
will take care of it for you. Versions of which use for rejects use a tilde instead of .
There are better ways to get rid of the .origfiles, which depend on GNU xargs:
find . -name '*.orig' | xargs rm
or the ``quite secure but a little more verbose'' method:
find . -name '*.orig' -print0 | xargs --null rm --
Other patches
There are other patches (I'll call them ``nonstandard'') than the ones Linus distributes. If you apply these, Linus' patches may not work correctly and you'll have to either back them out, fix the source or the patch, install a new source tree, or a combination of the above. This can become very frustrating, so if you do not want to modify the source (with the possibility of a very bad outcome), back out the nonstandard patches before applying Linus', or just install a new tree. Then, you can see if the nonstandard patches still work. If they don't, you are either stuck with an old kernel, playing with the patch or source to get it to work, or waiting (possibly begging) for a new version of the patch to come out.
How common are the patches not in the standard distribution? You will probably hear of them. I used to use the noblink patch for my virtual consoles because I hate blinking cursors (This patch is (or at least was) frequently updated for new kernel releases.). With most newer device drivers being developed as loadable modules, though, the frequecy of ``nonstandard'' patches is decreasing significantly.
config.in.rejpatch#.orig