Basic concepts configuring and verifying RIP 2
Â

The Routing Information Protocol (RIP) is a relatively old, but still commonly used, interior gateway protocol (IGP) created for use in small, homogeneous networks. It is a classical distance-vector routing protocol. RIP is documented in RFC 1058.
RIP uses broadcast User Datagram Protocol (UDP) data packets to exchange routing information. The Cisco IOS software sends routing information updates every 30 seconds; this process is termed advertising. If a router does not receive an update from another router for 180Â seconds or more, it marks the routes served by the nonupdating router as being unusable. If there is still no update after 240 seconds, the router removes all routing table entries for the nonupdating router.
Â
The metric that RIP uses to rate the value of different routes is hop count. The hop count is the number of routers that can be traversed in a route. A directly connected network has a metric of zero; an unreachable network has a metric of 16. This small range of metrics makes RIP an unsuitable routing protocol for large networks.
Â
If the router has a default network path, RIP advertises a route that links the router to the pseudonetwork 0.0.0.0. The network 0.0.0.0 does not exist; RIP treats 0.0.0.0 as a network to implement the default routing feature. The Cisco IOS software will advertise the default network if a default was learned by RIP, or if the router has a gateway of last resort and RIP is configured with a default metric.
Â
RIP sends updates to the interfaces in the specified networks. If an interface's network is not specified, it will not be advertised in any RIP update.
Â
Cisco's implementation of RIP Version 2 supports plain text and MD5 authentication, route summarization, classless interdomain routing (CIDR), and variable-length subnet masks (VLSMs).
Â
For protocol-independent features, which also apply to RIP.Â
Â
RIP Configuration Task List
Â
To configure RIP, complete the tasks in the following sections. You must enable RIP. The remaining tasks are optional.
Â
•Enable RIP
Â
•Allow Unicast Updates for RIP
Â
•Apply Offsets to Routing Metrics
Â
Â
Â
Â
•Disable Route Summarization
Â
•Run IGRP and RIP Concurrently
Â
•Disable the Validation of Source IP Addresses
Â
•Enable or Disable Split Horizon
Â
•Configure Interpacket Delay
Â
Enable RIP
Â
To enable RIP, use the following commands, starting in global configuration mode:
|
Step
|
Command
|
Purpose
|
|---|---|---|
|
1 |
router rip |
Enable a RIP routing process, which places you in router configuration mode. |
|
2 |
network network-number |
Associate a network with a RIP routing process. |
Â
Â
Allow Unicast Updates for RIP
Â
Because RIP is normally a broadcast protocol, in order for RIP routing updates to reach nonbroadcast networks, you must configure the Cisco IOS software to permit this exchange of routing information. To do so, use the following command in router configuration mode:
|
Command
|
Purpose
|
|---|---|
|
neighbor ip-address |
Define a neighboring router with which to exchange routing information. |
Â
Â
To control the set of interfaces with which you want to exchange routing updates, you can disable the sending of routing updates on specified interfaces by configuring the passive-interface command.
Â
Apply Offsets to Routing Metrics
Â
An offset list is the mechanism for increasing incoming and outgoing metrics to routes learned via RIP. This is done to provide a local mechanism for increasing the value of routing metrics. Optionally, you can limit the offset list with either an access list or an interface. To increase the value of routing metrics, use the following command in router configuration mode:
|
Command
|
Purpose
|
|---|---|
|
offset-list [access-list-number | name] {in | out} offset [type number] |
Apply an offset to routing metrics. |
Â
Â
Adjust Timers
Â
Routing protocols use several timers that determine such variables as the frequency of routing updates, the length of time before a route becomes invalid, and other parameters. You can adjust these timers to tune routing protocol performance to better suit your internetwork needs. You can make the following timer adjustments:
Â
•The rate (time in seconds between updates) at which routing updates are sent
Â
•The interval of time (in seconds) after which a route is declared invalid
Â
•The interval (in seconds) during which routing information regarding better paths is suppressed
Â
•The amount of time (in seconds) that must pass before a route is removed from the routing table
Â
•The amount of time for which routing updates will be postponed
Â
It also is possible to tune the IP routing support in the software to enable faster convergence of the various IP routing algorithms, and, hence, quicker fallback to redundant routers. The total effect is to minimize disruptions to end users of the network in situations where quick recovery is essential.
Â
To adjust the timers, use the following command in router configuration mode:
|
Command
|
Purpose
|
|---|---|
|
timers basic update invalid holddown flush [sleeptime] |
Adjust routing protocol timers. |
Â
Â
Specify a RIP Version
Â
Cisco's implementation of RIP Version 2 supports authentication, key management, route summarization, classless interdomain routing (CIDR), and variable-length subnet masks (VLSMs). Key management and VLSM are described in the chapter "Configuring IP Routing Protocol-Independent Features."
Â
By default, the software receives RIP Version 1 and Version 2 packets, but sends only Version 1 packets. You can configure the software to receive and send only Version 1 packets. Alternatively, you can configure the software to receive and send only Version 2 packets. To do so, use the following command in router configuration mode:
|
Command
|
Purpose
|
|---|---|
|
version {1 | 2} |
Configure the software to receive and send only RIP Version 1 or only RIP Version 2 packets. |
Â
Â
The preceding task controls the default behavior of RIP. You can override that behavior by configuring a particular interface to behave differently. To control which RIP version an interface sends, use one of the following commands in interface configuration mode:
|
Command
|
Purpose
|
|---|---|
|
ip rip send version 1 |
Configure an interface to send only RIP Version 1 packets. |
|
ip rip send version 2 |
Configure an interface to send only RIP Version 2 packets. |
|
ip rip send version 1 2 |
Configure an interface to send RIP Version 1 and Version 2 packets. |
Â
Â
Similarly, to control how packets received from an interface are processed, use one of the following commands in interface configuration mode:
|
Command
|
Purpose
|
|---|---|
|
ip rip receive version 1 |
Configure an interface to accept only RIP Version 1 packets. |
|
ip rip receive version 2 |
Configure an interface to accept only RIP Version 2 packets. |
|
ip rip receive version 1 2 |
Configure an interface to accept either RIP Version 1 or 2 packets. |
Â
Â
Enable RIP Authentication
Â
RIP Version 1 does not support authentication. If you are sending and receiving RIP Version 2 packets, you can enable RIP authentication on an interface.
Â
The key chain determines the set of keys that can be used on the interface. If a key chain is not configured, no authentication is performed on that interface, not even the default authentication. Therefore, you must also perform the tasks in the section "Manage Authentication Keys" in the "Configuring IP Routing Protocol-Independent Features" chapter.
Â
We support two modes of authentication on an interface for which RIP authentication is enabled: plain text authentication and MD5 authentication. The default authentication in every RIP Version 2 packet is plain text authentication.
Note   Do not use plain text authentication in RIP packets for security purposes, because the unencrypted authentication key is sent in every RIP Version 2 packet. Use plain text authentication when security is not an issue, for example, to ensure that misconfigured hosts do not participate in routing.
To configure RIP authentication, use the following commands in interface configuration mode:
|
Step
|
Command
|
Purpose
|
|---|---|---|
|
1 |
ip rip authentication key-chain name-of-chain |
Enable RIP authentication. |
|
2 |
ip rip authentication mode {text | md5} |
Configure the interface to use MD5 digest authentication (or let it default to plain text authentication). |
|
3 |
Manage Authentication Keys |
Perform the authentication key management tasks. |
Disable Route Summarization
Â
RIP Version 2 supports automatic route summarization by default. The software summarizes subprefixes to the classful network boundary when crossing classful network boundaries.
Â
If you have disconnected subnets, disable automatic route summarization to advertise the subnets. When route summarization is disabled, the software transmits subnet and host routing information across classful network boundaries. To disable automatic summarization, use the following command in router configuration mode:
|
Command
|
Purpose
|
|---|---|
|
no auto-summary |
Disable automatic summarization. |
Â
Â
Run IGRP and RIP Concurrently
Â
It is possible to run IGRP and RIP concurrently. The IGRP information will override the RIP information by default because of IGRP's administrative distance.
Â
However, running IGRP and RIP concurrently does not work well when the network topology changes. Because IGRP and RIP have different update timers, and because they require different amounts of time to propagate routing updates, one part of the network will end up believing IGRP routes and another part will end up believing RIP routes. This will result in routing loops. Even though these loops do not exist for very long, the time to live (TTL) will quickly reach zero, and ICMP will send a "TTL exceeded" message. This message will cause most applications to stop attempting network connections.
Â
Disable the Validation of Source IP Addresses
Â
By default, the software validates the source IP address of incoming RIP routing updates. If that source address is not valid, the software discards the routing update.
Â
You might want to disable this feature if you have a router that is "off network" and you want to receive its updates. However, disabling this feature is not recommended under normal circumstances. To disable the default function that validates the source IP addresses of incoming routing updates, use the following command in router configuration mode:
|
Command
|
Purpose
|
|---|---|
|
no validate-update-source |
Disable the validation of the source IP address of incoming RIP routing updates. |
Â
Â
Enable or Disable Split Horizon
Â
Normally, routers that are connected to broadcast-type IP networks and that use distance-vector routing protocols employ the split horizon mechanism to reduce the possibility of routing loops. Split horizon blocks information about routes from being advertised by a router out of any interface from which that information originated. This behavior usually optimizes communications among multiple routers, particularly when links are broken. However, with nonbroadcast networks (such as Frame Relay and SMDS), situations can arise for which this behavior is less than ideal. For these situations, you might want to disable split horizon. This applies to IGRP and RIP.
Â
If an interface is configured with secondary IP addresses and split horizon is enabled, updates might not be sourced by every secondary address. One routing update is sourced per network number unless split horizon is disabled.
Â
To enable or disable split horizon, use one of the following commands in interface configuration mode:
|
Command
|
Purpose
|
|---|---|
|
ip split-horizon |
Enable split horizon. |
|
no ip split-horizon |
Disable split horizon. |
Â
Â
Split horizon for Frame Relay and SMDS encapsulation is disabled by default. Split horizon is not disabled by default for interfaces using any of the X.25 encapsulations. For all other encapsulations, split horizon is enabled by default.
Â
Note   In general, changing the state of the default is not recommended unless you are certain that your application requires making a change in order to advertise routes properly. Remember: If split horizon is disabled on a serial interface (and that interface is attached to a packet-switched network), you must disable split horizon for all routers in any relevant multicast groups on that network.
Configure Interpacket Delay
Â
By default, the software adds no delay between packets in a multiple-packet RIP update being sent. If you have a high-end router sending to a low-speed router, you might want to add such interpacket delay to RIP updates, in the range of 8 to 50 milliseconds. To do so, use the following command in router configuration mode:
|
Command
|
Purpose
|
|---|---|
|
output-delay delay |
Add interpacket delay for RIP updates sent. |
Â
Â
RIP Configuration Examples
Â
This section contains RIP split horizon configuration examples.
Â
Split Horizon Examples
Â
Two examples of configuring split horizon are provided.
Â
Example 1
Â
The following sample configuration illustrates a simple example of disabling split horizon on a serial link. In this example, the serial link is connected to an X.25 network.
Â
interface serial 0
Â
encapsulation x25
Â
no ip split-horizon
Â
Example 2
Â
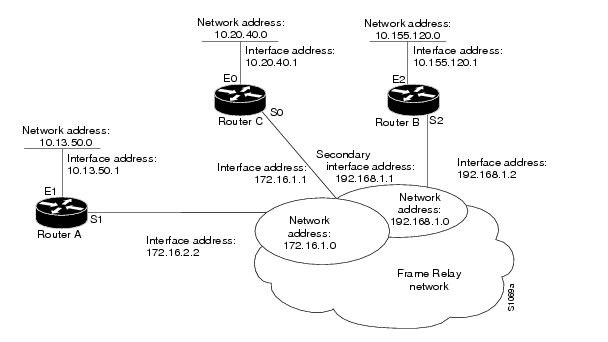
In the next example, illustrates a typical situation in which the no ip split-horizon interface configuration command would be useful. This figure depicts two IP subnets that are both accessible via a serial interface on Router C (connected to Frame Relay network). In this example, the serial interface on Router C accommodates one of the subnets via the assignment of a secondary IP address.
Â
The Ethernet interfaces for Router A, Router B, and Router C (connected to IP networks 10.13.50.0, 10.155.120.0, and 10.20.40.0, respectively, all have split horizon enabled by default, while the serial interfaces connected to networks 172.16.1.0 and 192.168.1.0 all have split horizon disabled with the no ip split-horizon command. shows the topology and interfaces.
Â
Figure 17 Disabled Split Horizon Example for Frame Relay Network
Â
Â
In this example, split horizon is disabled on all serial interfaces. However, split horizon must be disabled on Router C in order for network 172.16.1.0 to be advertised into network 192.168.1.0, and vice versa. These subnets overlap at Router C, interface S0. If split horizon were enabled on serial interface S0, it would not advertise a route back into the Frame Relay network for either of these networks
Â
Configuration for Router A
Â
interface ethernet 1
Â
 ip address 10.13.50.1
Â
!
Â
interface serial 1
Â
 ip address 172.16.2.2
Â
 encapsulation frame-relay
Â
 no ip split-horizon
Â
Configuration for Router B
Â
interface ethernet 2
Â
 ip address 10.155.120.1
Â
!
Â
interface serial 2
Â
 ip address 192.168.1.2
Â
 encapsulation frame-relay
Â
 no ip split-horizon
Â
Configuration for Router C
Â
interface ethernet 0
Â
 ip address 10.20.40.1
Â
!
Â
interface serial 0
Â
 ip address 172.16.1.1
Â
 ip address 192.168.1.1 secondary
Â
 encapsulation frame-relay
Â
 no ip split-horizon
Â
Â
Â
Â
RIP v2
Configuring RIP v2 on a Network.
Â
router#configure terminal
Router(config)#router rip
Router(config-router)#version 2
Router(config-router)#network 192.168.1.0
Router(config-router)#network 192.168.2.0
Router(config-router)#network 192.168.3.0
Router(config-router)#network 192.168.4.0
Router(config-router)#network 172.16.1.0
Router(config-router)#network 172.16.2.0
Router(config-router)#no auto-summary
Router(config-router)#end
Â
From the command above, all other routers on the network must be configured the same way, each router must declare its directly connected network to be seen by other routers on the network.
Â
Â
Â
Â
Â
Redistributing Static Routes into RIP
You want RIP to redistribute static routes that you have configured on your router it works on both versions, make sure you include the version during your configuration.
The redistribute static command tells RIP to forward static routes in addition to the directly connected routes and the routes that have been learned from other RIP routers, which it forwards by default:
Router1#configure terminal
router(config)#ip route 192.168.2.0 255.255.255.0 172.16.1.2
router(config)#router rip
router(config-router)#redistribute static
router(config-router)#end
router#
You can characterize how these routes will appear to other routers when they are redistributed:
Router1#configure terminal
router(config)#ip route 192.168.2.0 255.255.255.0 172.16.1.2
router(config)#router rip               Â
router(config-router)#redistribute static metric 4
router(config-router)#distribute-list 7 out static
router(config-router)#exit
router(config)#access-list 7 permit 192.168.2.0
router(config)#end
router#
Explaination:
One of the potential problems that network administrators do encounter with redistributing routes into RIP enabled network comes from the breaking down of network class boundaries. RIP is classful, so you have to be rather careful about how you distribute routing information from other sources that may be classless. In the above example, Router1 or router (or any other hostname) redistributes a static route for the Class C network 192.168.2.0. Most times to redistribute a larger range (192.168.2.0 /22) there would be no displayed errors in the redistribution rather; the router would refuse to forward this route
To view the redistributed static route:
Router1#show ip rip database 192.168.2.0 255.255.255.0
192.168.20.0/24Â Â Â redistributed
   [5] via 0.0.0.0,
router#
After the configuration of the second example, use the show ip protocols to view information about the filtering. This command also tells you what protocols RIP is distributing;
Router1#show ip protocols
Â
Creating a Default Route in RIP
You want RIP to propagate a default route.
One of the two ways to get RIP to propagate a default route is to use the default-information originate command.
The preferred method is as follows:
Router1#configure terminal
router(config)#ip route 0.0.0.0 0.0.0.0 172.16.2.2
router(config)#router rip
Router(config-router)#version 2
router(config-router)#default-information originate
router(config-router)#end
router#
Another method is using redistribute static; you will accomplish the same thing:
Router1#configure terminal
router(config)#ip route 0.0.0.0 0.0.0.0 172.16.2.2
router(config)#access-list 7 permit 0.0.0.0
router(config)#router rip
router(config-router)#version 2
router(config-router)#redistribute static
router(config-router)#distribute-list 7 out static
router(config-router)#end
router#
Disabling RIP on an Interface
You want to prevent an interface from participating in RIP.
You don’t want an interface to participate in RIP, use the following set of commands:
Router1#configure terminal
router(config)#access-list 10 deny any
router(config)#router rip
Router(config-router)#version 2
router(config-router)#passive-interface FastEthernet0/1
router(config-router)#distribute-list 10 in FastEthernet0/1
router(config-router)#end
router#
Reasons to disable RIP on a particular interface.
 a.),     If another protocol is running on a particular interface, the additional RIP traffic could consume important bandwidth resources.
 b.),     There may be devices on a particular network segment that you do not trust. In this case, you want to make sure that you don't allow this device or equipment distribute routing information into your network.
Â