Imagine that you want to build an application for your city’s community-supported agriculture (CSA) club. Through this application, users could subscribe to receive food from local farms and distributors. The application ensures that your community gets healthy food and stays connected. You plan to use Node.js to build this web application and you want to start by verifying users’ zip codes to see if they live close enough for delivery. The question is: will you need to build your own tool to make this possible?
Luckily for us, the answer is no, npm can be used to install Node.js packages, libraries of code others have written that you can use to add specific features to your application. In fact, there’s a package for verifying locations based on zip codes. We’ll take a closer look at that package and how to install it in a little bit.
Creating a Node.js Module
A Node.js application is ultimately made up of many JavaScript files. For your application to stay organized and efficient, these files need to have access to each other’s contents when necessary. Each file, whose code is collectively related, is called a module. Let’s look at our app again and add some positive messages to it. You can create a file called messages.js with the following code:
let messages = [“You are great!”, “You can accomplish anything!”, “Success is in your future!”];
Keeping these messages separate from the code you’ll write to display them will make your code more organized. To manage these messages in another file, you need to change the let variable definition to use the exports object, like so:
exports.messages =[“You are great!”, “You can accomplish anything!”, “Success is in your future!”];
Just like other JavaScript objects, you are adding a messages property on the Node.js exports object, which can be shared between modules. The exports object is actually a property of the moduleobject. module is both the name of the code files in Node.js and one of its global objects. Using exports is essentially a shorthand for module.exports.
The module is ready to be required (imported) by another JavaScript file. You can test this by creating another file called printMessages.js, whose purpose is to loop through the messages and log them to your console with the code in listing 1. First, require the local module by using the require object and the module’s filename (with or without a .js extension). Then, refer to the module’s array by the variable set up in printMessages.js.
Listing 1. log messages to console in printMessages.js
const messageModule = require(’./messages’); 1
messageModule.messages.forEach( (m) => { 2
console.log(m);
});
1 – Require the local messages.js module.
2 – Refer to the module’s array through messageModule.messages.
require is another Node.js global object used to locally introduce methods and objects from other modules. Node.js interprets require(‘./messages’); to look for a module called messages.js within your project directory and allow code within printMessages.js to use any properties added to the exports object.
Next, we’ll use npm, another tool for adding modules to your project.
Running npm Commands
With your installation of Node.js, you also got Node Package Manager (npm). As the name suggests, npm is responsible for managing the external packages (modules others have built and made available online) in your application. Throughout application development, npm will be used to install, remove, and modify these packages. Entering npm -l in your terminal brings up a list of npm commands with brief explanations. Listing 2 contains a few npm commands that you’ll want to know about.
Listing 2. Npm commands to know
- npm init. Initializes a Node.js application and creates a package.json file
- npm install <package>. Installs a Node.js package.
- npm publish. Saves and uploads a package you built to the npm package community.
- npm start. Runs your Node.js application (provided the package.json file is set up to use this command). npm stop will quit the running application.
When using the npm install <package>, appending –save to your command installs the package as a dependency for your application. Appending –global installs the package globally on your computer to be used anywhere within terminal. These command extensions, called flags, have the shorthand forms of -S and -g, respectively. npmuninstall <package> reverses the install action. Should a project call for it, the npm install express -S can be used to install the Express.js framework, and npm install express-generator -g to install the Express.js generator for use as a command-line tool.
Modules and packages
Throughout your development with Node.js, you’ll hear the terms module and package thrown around a lot. Here’s what you need to know:
- Modules are individual JavaScript files containing code that pertains to a single concept, functionality, or library.
- Packages may contain multiple modules or a single module. Packages are used to group together files offering relevant tools.
“Dependencies” are Node.js modules used by an application or another module. If a package is considered an application dependency, it must be installed (at the version specified by the application) before the application can be expected to run successfully.
If there’s some functionality you’d like to incorporate into your application, there’s likely a package you can find online at npmjs.com to perform that task. Let’s go ahead and add the ability to find where your users are located based on their zip code.
To do this, we’ll need to install the cities package, built to convert text addresses into location coordinates. However, we’re still missing one thing from this project before the package can be installed successfully. We’ll need to properly initialize a Node.js project and create a package.json file used by npm for installing cities, which we will do in the next section.
Initializing a Node.js Application
Every Node.js application or module will contain a package.json file to define the properties of that particular project. This file lives at the root level of your project. Typically, this file is where you’ll specify the version of your current release, the name of your application, and the main application file. This file is important for npm to save any packages to the node community online.
To get started, create a folder called zip_connection, navigate to your project directory in terminal, and use the npm init command to initialize your application. You’ll be prompted to fill out the name of your project, the application’s version, a short description, the name of the file from which you’ll start the app (entry point), test files, git repositories, your name (author), and a license code. For now, just be sure to enter your name and press enter to accept all the default options. Once you confirm all these changes, you should see a new package.json file in your project directory resembling the contents of Listing 3.
Listing 3. Result of your package.json file in your zip_connection project
{
“name”: “zip_connection”,
“version”: “1.0.0”,
“description”: “An app to promote locally sourced food.”,
“main”: “printMessages.js”,
“scripts”: {
“test”: “echo \”Error: no test specified\” && exit 1″
},
“author”: “Jon Wexler”,
“license”: “ISC”
}
This example package.json contains a name, version, description, starting file, custom scripts, an author, and license.
Now your application has a starting point for saving and managing application configurations and packages. You should be able to install cities by navigating to your project folder and running the following in terminal:
npm install cities –save
Also, with this installation, your project folder will have just gained a new folder called node_modules. The code contents of the cities package you just installed lives in this folder.
The –save flag will save the cities package as a dependency for this project. Check your package.json file now to see how the package is listed under dependencies. Because your node_modules folder will grow in size, it is not recommended to include it when you share the project code online. However, anyone who downloads the project can enter npm install to automatically install all the project dependencies listed in this file.
Test out this new package by adding the lines in Listing 4 to main.js. We’ll start by requiring the locally installed cities package and make it available in this file. Then we’ll use the zip_lookup method from the cities package to find a city by its zip code. The result is stored in a variable called myCity.
Listing 4. Implementing the cities package in main.js
const cities = require(’cities’);
var myCity = cities.zip_lookup(10016);
console.log(myCity);
The code above does the following:
- Require the cities package.
- Store the resulting city from using the zip_lookup method.
- Log the results to your console.
The resulting data from that zip code is printed to console as shown in Listing 5.
Listing 5. Sample result from running the main.js in terminal
{ zipcode: ’10016’,
state_abbr: ’NY’,
latitude: ’40.746180’,
longitude: ’-73.97759’,
city: ’New York’,
state: ’New York’ }
The cities zip_lookup method returns a JavaScript object with coordinates.
Building a Simple Web Server in Node.js
The tech community raves about Node.js and its use of JavaScript as a server-side language, and that’s exactly what we’re going to do now: build it!
This section covers some basic functions of the http module, a Node.js library of code used for handling requests over the internet. Through a few short steps, you’ll convert a few lines of JavaScript into an application with which you can communicate on your web browser. Web servers are the foundation of most Node.js web applications. They allow you to load images and HTML web pages to users of your app.
Let’s consider that application that we’re working on to connect users from the same zip code. Before you deliver the complete application, the community might like to see a simple site with the flexibility to improve and add features in the future. How long do you think it will take you to build a prototype?
With Node.js, you can use the http module to get a web server with sufficient functionality built within hours.
Web servers and HTTP
Before getting started, let’s discuss some important web server concepts. After all, the final product will look and feel a lot better if you have clear expectations for the result ahead of time.
A web server is software designed to respond to requests over the internet by loading or processing data. Think of a web server like a bank teller, whose job is to process your request to deposit, withdraw, or simply view money in your account. Just as the bank teller follows a protocol to ensure that they process your request correctly, web servers follow the Hypertext Transfer Protocol (HTTP), a standardized system globally observed for the viewing of web pages and sending of data over the internet.
One way a client (your computer) and a server communicate is through the use of HTTP verbs. These verbs indicate what type of request is being made. For example, is the user trying to load a new web page or are they updating information in their profile page? The context of a user’s interaction with an application is an important part of the request–response cycle.
Here are the two most widely used HTTP methods you’ll encounter:
- This method is used to request information from a server. Typically, a server responds with content you can view back on your browser (e.g. clicking a link to see the home page of a site).
- This method is used to send information to the server. A server may respond with an HTML page or redirect you to another page in the application after processing your data (e.g. filling out and submitting a sign-up form).
Consider what happens when you visit google.com. Behind the scenes, you’re actually making a request to Google’s servers, which in turn sends a response back to you, rendering their famous “Google Search” landing page. This request–response relationship allows for a channel of communication between the user and the application. Notice in Figure 3 how a bundle of data is sent to the application’s server in the form of a request and, once the server processes the request, it issues a bundle of data back in the form of a response. This is how most of your interactions on the internet are facilitated.
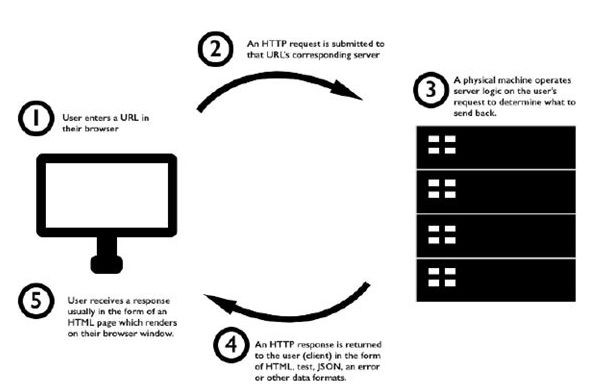
Figure 3. A web server sends your browser web pages, images and other resources on request
When you enter the URL you want to see in your browser, an HTTP request is sent to a physical computer elsewhere. This request contains some information indicating whether you want to load a web page or send information to that computer.
You might build a fancy application with many bells and whistles, but at the core there is web server, handing its communication on the internet. These concepts will make more sense the more practice you get. For now, let’s start building our web server.
Initialize the application with npm
To get started with a Node.js web application, you first need to initialize the project in your project folder on terminal. Open a terminal window and create a new directory called simple_server with mkdir. You can initialize the project with npm init.
npm stands for Node package manager. Your node projects rely on this tool to install and build Node.js applications.
Running the npm init command initiates a prompt to create a package.json file (Figure 4). As the prompt explains, you’ll walk through configuring the most basic settings of your Node.js application in this file.
Figure 4. Filling out the Node.js initializer prompts
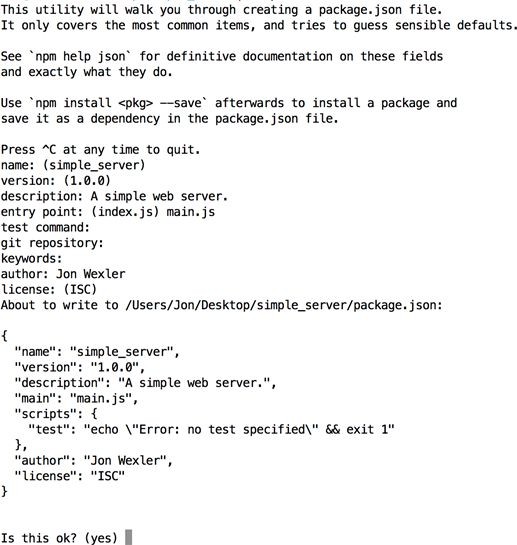
For now, you can add main.js as the entry point, a short description, your name as the author, and elect to use the default values offered by hitting the enter key until the end of the prompt is reached.
You’ll then be asked to confirm your settings with a preview of your package.json file. Press enter to confirm and return to the regular terminal prompt.
Code the application
When you installed Node.js at the beginning of this article, the core library was installed too. Within that library is a module called http, which we talked about earlier. This is what you’ll use to build your web server. We’ll also use another core module called url to examine the contents of the URL we visit in the web browser.
Remember, modules in Node.js are libraries of code that come packaged to offer specific functionality to your application. Here, the http module helps you communicate across the Web using HTTP.
In your text editor, create a new file called main.js and save it in the project folder containing the package.json file created above. This file will serve as the core application file, and is where your application will literally serve web pages to your users. In the following application, we’ll use the cities package to determine a city based on the provided zip code. We’ll get the zip code from the end of the URL, the query parameter. This parameter follows the URL path, starting with a question mark and a key value pair. In our example, we’ll use zipCode as the key and provide it some zip code value. For example, if I visit http://localhost:3000/?zipCode=10016 I’ll extract the zip code, 1006, and discover the city is New York!
Before we analyze every aspect of what we’re about to build, let’s take a look at all of the code. The first line of code requires you to import specific Node.js core modules called http and url. We save those two modules along with the cities module as constants, because we don’t expect this value to change like a normal variable might. We use the http variable as a reference to the http module to create a server. In ES6 it is conventional to structure a callback function with its parameters in parentheses, followed by ⇒ instead of the function keyword. In this code block, we use the response parameter in the callback function to send content back to the user’s request. The first line uses a writeHead method to define some basic properties for the response’s HTTP header. In this case, we’re returning a 200 response code and html content-type to indicate the server received a request successfully and will return content in the form of HTML. This code takes the server instance, server, and runs the listen method to indicate the server is ready for incoming requests at port 3000. Before we submit a response, we use the url module to extract the query at the end of the request’s URL using url.parse(request.url, true).query;.
Using an if statement, we check if there is a zip code parameter we can use with query.zipCode. If there is, we use its value in our cities.zip_lookup(query.zipCode) line and chain .city to pull the city’s name from the results. Otherwise, we set the city as “not found”. In the end, we return some HTML to the user’s screen with some text and the city associated with the zip code provided.
Listing 6. Simple web application code for main.js
const cities = require(’cities’);
const url = require(’url’);
const http = require(’http’);
const app = http.createServer((request, response) => {
var city, query;
query = url.parse(request.url, true).query;
if (query.zipCode) city = cities.zip_lookup(query.zipCode).city;
else city = “not found”
response.writeHead(200, {“Content-Type”: “text/html”});
response.write(`<h1>The city you are in is ${city}.</h1>`);
response.end();
});
app.listen(3000);
- const cities = require(’cities’);: Requiring the necessary modules.
- const app = http.createServer((request, response) =>: Setting up the server and extracting the query parameters.
- if (query.zipCode) city = cities.zip_lookup(query.zipCode).city;: Checking for city results from a zip code.
- writeHead(200, {“Content-Type”: “text/html”});: Setting up the response.
- listen(3000);: Telling the server to listen on port 3000.
There it is in all of its glory! Not so terrible. In only a few lines of code you can also build a web server like this. Give it a try!
If you don’t specify a port number, your operating system will choose a port for you. This port number is what you’ll soon use to confirm through your web browser that your web server is running.
Callbacks in Node.js
Part of what makes Node.js so fast and efficient is its use of callbacks. Callbacks are not new to JavaScript, but they are overwhelmingly used throughout Node.js and are thus worth mentioning.
A callback is essentially an anonymous function (a function without a name) that is set up to be invoked as soon as another function completes. The benefit of callbacks is you don’t have to wait for the original function to complete processing before other code is run.
Consider virtually depositing a check to your bank account by uploading a picture to your bank’s mobile app. A callback is equivalent to receiving a notification a couple days later to let you know the check has been verified and deposited. In between that time you were able to go about your normal routine.
In the http web server example, incoming requests from the client are received on a rolling basis, and thereupon pass the request and response as JavaScript objects to a callback function. Method names are case sensitive. For example, using createserver() will throw an error.
The createServer() method generates a new instance of http.Server, a built-in Node.js class with tools to evaluate HTTP communication. With this newly created server instance, your app is prepared to receive HTTP requests and send HTTP responses. The argument in createServer() is a callback function that is invoked whenever a certain event occurs within the server. For example, once the server is running and your application’s root URL (home page) is accessed, an HTTP request event will trigger this callback and allow you to run some custom code. In this case, the server will return a simple HTML response.
200 is the HTTP status code for “OK”, used to indicate that there was no issue in returning content in an HTTP response header. To get a list of other HTTP status codes, enter http.STATUS_CODES in the Node.js REPL shell.
Right below that line, you’re writing one line of HTML in the response with write() and closing the response with end(). You must end your response with end() to tell the server you are no longer writing content. Not doing so will leave the connection open to send more in the response and the server will ultimately never consider the response complete. With this code in place, you’re ready to start your Node.js application from the terminal.
Run the Application
The last step is an easy one: navigate to your project’s directory using terminal and run node main.js in your terminal window. Next, open any browser to the address localhost:3000. You won’t see any indication in the terminal window that the server has started, but you’ll soon see in the browser that everything is working properly. Your terminal window should resemble Figure 5.

Figure 5. Running a basic Node.js server
To start with, the browser window should display that no city was found. Next, try adding a zip code as the query parameter by visiting http://localhost:3000/?zipCode=10016. The browser window should display the city as New York, as shown in the figure below. Congratulations! Your first Node.js web application is up and running. This is big and it’s about to get bigger and better.
![]()
Figure 6. You’re in New York!
To stop the application, enter Ctrl + C in your terminal window. You can also close the terminal window, but you risk not shutting down the application properly, and it could continue to run behind the scenes (requiring more command-line magic to kill the process)
