Once the user has filled the form to the point that it passes our validation rules, we need to do something useful with the data. In this case, we want to construct and send an email containing the user’s feedback. We’ll use Django’s email package to do this.
First, though, we need to tell if the data is indeed valid, and if it is, we need access to the validated data. The forms framework does more than just validate the data, it also converts it into Python types. Our contact form only deals with strings, but if we were to use an IntegerField or DateTimeField, the forms framework would ensure that we got back a Python integer or datetime object, respectively. To tell whether a form is bound to valid data, call the is_valid() method:
form = ContactForm(request.POST)
if form.is_valid():
# Process form data
Now we need access to the data. We could pull it straight out of request.POST, but if we did, we’d miss out on the type conversions performed by the forms framework. Instead, we use form.clean_data:
if form.is_valid():
topic = form.clean_data[‘topic’]
message = form.clean_data[‘message’]
sender = form.clean_data.get(‘sender’, ‘noreply@example.com’)
# …
Note that since sender is not required, we provide a default when it’s missing. Finally, we need to record the user’s feedback. The easiest way to do this is to email it to a site administrator. We can do that using the send_mail function:
from django.core.mail import send_mail
# …
send_mail(
‘Feedback from your site, topic: %s’ % topic,
message, sender,
[‘administrator@example.com’]
)
The send_mail function has four required arguments: the email subject, the email body, the “from” address, and a list of recipient addresses. send_mail is a convenient wrapper around Django’s EmailMessage class, which provides advanced features such as attachments, multipart emails, and full control over email headers.
Having sent the feedback email, we’ll redirect our user to a static confirmation page. The finished view function looks like this:
from django.http import HttpResponseRedirect
from django.shortcuts import render_to_response
from django.core.mail import send_mail
from forms import ContactForm
def contact(request):
if request.method == ‘POST’:
form = ContactForm(request.POST)
if form.is_valid():
topic = form.clean_data[‘topic’]
message = form.clean_data[‘message’]
sender = form.clean_data.get(‘sender’, ‘noreply@example.com’)
send_mail(
‘Feedback from your site, topic: %s’ % topic,
message, sender,
[‘administrator@example.com’]
)
return HttpResponseRedirect(‘/contact/thanks/’)
else:
form = ContactForm()
return render_to_response(‘contact.html’, {‘form’: form})
Redirect After POST – If a user selects Refresh on a page that was displayed by a POST request, that request will be repeated. This can often lead to undesired behavior, such as a duplicate record being added to the database. Redirect after POST is a useful pattern that can help avoid this scenario: after a successful POST has been processed, redirect the user to another page rather than returning HTML directly.
Simple Validation
Our search example is still reasonably simple, particularly in terms of its data validation; we’re merely checking to make sure the search query isn’t empty. Many HTML forms include a level of validation that’s more complex than making sure the value is non-empty. We’ve all seen the error messages on web sites:=
- “Please enter a valid e-mail address. ‘foo’ is not an e-mail address.”
- “Please enter a valid five-digit U.S. ZIP code. ‘123’ is not a ZIP code.”
- “Please enter a valid date in the format YYYY-MM-DD.”
- “Please enter a password that is at least 8 characters long and contains at least one number.”
Let’s tweak our search() view so that it validates that the search term is less than or equal to 20 characters long. (For sake of example, let’s say anything longer than that might make the query too slow.) How might we do that? The simplest possible thing would be to embed the logic directly in the view, like this:
def search(request):
error = False
if ‘q’ in request.GET:
q = request.GET[‘q’]
if not q:
error = True
elif len(q) > 20:
error = True
else:
books = Book.objects.filter(title__icontains=q)
return render(request, ‘search_results.html’, {‘books’: books, ‘query’: q})
return render(request, ‘search_form.html’, {‘error’: error})
Now, if you try submitting a search query greater than 20 characters long, it won’t let you search; you’ll get an error message. But that error message in search_form.html currently says “Please submit a search term.”– so we’ll have to change it to be accurate for both cases:
<html>
<head>
<title>Search</title>
</head>
<body>
{% if error %}
<p style=”color: red;”>
Please submit a search term 20 characters or shorter.
</p>
{% endif %}
<form action=”/search/” method=”get”>
<input type=”text” name=”q”>
<input type=”submit” value=”Search”>
</form>
</body>
</html>
There’s something ugly about this. Our one-size-fits-all error message is potentially confusing. Why should the error message for an empty form submission mention anything about a 20-character limit? Error messages should be specific, unambiguous and not confusing. The problem is in the fact that we’re using a simple boolean value for error, whereas we should be using a list of error message strings. Here’s how we might fix that:
def search(request):
errors = []
if ‘q’ in request.GET:
q = request.GET[‘q’]
if not q:
errors.append(‘Enter a search term.’)
elif len(q) > 20:
errors.append(‘Please enter at most 20 characters.’)
else:
books = Book.objects.filter(title__icontains=q)
return render(request, ‘search_results.html’, {‘books’: books, ‘query’: q})
return render(request, ‘search_form.html’, {‘errors’: errors})
Then, we need make a small tweak to the search_form.html template to reflect that it’s now passed an errors list instead of an error boolean value:
<html>
<head>
<title>Search</title>
</head>
<body>
{% if errors %}
<ul>
{% for error in errors %}
<li>{{ error }}</li>
{% endfor %}
</ul>
{% endif %}
<form action=”/search/” method=”get”>
<input type=”text” name=”q”>
<input type=”submit” value=”Search”>
</form>
</body>
</html>
Making a Contact Form
Although we iterated over the book search form example several times and improved it nicely, it’s still fundamentally simple: just a single field, ‘q’. As forms get more complex, we have to repeat the above steps over and over again for each form field we use. This introduces a lot of cruft and a lot of opportunities for human error. Lucky for us, the Django’s developers thought of this and built into Django a higher-level library that handles form- and validation-related tasks.
Your First Form Class – Django comes with a form library, called django.forms, that handles many of the issues we’ve been exploring this chapter – from HTML form display to validation. Let’s dive in and rework our contact form application using the Django forms framework. The primary way to use the forms framework is to define a Form class for each HTML <form> you’re dealing with.
In our case, we only have one <form>, so we’ll have one Form class. Django community convention is to keep Form classes in a separate file called forms.py. Create this file in the same directory as your mysite\views.py, and enter the following:
# mysite_project\mysite\mysite\forms.py
from django import forms
class ContactForm(forms.Form):
subject = forms.CharField()
email = forms.EmailField(required=False)
message = forms.CharField()
This is pretty intuitive, and it’s similar to Django’s model syntax. Each field in the form is represented by a type of Field class – CharField and EmailField are the only types of fields used here – as attributes of a Form class. Each field is required by default, so to make email optional, we specify required=False.
Let’s hop into the Python interactive interpreter and see what this class can do. The first thing it can do is display itself as HTML:
(env_mysite) C:\Users\…\mysite> python manage.py shell
>>> from mysite.forms import ContactForm
>>> f = ContactForm()
>>> print(f)
<tr><th><label for=”id_subject”>Subject:</label></th><td><input type=”text” name=”subject” required id=”id_subject” /></td></tr>
<tr><th><label for=”id_email”>Email:</label></th><td><input type=”email” name=”email” id=”id_email” /></td></tr>
<tr><th><label for=”id_message”>Message:</label></th><td><input type=”text” name=”message” required id=”id_message” /></td></tr>
Django adds a label to each field, along with <label> tags for accessibility. The idea is to make the default behavior as optimal as possible. This default output is in the format of an HTML <table>, but there are a few other built-in outputs:
>>> print(f.as_ul())
<li><label for=”id_subject”>Subject:</label> <input type=”text” name=”subject” required id=”id_subject” /></li>
<li><label for=”id_email”>Email:</label> <input type=”email” name=”email” id=”id_email” /></li>
<li><label for=”id_message”>Message:</label> <input type=”text” name=”message” required id=”id_message” /></li>
>>> print(f.as_p())
<p><label for=”id_subject”>Subject:</label> <input type=”text” name=”subject” required id=”id_subject” /></p>
<p><label for=”id_email”>Email:</label> <input type=”email” name=”email” id=”id_email” /></p>
<p><label for=”id_message”>Message:</label> <input type=”text” name=”message” required id=”id_message” /></p>
Note that the opening and closing <table>, <ul> and <form> tags aren’t included in the output, so that you can add any additional rows and customization if necessary. These methods are just shortcuts for the common case of displaying the entire form. You can also display the HTML for a particular field:
>>> print(f[‘subject’])
<input type=”text” name=”subject” required id=”id_subject” />
>>> print f[‘message’]
<input type=”text” name=”message” required id=”id_message” />
The second thing Form objects can do is validate data. To validate data, create a new Form object and pass it a dictionary of data that maps field names to data:
>>> f = ContactForm({‘subject’: ‘Hello’, ’email’: ‘nige@example.com’, ‘message’: ‘Nice site!’})
Once you’ve associated data with a Form instance, you’ve created a “bound” form:
>>> f.is_bound
True
Call the is_valid() method on any bound Form to find out whether its data is valid. We’ve passed a valid value for each field, so the Form in its entirety is valid:
>>> f.is_valid()
True
If we don’t pass the email field, it’s still valid, because we’ve specified required=False for that field:
>>> f = ContactForm({‘subject’: ‘Hello’, ‘message’: ‘Nice site!’})
>>> f.is_valid()
True
But, if we leave off either subject or message, the Form is no longer valid:
>>> f = ContactForm({‘subject’: ‘Hello’})
>>> f.is_valid()
False
>>> f = ContactForm({‘subject’: ‘Hello’, ‘message’: ”})
>>> f.is_valid()
False
You can drill down to get field-specific error messages:
>>> f = ContactForm({‘subject’: ‘Hello’, ‘message’: ”})
>>> f[‘message’].errors
[‘This field is required.’]
>>> f[‘subject’].errors
[ ]
>>> f[’email’].errors
[ ]
Each bound Form instance has an errors attribute that gives you a dictionary mapping field names to error-message lists:
>>> f = ContactForm({‘subject’: ‘Hello’, ‘message’: ”})
>>> f.errors
{‘message’`: [‘This field is required.’]}
Finally, for Form instances whose data has been found to be valid, a cleaned_data attribute is available. This is a dictionary of the submitted data, “cleaned up”. Django’s forms framework not only validates data; it cleans it up by converting values to the appropriate Python types:
>>> f = ContactForm({‘subject’: ‘Hello’, ’email’: ‘nige@example.com’, ‘message’: ‘Nice site!’})
>>> f.is_valid()
True
>>> f.cleaned_data
{‘subject’: ‘Hello’, ’email’: ‘nige@example.com’, ‘message’: ‘Nice site!’}
Our contact form only deals with strings, which are “cleaned” into string objects – but if we were to use an IntegerField or DateField, the forms framework would ensure that cleaned_data used proper Python integers or datetime.date objects for the given fields.
Tying Forms to Views
Our contact form is not much good to us unless we have some way of displaying it to the user. To do this, we need to first update our mysite\views.py:
# mysite_project\mysite\mysite\views.py
from django.http import Http404, HttpResponse, HttpResponseRedirect
from django.shortcuts import render
import datetime
from mysite.forms import ContactForm
from django.core.mail import send_mail, get_connection
# …
def contact(request):
if request.method == ‘POST’:
form = ContactForm(request.POST)
if form.is_valid():
cd = form.cleaned_data
con = get_connection(‘django.core.mail.backends.console.EmailBackend’)
send_mail(
cd[‘subject’],
cd[‘message’],
cd.get(’email’, ‘noreply@example.com’),
[‘siteowner@example.com’],
connection=con
)
return HttpResponseRedirect(‘/contact/thanks/’)
else:
form = ContactForm()
return render(request, ‘contact_form.html’, {‘form’: form})
We’ve added the contact function to our view to handle the form submission. In this new function, we:
- Check to see if the request have been submitted with the POST method, otherwise we just display the blank form.
- We then check if the form contains valid data by calling the form’s is_valid() method.
- If the form contains valid data, an email is sent and the user is redirected to a new view (/contact/thanks/).
- If the form doesn’t contain valid data, the if block jumps out to the final render() and the form is rendered back to the browser.
Note that we don’t do any error handling in the view – this is all handled by the form class. If the form doesn’t validate, Django will automatically create a list of errors and append them to the response.
A contact form is not much use without some way of sending the contact form information to the site owner. A very common way of doing this is to send an email. Django has the ability to send emails built in to the core. The email functions can be found in the django.core.mail module, which I have imported at the top of our modified views.py.
We are using the send_mail() function to send the email to a dummy email address.
To be able to display our contact form, we have to create our contact form (save this to mysite\templates):
# mysite_project\mysite\templates\contact_form.html
<html>
<head>
<title>Contact us</title>
</head>
<body>
<h1>Contact us</h1>
{% if form.errors %}
<p style=”color: red;”>
Please correct the error{{ form.errors|pluralize }} below.
</p>
{% endif %}
<form action=”” method=”post” novalidate>
<table>
{{ form.as_table }}
</table>
{% csrf_token %}
<input type=”submit” value=”Submit”>
</form>
</body>
</html>
Since we’re creating a POST form (which can have the effect of modifying data), we need to worry about Cross Site Request Forgeries. Thankfully, you don’t have to worry too hard, because Django comes with a very easy-to-use system for protecting against it.
In short, all POST forms that are targeted at internal URLs should use the {% csrf_token %} template tag.
Keen-eyed readers will also notice the novalidate attribute in the <form> tag. When using HTML5 in some of the latest browsers (notably Chrome), form fields will be automatically validated by the browser. As we want Django to handle form validation, the novalidate attribute tells the browser not to validate the form.
Finally, we need to change our urls.py to display our contact form at /contact/:
# …
from mysite.views import hello, current_datetime, hours_ahead, contact
urlpatterns = [
# …
url(r’^contact/$’, contact),
url(r’^’, include(‘books.urls’)),
]
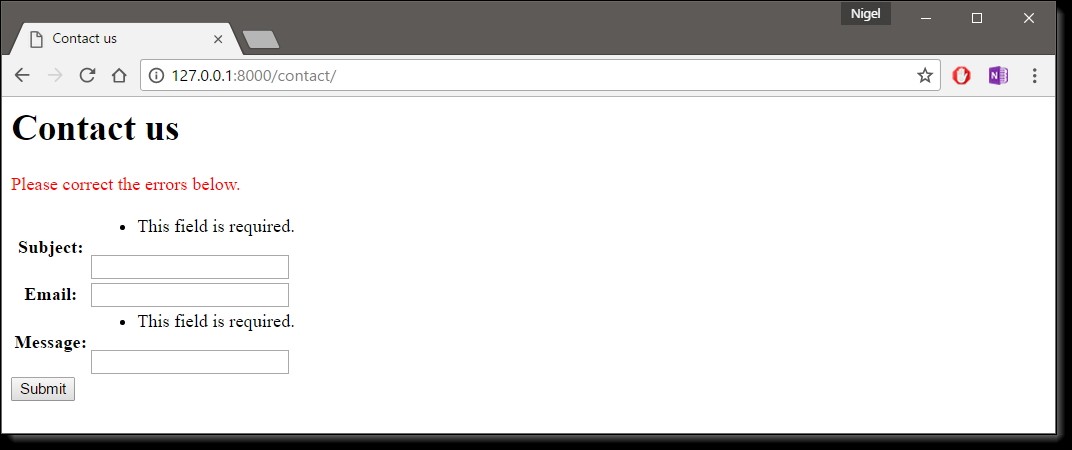
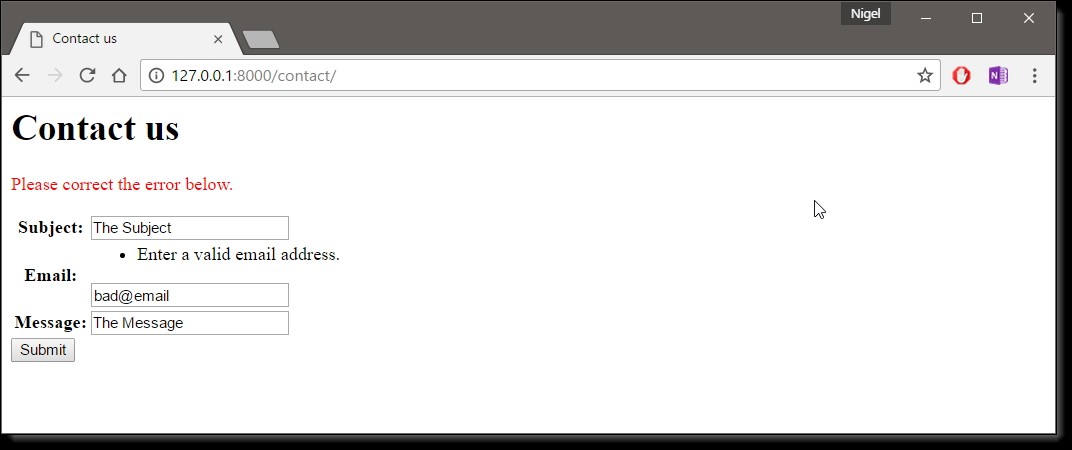
Try running this locally. Load the form, submit it with none of the fields filled out figure below, submit it with an invalid e-mail address (Figure 6-6), then finally submit it with valid data.
Note that you will get a “Page not found (404)” error when you submit the completed form. This is because I have not created the view or URLconf for the redirect to /contact/thanks/. I will leave this to you as a learning exercise.
Changing How Fields Are Rendered
Probably the first thing you’ll notice when you render this form locally is that the message field is displayed as an <input type=”text”>, and it ought to be a <textarea>. We can fix that by setting the field’s widget:
from django import forms
class ContactForm(forms.Form):
subject = forms.CharField()
email = forms.EmailField(required=False)
message = forms.CharField(widget=forms.Textarea)
The forms framework separates out the presentation logic for each field into a set of widgets. Each field type has a default widget, but you can easily override the default, or provide a custom widget of your own. Think of the Field classes as representing validation logic, while widgets represent presentation logic.
Setting a Maximum Length
One of the most common validation needs is to check that a field is of a certain size. For good measure, we should improve our ContactForm to limit the subject to 100 characters. To do that, just supply a max_length to the CharField, like this:
from django import forms
class ContactForm(forms.Form):
subject = forms.CharField(max_length=100)
email = forms.EmailField(required=False)
message = forms.CharField(widget=forms.Textarea)
An optional min_length argument is also available.
Setting Initial Values
As an improvement to this form, let’s add an initial value for the subject field: “I love your site!” (A little power of suggestion can’t hurt.) To do this, we can use the initial argument when we create a Form instance:
def contact(request):
# …
else:
form = ContactForm(
initial={‘subject’: ‘I love your site!’}
)
return render(request, ‘contact_form.html’, {‘form’:form})
Now, the subject field will be displayed pre-populated with that kind statement. Note that there is a difference between passing initial data and passing data that binds the form. The biggest difference is that if you’re just passing initial data, then the form will be unbound, which means it won’t have any error messages.
