Out of the box, Django provides a number of tools for customizing the built-in admin templates, which we’ll go over shortly, but for tasks beyond that (e.g., anything requiring custom workflow or granular permissions), you’ll need to read the section titled “Creating Custom Admin Views” later in this chapter. For now, though, let’s look at some quick ways of customizing the appearance (and, to some extent, behavior) of the admin interface. Chapter 6 covers a few of the most common tasks: “rebranding” the Django admin interface (for those pointy-haired bosses who hate blue) and providing a custom admin form.
Past that point, the goal usually involves changing some of the templates for a particular item. Each of the admin views — the change lists, edit forms, delete confirmation pages, and history views — has an associated template that can be overridden in a number of ways. First, you can override the template globally. The admin view looks for templates using the standard template-loading mechanism, so if you create templates in one of your template directories, Django will load those instead of the default admin templates bundled with Django. These global templates are outlined in Table.
| View | Base Template Name |
| Change list | admin/change_list.html |
| Add/edit form | admin/change_form.html |
| Delete confirmation | admin/delete_confirmation.html |
| Object history | admin/object_history.html2 |
Most of the time, however, you’ll want to change the template for just a single object or application (not globally). Thus, each admin view looks for model- and application-specific templates first. Those views look for templates in this order:
- admin/<app_label>/<object_name>/<template>.html
- admin/<app_label>/<template>.html
- admin/<template>.html
For example, the add/edit form view for a Book model in the books application looks for templates in this order:
- admin/books/book/change_form.html
- admin/books/change_form.html
- admin/change_form.html
Custom Model Templates – Most of the time, you’ll want to use the first template to create a model-specific template. This is usually best done by extending the base template and adding information to one of the blocks defined in that template. For example, say we want to add a little bit of help text to the top of that book page. Maybe something like the form shown in Figure.
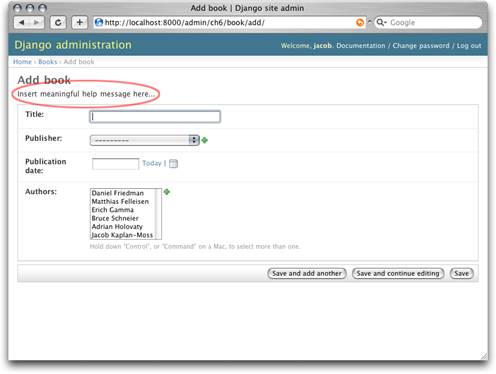
Figure A customized admin edit form
This is pretty easy to do: simply create a template called admin/bookstore/book/change_form.html and insert this code:
{% extends “admin/change_form.html” %}
{% block form_top %}
<p>Insert meaningful help message here…</p>
{% endblock %}
All these templates define a number of blocks you can override. As with most programs, the best documentation is the code, so we encourage you to look through the admin templates (they’re in
django/contrib/admin/templates/) for the most up-to-date information.
Custom JavaScript – A common use for these custom model templates involves adding custom JavaScript to admin pages — perhaps to implement some special widget or client-side behavior.
Luckily, that couldn’t be easier. Each admin template defines a {% block extrahead %}, which you can use to put extra content into the <head> element. For example, if you want to include jQuery (http://jquery.com/) in your admin history, it’s as simple as this:
{% extends “admin/object_history.html” %}
{% block extrahead %}
<script src=”http://media.example.com/javascript/jquery.js” type=”text/javascript”></script>
<script type=”text/javascript”>
// code to actually use jQuery here…
</script>
{% endblock %}
Note – We’re not sure why you’d need jQuery on the object history page, but, of course, this example applies to any of the admin templates.
You can use this technique to include any sort of extra JavaScript widgets you might need.
