Document Views
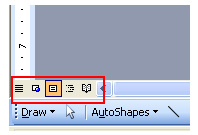
To more easily verify several of the Normal document settings, we can also switch to another document view. Word includes several views that are used for different purposes. We can change views using the View menu commands or by clicking on the icons in the left horizontal scroll bar at bottom of window.
Normal Layout
Work in normal view for typing, editing, and formatting text. Normal view shows text formatting but simplifies the layout of the page so that we can type and edit quickly. It is the basic layout with no page layout indicator.
Print Layout
Work in print layout view to see how text, graphics, and other elements will be positioned on the printed page. This view is useful for editing headers and footers, for adjusting margins, and for working with columns and drawing objects
Web page layout
In Web page preview, we can see how our document will look in a Web browser. Microsoft Word saves a copy of our document and then opens it in our default browser. If our Web browser is not already running, Word starts it automatically. We can return to our document in Word at any time.
Outline layout
Outline layout shows how a document is organized and make it easy to quickly restructure a document. To make it easier to view and reorganize a document’s structure, you can collapse the document to show just the headings you want.
Creating and Modifying The Outline
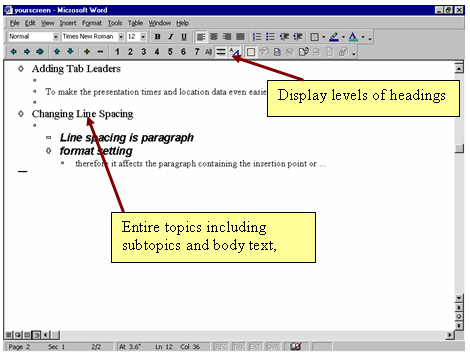
It shows the hierarchy of topics in a document by displaying the different heading levels indented to represent their level in the document’s structure. The arrangement of headings in a hierarchy of importance quickly shows the relationship between topics.
Outline bar contains the buttons that make it easy to modify the outline. The first line of the blank document displays an outline symbol. There are different outline symbols that are used to identify the levels of topics in the outline and to quickly reorganize topics.
Outline view
Collapsing and expanding outline
In outline view we can display as much as or little of the document text as we want. To make it easier to view and reorganize the document’ structure, we can “collapse” the document to show just the headings we want. Alternatively we can display a part of the body text below each heading or the entire body text. We can then easily move the headings around until the order is logical, and the body text will follow the heading.
Reading layout
It is used to visualize as the document as it will appear in a book format.

Various views from Menu
OR
Bottom left corner
Optional Components
They are the components of MS-Word document which can be shown or hidden as per need of the user. They include-
Task Pane
Task pane display can be toggled by selecting task pane in the view menu
Ruler
Horizontal and vertical ruler display can be toggled by selecting ruler in the view menu
Toolbar
MS-Word displays standard and formatting toolbars, which can be hidden or remaining toolbars, can be shown by either right click in empty space of toolbars or by selecting toolbar option in view menu and then toggling specific toolbar for display.
Headers and Footers
Headers are positioned at the top margin and footers at the bottom margin of each page in the current section of a document. Headers and Footers are primarily used in Word to include additional information such as date, page numbers, file name, company logo etc. that are required to be displayed on each page of the document.
A header is a line or several lines of text at the top of each page just below the tip margin. The header usually contains the title and the section of the document. Footer is a line or several lines of text at the bottom margin. When we choose View/Header and Footer, the document dims, the header are becomes active and the Header and footer are displayed. We can insert current date, authors name, page number etc. we can control the placement of the header or footer text by specifying where it should appear: left aligned, in center or right–aligned. As the figure below shows the header and footer toolbar

- To add page number
- To add number of pages
- To add date
- To add time
- To switch between header and footer
- To close this view.
Following are the steps to insert or edit Headers and Footers
- Select the View menu
- Choose the Header and Footer option in the view menu.
- The Header section at the top of the document opens such that the current text document immediately becomes dull.
- Enter the text that needs to appear in the Header segment like AutoText, Page Numbers, Date and Time buttons and even graphics.
- Click the Switch between Header and Footer button on the Header and Footer toolbar to insert any necessary text or field codes in the footer.
- In order to compose different headers and footers in different segments, click Show Previous or Show Next buttons to activate the header/footer in the previous or next section of the document, and then make necessary changes to that header/footer.
- Click Close button on Header and Footer toolbar to close the Header and Footer toolbar once you have finished editing the headers and footers to return to the document.

Header and Footer toolbar
Alternating Headers and Footers
Word facilitates the user to generate different headers and footers on odd and even pages as well as different headers and footers on the first page. The usefulness of these alternate Headers and Footers originate only when you are using long documents with a cover page, acknowledgement etc. Steps to generate different Headers and Footers for different pages
- Select File menu on the Toolbar.
- Choose the Page Setup option from the drop-down list.
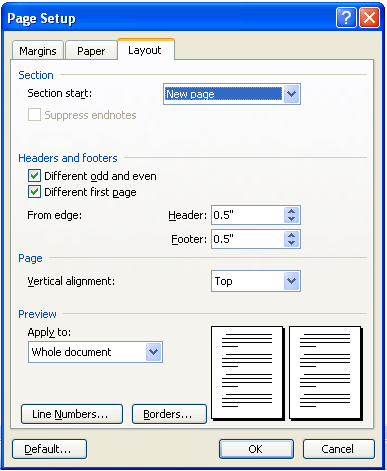
- Click on the Layout Tab.
- Turn on Different first page and Different odd and even by clicking on the check boxes adjacent to them.
- End by clicking on the OK button.
Following dialog box demonstrates the Page Setup option to create alternate Headers and Footers in a document using Layout Tab.
Different First Page Header and Footer
This feature in Word provides a new section titled First Page Header such that you can leave the off the first page or create a unique first page header or footer for the first page in a document or the first page of each section within a document.
Different Odd and Even Header and Footer
Word facilitates the user to use two new sections titled Odd Page Header on the odd numbered pages and Even Page Header on the even-numbered pages. Enter the first header and footer, and click the Show Next button on the Header and Footer toolbar to enter the opposite page header or footer.
Different Headers and Footers on Different Pages
In order to generate different headers and footers on different Odd pages and/or different Even pages, MS-Word facilitates the user with a feature called Section Break used to generate different header and footers on different odd-numbered pages and/or different even-numbered pages as per the requirement of the user and thus help in distinguishing between odd-numbered pages and/or even-numbered pages in the document.
Steps in generating different Headers and Footers on Different Pages are elaborated below using an example. For e.g., Page numbers 2, 4, 6, 8 and 10 should contain a header as “MS-Word 2003” and from page number 12 onwards the even page header should contain “MS-PowerPoint 2003”
- Place the cursor at the end of 11th page to test the effect of the section break from 12th page,
- Select the Insert menu tab in the toolbar
- Choose the Break option from the Insert menu
- Click on Continuous check box in the Section break.
- Go to the 12th page and double-click on the existing header/footer matter Or Select View menu, choose Header and Footer option, the header/footer section gets activated.
- Turn off the button same as Previous on the Header and Footer toolbar.
- Substitute the current header or footer with different text or object and click Close or double click mouse left button anywhere outside the header/footer margins to activate Close option
- Notice that this header/footer text/object does not affect the previous even pages header/footer.
- Be careful that, if you do not turn off the button Same as Previous, then previous header/footer content will be replaced with the current one.
Thumbnail
It allows users to view and navigate pages of the document in thumbnail. Enable or disable of thumbnail can be done by selecting thumbnail option in view menu.
Thumbnail view
Zoom
Zooming a document can be done either by selecting zoom option in view menu and selecting zoom level in the zoom dialog box or by manually selecting zoom level in standard toolbar by the drop down box.

Zoom dialog box
Zoom drop down list
