Understanding SOAP and WSDL API Testing

This section is dedicated to Testing SOAP and WSDL API.
Testing SOAP and WSDL API: WSDL
WSDL, or Web Service Description Language, is an XML based definition language. It’s used for describing the functionality of a SOAP-based web service. WSDL files define various aspects of SOAP messages-
- Firstly, whether any element or attribute is allowed to appear multiple times.
- Secondly, the required or optional elements and attributes.
- Lastly, a specific order of elements, if it is required.
Create Project from WSDL
To take a closer look at a WSDL file, create a new project and import a sample WSDL file-
- First of all, in SoapUI, click Create SOAP Project or select File > New SOAP Project.
- Secondly, in the dialog box, specify the following URL in the Initial WSDL field: http://www.dneonline.com/calculator.asmx?wsdl.
- Lastly, leave the default settings and click OK.
Exploring WSDL
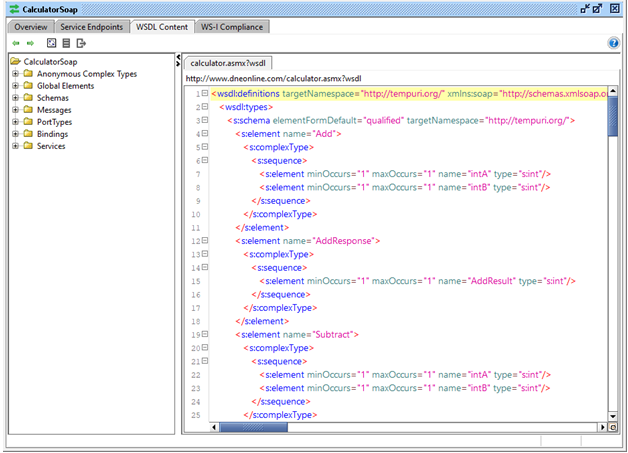
Double-click the service in the navigator to open the editor:
- First thing first, the Overview tab contains general information on the WSDL file: its URL, target namespace, etc.
- Secondly, the Service Endpoint tab contains endpoints for the interface. Besides endpoints specified in the WSDL file, you can add endpoints for the service. For each endpoint, you can specify the required authentication.
- Subsequently, the WSDL Content tab provides more details on the WSDL file.
Validate the WSDL against the WS-I Basic Profile
To make interoperability between different Web Service vendors easier, the Web Service Interoperability Organization has defined the WS-I Basic Profile – a set of rules mandating how the standards should be used.
To validate the WSDL Service:
- Firstly, double-click the service in the Navigator and switch to the WS-I Compliance tab
- Subsequently, click Run to run validation
Operations
Each WSDL-based Service exposes a number of operations that each have a request and response message format. In soapUI, the operations for a Service are shown as nodes under the Service node in the project navigator:
Requests
For invoking an operation you can add any number of request objects to an operation in the navigator tree. soapUI by default creates a sample request for each operation when importing.
Double-clicking a request opens one of the more common concepts in soapUI, the request editor:
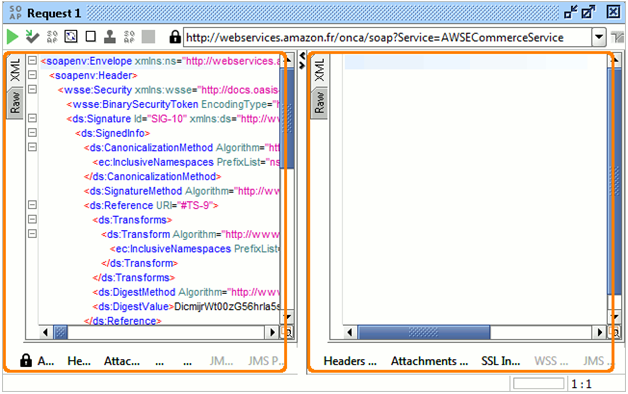
The editor is divided into two main panels, one for the request and one for the response.
Each editor has a number of views (shown with vertical tabs along the left side of the editor) and a number of inspectors at the bottom-
- First of all, views are for viewing the underlying request or response message in different ways
- Subsequently, Inspectors are either for adding non-message-body-content to a message or for inspecting the corresponding message in different ways.
SOAP and WSDL API Testing: Request and Response Messages
Request Messages
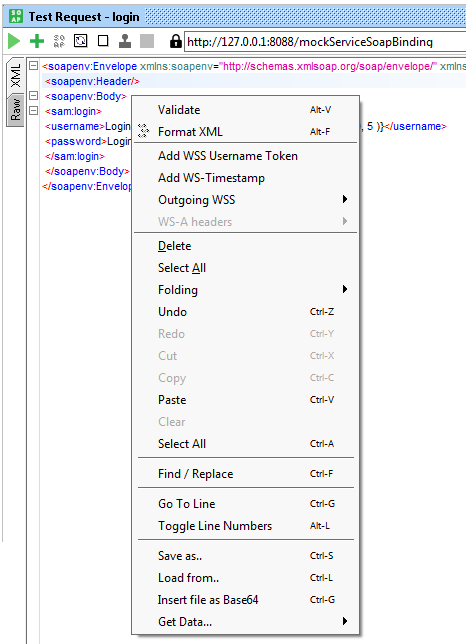
- Firstly, XML – a standard text view of the underlying XML message, right-click in the editor to get a popup-menu with applicable actions. Select Validate to validate the current message against the underlying schema and display a list of validation errors at the bottom if found:
- Secondly, Raw – displays the actual bytes of the last sent message including HTTP headers, MIME attachments, and so on.
Response Messages
The Response message has the following panels:
- Firstly, XML – shows the XML content of the response message:
- Secondly, Raw – shows the raw bytes of the response message:
SOAP and WSDL API Testing: Authenticating SOAP Requests
Add Authorization
To add a new authorization:
- Firstly, in the Authorization drop-down list, select Add New Authorization.
- Secondly, in the subsequent Add Authorization dialog, select an authorization type.
- Thirdly, there are following authorization types supported:
- Subsequently, Basic
- Further, NTLM
- In addition, SPNEGO/Kerberos
- Lastly, Click OK.
Configure Authorization
To configure your authorization, use the options that are available on the Auth tab and the corresponding request properties.

Preemptive Authentication
In general, preemptive authentication means that the server expects that the authorization credentials will be sent without providing the Unauthorized response. This reduces the load on the network and the server itself.
You can configure your requests to use or omit the preemptive authentication. To do that:
- First of all, go to File > Preferences.
- Secondly, switch to the HTTP Settings tab.
- Last but not least, to enable preemptive authentication, select the Authenticate preemptively checkbox. To disable preemptive authentication, clear the Authenticate preemptively checkbox.
Manage Authorizations
To manage authorizations in the request:
- Firstly, open the XML editor for the needed request.
- Secondly, open the Auth panel. In the Auth panel, you configure authentication parameters for your request.
Custom HTTP Headers
Creating custom HTTP headers in SoapUI is very straightforward. Switch to the Headers tab at the bottom of the request editor and add click to add a new header-

SOAP and WSDL API Testing: Property Expansion
SoapUI provides a common syntax to dynamically insert (“expand”) property values during processing. The syntax is as follows:
${[scope]propertyName[#xpath-expression]}
where scope can be one of the following literal values:
- Firstly, #Project# – references a Project property(Reference properties across a particular SoapUI project)
- Secondly, #TestSuite# – references a TestSuite property in the containing TestSuite
- Thirdly, #TestCase# – references a TestCase property in the containing TestCase
- Subsequently, #MockService# – references a MockService property in the containing MockService
- Moreover, #Global# – references a global property. Found in File>Preferences>Global Properties tab. Reference properties across all projects
- Further, #System# – references a system property. Found in Help>System properties.
- In adittion, #Env# – references an environment variable
- Lastly, [TestStep name]# – references a TestStep property
SOAP and WSDL API Testing: Attachments and Files
In SoapUI, you can simulate requests that transfer attachments to the tested server. SoapUI supports various technologies:
- Firstly, MTOM (Message Transmission Optimization Mechanism) – A method that W3C recommends to use for transferring binary data in SOAP messages.
- Secondly, SWA (SOAP with Attachments, also known as MIME for Web Services) – A MIME-based attachment mechanism for SOAP/HTTP. SoapUI supports plain SWA as well as swaRef attachments in accordance with the WS-I Attachments Profile.
- Last but not least, SoapUI also supports specifying file names inline to insert binary contents from a file into a message body.
Viewing an Attachment – To view contents of a file, double-click this file in the Attachments tab.
Response Attachments – The response part of the editor also has the Attachments tab. It displays all attachments that the response message includes, with their corresponding names, content types, sizes, and other attributes.
Adding an Attachment
- First of all, switch to the Attachment tab of the request editor, click and select a file from the file system.
- Secondly, SoapUI will prompt if the file should be cached in the request or not. If you select to cache the file, SoapUI will store a compressed file copy in the project and will use it in simulated requests.
- Further, after you added a file to the Attachments tab, you need to specify a message part for the file.
- Secondly, If the request message contains swaRef elements with the cid:nnnn values, or binary elements (base64 or hex) with cid:nnnn values, that nnnn value will be available in the Part drop-down list.
- Moreover, Selecting a message part for an attachment will update the attachment’s Type attribute, which will display one of the supported values like XOP, MIME, or another.
- Lastly, After you added a file to the Attachments tab, you may need to specify the attachment in the message body and to change certain project properties.
MTOM Attachments
To specify the place for the attachment contents in message payload, use the cid:nnnn syntax:
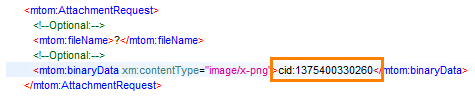
nnnn is an arbitrary identifier that you use to indicate the message part for the attachment.
To specify an MTOM attachment:
- First thing first, set the Enable MTOM request property to true.
- Subsequently, add a file to the Attachments tab as it was described above.
- Last but not least, In the Part column, select the cid identifier that your request body specifies:
If we simulate this request, we will see the following:
- Firstly, SoapUI sends the outgoing message as a multipart message with the appropriate value of the Content-Type header
- Secondly, the first message part contains the message, the second contains the attachment
- Lastly, the binaryData element in the message contains an XOP <Include> element referring to the second part of the message
SWA and swaREF Attachments
These attachments are an older mechanism of attaching files to SOAP messages.
- Firstly, Add a file to the Attachments tab as it was described above
- Subsequently, select the appropriate value in the Part drop-down list. The part is set by the web service definition
Inline Files
One more way to include a file in a request is to “inline” it:
- Firstly, Set the Enable Inline Files property of your request to true
- Secondly, Add a file to the Attachments tab as it was described above
- Lastly, Use the file: prefix to specify the file name in the request body. If you added the file to the Attachments tab, specify the file name only. Otherwise, type the file name and path.
Caching Attachments
When you are adding a file to the Attachments tab, SoapUI asks you if you want to cache the file or not:
- First of all, if you select to cache the file, SoapUI will save the compressed copy of the file into your test project and will use this copy in simulated requests. If the file on hard drive changes, SoapUI will not “notice” this.
- Subsequently, if you choose not to cache the file, SoapUI will store the fully-qualified file name in the project. Every time you simulate the request, SoapUI will read the file contents from the hard drive.
Message Inspectors
SoapUI Pro adds a number of WSDL Context-sensitive message inspectors that are available for both the standard XML Source editor and the Outline Editor displaying context-sensitive details for the currently selected content element.
The following inspectors are currently available:
- First of all, XSD – displays XML Schema information for the selected node
- Secondly, Table – displays a tabular view of the current nodes’ siblings and children
- Subsequently, XML – displays XML fragment and XPath information for the current node
- Moreover, Doc – displays schema documentation annotations if available
- Lastly, Coverage – displays Message Coverage information for the selected node
Validating SOAP Services
When creating a functional TestCase in soapUI, a very common scenario is that you want to call some SOAP/WSDL service and validate the response to check that the correct result is returned. This is easily done once you have imported the WSDL for the service you want to test:
- Firstly, add a SOAP Request TestStep to a new or existing TestCase.
- Subsequently, add Assertions to the TestStep that validate the response message.
SOAP-specific assertions available
- Firstly, Schema Compliance – validates the response message against the definition in the WSDL and contained XML Schema.
- Secondly, SOAP Response – checks that the response is a valid SOAP message, always use this to make sure you are actually getting a response (if no assertions are added a connection error will not cause a failure).
- Thirdly, SOAP Fault – checks that the response is a SOAP Fault (for negative testing).
- Moreover, Not SOAP Fault – checks that the response is not a SOAP Fault.
- Further, WS-Security Status – validates the WS-Security headers and tokens in the response.
- Subsequently, WS-Addressing Response – validates the availability of WS-Addressing Headers in the response:
- In addition, JMS Timeout – when using a JMS endpoint that specifies a response channel this assertion validates that the response is received within the specified time.
- Lastly, JMS Status – when using a JMS endpoint, this assertion validates that no JMS-related errors occurred.
Make your resume stand out and become a Certified SoapUI Testing Professional. Try free practice tests here!
A great career is just a certification away. So, practice and validate your skills to become Certified SoapUI Testing Professional Now!
