Hiding lines enhances the drawing and clarifies the design. The addition of shading produces a more realistic image of your model.
Visual Style
A visual style is a collection of settings that control the display of edges and shading in the viewport. Instead of using commands and setting system variables, you change the properties of the visual style. As soon as you apply a visual style or change its settings, you can see the effect in the viewport. The Visual Styles Manager displays sample images of the visual styles available in the drawing. The selected visual style is indicated by a yellow border, and its settings are displayed in the panel below the sample images.
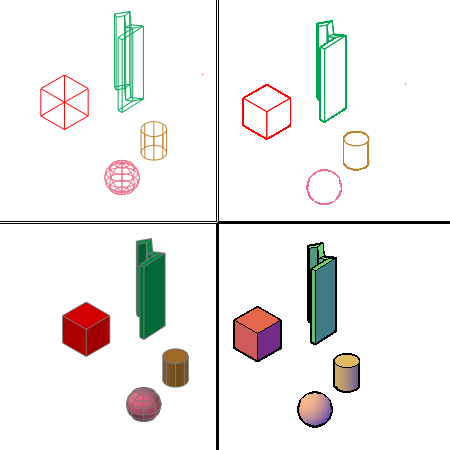
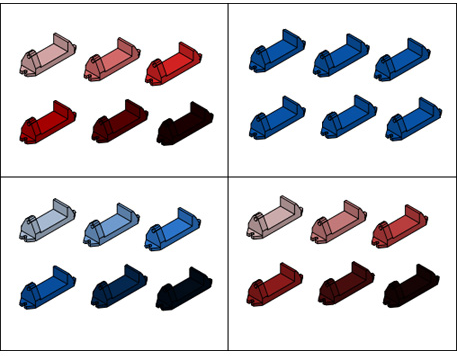
When the ribbon is displayed, you can change some frequently used settings directly or open the Visual Styles Manager. Five default visual styles are supplied with the product
- 2D Wireframe. Displays the objects using lines and curves to represent the boundaries. Raster and OLE objects, linetypes, and lineweights are visible.
- 3D Wireframe (upper left in the illustration). Displays the objects using lines and curves to represent the boundaries.
- 3D Hidden (upper right). Displays the objects using 3D wireframe representation and hides lines representing back faces.
- Realistic (lower left). Shades the objects and smooths the edges between polygon faces. Materials that you have attached to the objects are displayed.
Conceptual (lower right). Shades the objects and smooths the edges between polygon faces. Shading uses the Gooch face style, a transition between cool and warm colors rather than dark to light. The effect is less realistic, but it can make the details of the model easier to see.
In shaded visual styles, faces are lighted by two distant light sources that follow the viewpoint as you move around the model. This default lighting is designed to illuminate all faces in the model so that they are visually discernable. Default lighting is available only when other lights, including the sun, are off.
You can select a visual style and change its settings at any time. The changes you make are reflected in the viewports where the visual style is applied. For more information about face settings, environment settings, and edge settings, see Customize a Visual Style. Any changes you make to a visual style are saved in the drawing.
Shade and Color Faces
Shading and color effects control the display of faces in a model.
Face Styles – The face style defines the shading on a face. Real (below left) is meant to produce the effect of realism. Gooch (below right) can show details better by softening the contrast between lighted areas and shadowed areas. Lighted areas use warm tones and darker areas cool tones.
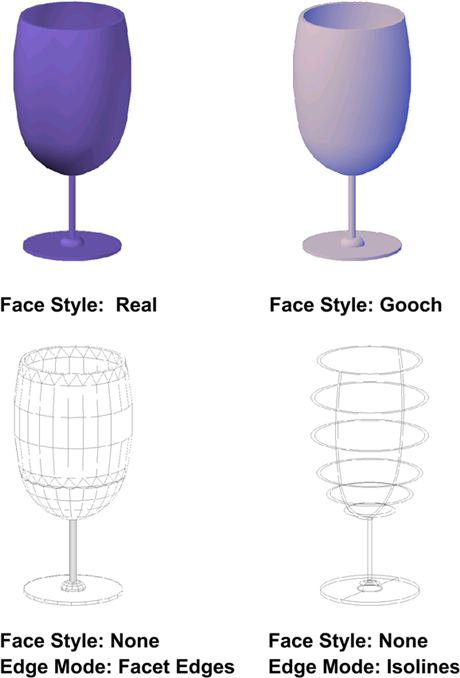
When the None face style is active, there is no shading, and only edges are displayed if Edge Mode is set to Facet Edges or Isolines under Edge Settings.

Lighting Quality – Faceted lighting computes a single color for each face. Objects appear flatter. Smooth lighting smoothes the edges between polygon faces by computing the colors as a gradient between the vertexes of the faces. This gives the objects a smooth appearance. For the smoothest option, the Per-Pixel Lighting setting needs to be turned on in the Manual Performance Tuning Dialog Box. The colors are computed for individual pixels and gives a smoother appearance. If not, the smooth setting is used instead.
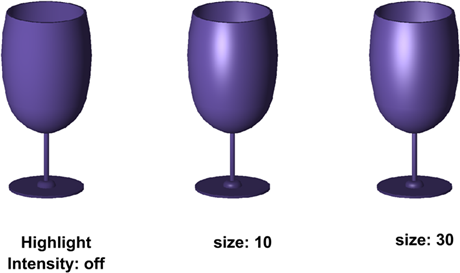
Highlights – The size of the highlights on an object affects the perception of shininess (below). A smaller, more intense highlight makes objects look shinier. The highlight intensity that is set in a visual style does not apply to objects with materials attached.
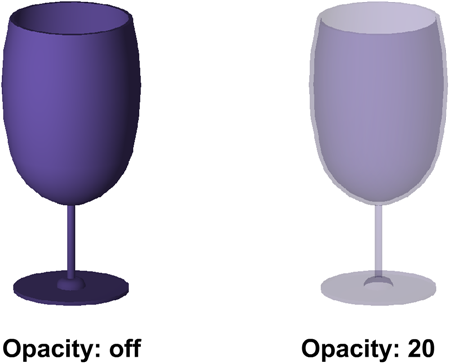
Opacity – The opacity property controls the transparency of an object.
Face Color Modes
Color can be displayed in the normal way, or you can change the face color mode. Monochrome displays all faces in the same color and shaded. Tint uses the same color to shade all faces by changing the hue and saturation values of the color. Desaturate mode softens colors.
Display Backgrounds and Shadows
The visual style also controls the display of backgrounds and shadows in the viewport.
Backgrounds – You can use a color, a gradient fill, an image, or the sun & sky as a background in the viewport in any 3D visual style, even one that does not shade objects. To use a background, you first create a named view with a background and set the named view as current in the viewport. When Background is set to On in the current visual style, the background is displayed.
Shadows – Shaded objects in a viewport can display shadows. Ground shadows are shadows that objects cast on the ground. Full shadows are shadows cast by objects onto other objects. The lighting in the viewport must be from user-created lights or the sun for full shadows to be displayed. Where shadows overlap, they appear darker.
To display full shadows, hardware acceleration is required. When Enhanced 3D Performance is off, full shadows cannot be displayed. (To access these settings, enter 3dconfig at the Command prompt. In the Adaptive Degradation and Performance Tuning dialog box, click Manual Tune.)
Displaying shadows can slow performance. You can turn off shadows in the current visual style while you work and turn them back on when you need them.

In the Properties palette, you can set the Shadow Display property for an object: casts shadows, receives shadows, casts and receives shadows, or ignores shadows. More options are available for shadows used in rendering.
Control the Display of Edges
Edges of different types can be displayed using different colors and linetypes. You can also add special effects such as jitter and overhang to edges. In a shaded or a wireframe model, the visual style sets the visibility and appearance of isolines, facet edges, silhouette edges, obscured edges, and intersection edges. Facet edges (the edges between planar faces representing a surface) are displayed only when the angle between the facets is smaller than the crease angle value you specify.
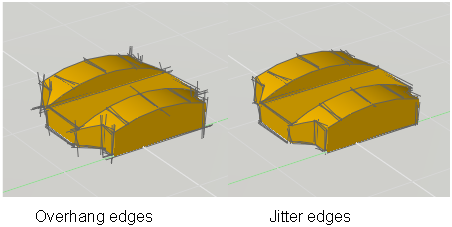
Edge modifiers such as Overhang and Jitter produce the look of a model that is still in the conceptual phase. Jitter makes lines look as though they were sketched with a pencil. Overhang produces another kind of hand-drawn effect. Plot styles are not available for objects with the Jitter edge modifier applied.
