React Router is a powerful routing library built on top of React that helps you add new screens and flows to your application incredibly quickly, all while keeping the URL in sync with what’s being displayed on the page.
To illustrate the problems React Router is going to solve for you, let’s build a small application without it. We will be using ES6/ES2015 syntax and language features throughout the documentation for any example code.
Without React Router
import React from ‘react’
import { render } from ‘react-dom’
const About = React.createClass({/*…*/})
const Inbox = React.createClass({/*…*/})
const Home = React.createClass({/*…*/})
const App = React.createClass({
getInitialState() {
return {
route: window.location.hash.substr(1)
}
},
componentDidMount() {
window.addEventListener(‘hashchange’, () => {
this.setState({
route: window.location.hash.substr(1)
})
})
},
render() {
let Child
switch (this.state.route) {
case ‘/about’: Child = About; break;
case ‘/inbox’: Child = Inbox; break;
default: Child = Home;
}
return (
<div>
<h1>App</h1>
<ul>
<li><a href=”#/about”>About</a></li>
<li><a href=”#/inbox”>Inbox</a></li>
</ul>
<Child/>
</div>
)
}
})
render(<App />, document.body)
As the hash portion of the URL changes, <App> will render a different <Child> by branching on this.state.route. Pretty straightforward stuff. But it gets complicated fast.
Imagine now that Inbox has some nested UI at different URLs, maybe something like this master detail view:
path: /inbox/messages/1234
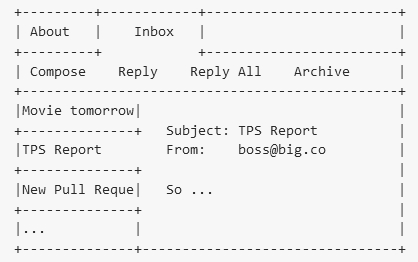
And maybe a stats page when not viewing a message:
path: /inbox
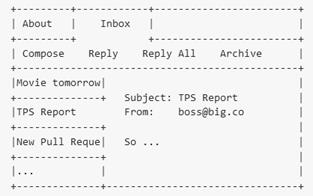
We’d have to make our URL parsing a lot smarter, and we would end up with a lot of code to figure out which branch of nested components to be rendered at any given URL: App -> About, App -> Inbox -> Messages -> Message, App -> Inbox -> Messages -> Stats, etc.
With React Router
Let’s refactor our app to use React Router.
import React from ‘react’
import { render } from ‘react-dom’
// First we import some modules…
import { Router, Route, IndexRoute, Link, hashHistory } from ‘react-router’
// Then we delete a bunch of code from App and
// add some <Link> elements…
const App = React.createClass({
render() {
return (
<div>
<h1>App</h1>
{/* change the <a>s to <Link>s */}
<ul>
<li><Link to=”/about”>About</Link></li>
<li><Link to=”/inbox”>Inbox</Link></li>
</ul>
{/*
next we replace `<Child>` with `this.props.children`
the router will figure out the children for us
*/}
{this.props.children}
</div>
)
}
})
// Finally, we render a <Router> with some <Route>s.
// It does all the fancy routing stuff for us.
render((
<Router history={hashHistory}>
<Route path=”/” component={App}>
<IndexRoute component={Home} />
<Route path=”about” component={About} />
<Route path=”inbox” component={Inbox} />
</Route>
</Router>
), document.body)
React Router knows how to build nested UI for us, so we don’t have to manually figure out which <Child> component to render. For example, for a full path /about it would build <App><About /></App>.
Internally, the router converts your <Route> element hierarchy to a route config. But if you’re not digging the JSX you can use plain objects instead:
const routes = {
path: ‘/’,
component: App,
indexRoute: { component: Home },
childRoutes: [
{ path: ‘about’, component: About },
{ path: ‘inbox’, component: Inbox },
]
}
render(<Router history={history} routes={routes} />, document.body)
Adding More UI
Alright, now we’re ready to nest the inbox messages inside the inbox UI.
// Make a new component to render inside of Inbox
const Message = React.createClass({
render() {
return <h3>Message</h3>
}
})
const Inbox = React.createClass({
render() {
return (
<div>
<h2>Inbox</h2>
{/* Render the child route component */}
{this.props.children}
</div>
)
}
})
render((
<Router history={history}>
<Route path=”/” component={App}>
<IndexRoute component={Home} />
<Route path=”about” component={About} />
<Route path=”inbox” component={Inbox}>
{/* add some nested routes where we want the UI to nest */}
{/* render the stats page when at `/inbox` */}
<IndexRoute component={InboxStats}/>
{/* render the message component at /inbox/messages/123 */}
<Route path=”messages/:id” component={Message} />
</Route>
</Route>
</Router>
), document.body)
Now visits to URLs like inbox/messages/Jkei3c32 will match the new route and build this for you:
<App>
<Inbox>
<Message params={{ id: ‘Jkei3c32’ }}/>
</Inbox>
</App>
And visits to /inbox will build this:
<App>
<Inbox>
<InboxStats/>
</Inbox>
</App>
Getting URL Parameters
We’re going to need to know something about the message in order to fetch it from the server. Route components get some useful properties injected into them when you render, particularly the parameters from the dynamic segment of your path. In our case, :id.
const Message = React.createClass({
componentDidMount() {
// from the path `/inbox/messages/:id`
const id = this.props.params.id
fetchMessage(id, function (err, message) {
this.setState({ message: message })
})
},
// …
})
You can also access parameters from the query string. For instance, if you’re on /foo?bar=baz, you can access this.props.location.query.bar to get the value “baz” from your Route component.
That’s the gist of React Router. Application UIs are boxes inside of boxes inside of boxes; now you can keep those boxes in sync with the URL and link to them easily.
