To see several views at the same time, you can split the drawing area of the Model tab into separate viewing areas called model space viewports. You can save arrangements of model space viewports for reuse at any time.
Model Space Viewports
On the Model tab, you can split the drawing area into one or more adjacent rectangular views known as model space viewports. Viewports are areas that display different views of your model. As you work on the Model tab, you can split the drawing area into one or more adjacent rectangular views known as model space viewports. In large or complex drawings, displaying different views reduces the time needed to zoom or pan in a single view. Also, errors you might miss in one view may be apparent in the others.
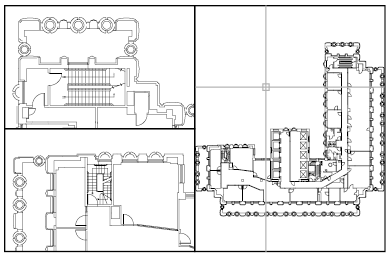
Viewports created on the Model tab completely fill the drawing area and do not overlap. As you make changes in one viewport, the others are updated simultaneously. Three model space viewports are shown in the illustration.
You can also create viewports on a layout tab. You use those viewports, called layout viewports, to arrange the views of your drawing on a sheet. You can move and resize layout viewports. By using layout viewports, you have more control over the display; for example, you can freeze certain layers in one layout viewport without affecting the others.
Use Model Space Viewports – With model space viewports, you can do the following:
- Pan; zoom; set Snap, Grid, and UCS icon modes; and restore named views.
- Save user coordinate system orientations with individual viewports.
- Draw from one viewport to another when executing a command.
- Name a viewport arrangement so that you can reuse it on the Model tab or insert it on a layout tab.
Split and Join Model Space Viewports – The illustrations below show several default model space viewport configurations.
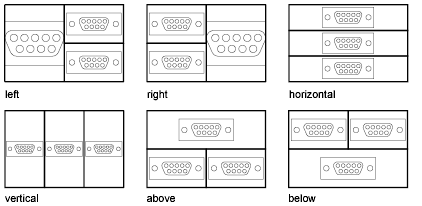
You can easily modify model space viewports by splitting and joining them. If you want to join two viewports, they must share a common edge of the same length.
Select and Use the Current Viewport
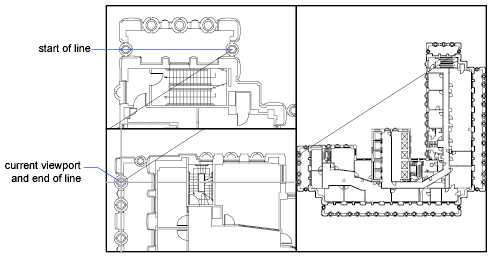
When you use multiple viewports, one of them is the current viewport, which accepts cursor input and view commands. When a viewport is current, the cursor is displayed as crosshairs rather than an arrow, and the viewport boundary is highlighted. You can change the current viewport at any time except when a View command is in progress.
To make a viewport the current viewport, you click inside it or press CTRL+R to cycle through the existing viewports. To draw a line using two model space viewports, you start the line in the current viewport, make another viewport current by clicking within it, and then specify the endpoint of the line in the second viewport. In a large drawing, you can use this method to draw a line from a detail in one corner to a detail in a distant corner.
Model Tab Viewport Arrangements
Arrangements of model viewports can be saved and restored by name.
You don’t have to set up viewports and views every time you need them. With VPORTS, viewport arrangements can be saved and later restored by name. Settings that are saved with viewport arrangements include
- The number and position of viewports
- The views that the viewports contain
- The grid and snap settings for each viewport
- The UCS icon display setting for each viewport
You can list, restore, and delete the available viewport arrangements. A viewport arrangement saved on the Model tab can be inserted on a layout tab.
