An Introduction to Word Processing
MS-WORD is called a word processor because it allows user to function more productively with lower efforts. We can print letters, prepare mailing lists, add page numbers, and decorate the document, etc., which are not possible in a text editor like Notepad or in WordPad. Default file extension for MS-Word file is “DOC”.
Creating a document
Documents can be created in various ways like creating a new blank document, a Web page, by using a wizard, creating from a template or creating a document from a copy of an existing document. Click File, point to New option and click. A new blank file is opened.
The other way to open a new file is to press “CTRL” key and then press “N” holding down the CTRL key and this key press sequence is denoted as “CTRL + N”.
As the figure below depicts the New Document task pane gives option for blank document, web page, XML page, E-mail or from existing document.
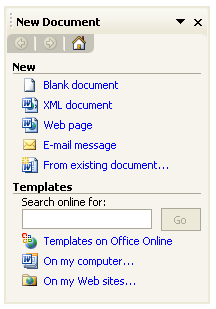
MS-Word can create different types of document as per our requirement whether a blank document or a web page. There are several types of Word documents we can start from
Blank document – Start with a blank document when we want to create a traditional printed document.
Web page – Use a Web document when we want to display the document’s contents on an intranet or the Internet in a Web browser. A Web page opens in Web layout view. Web pages are saved in HTML format.
Saving a document
As we enter and edit a text to create a new document, the changes we make are immediately displayed on screen and are stored in computer’s memory. However, changes are not permanently stored until we save our work to a file on our hard disk. We can press “Control” and “S” key or in File Menu click on save option (from the menu bar). Saving first time for new document opens “Save As” dialog box but after first time save, no dialog box opens on consecutive saves.
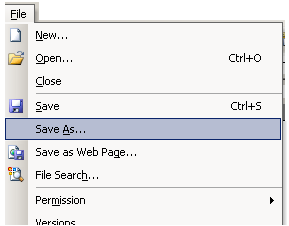

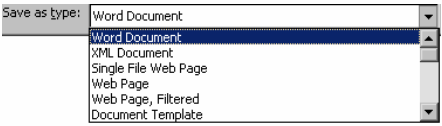
The Save As dialog box is used to specify the location to save the file and the file name. The “Save in” drop down list displays the default folder as the location where the file will be saved. File Name text box displays the proposed file name. The file list box displays the names of any word documents in the default location. The windows documents can have up to 256 characters in the file name. Names can contain letters or numerals, special symbols, with exception of underscore. Word files are identified by the extension.doc, which is automatically added to the file name when the file is saved. Document can be saved with new file name, at different location or as different file extension, in File menu after clicking Save As, apply following steps
Save a file with a new name
- In the File name field, enter the new name of the file and click Save
Save a file at different location
- In the Save in drop down box select the directory where to save and click Save
Save a file as different file extension
- In the Save as drop down box select the file type to save the document as.
- Click Save
Auto Recovery
Word includes an Auto Recovery feature for accidental loss of work due to power failure or other mishap. This indicates that the program is saving our work to a temporary recovery file. When we start up again, the recovery file is automatically opened containing all changes we made up to the last time it was saved by auto recover.
Closing Document
On the File menu, click Close or use shortcut key combination – “Control” and “W” or click on Document close button in right end of menu bar.
Opening Document
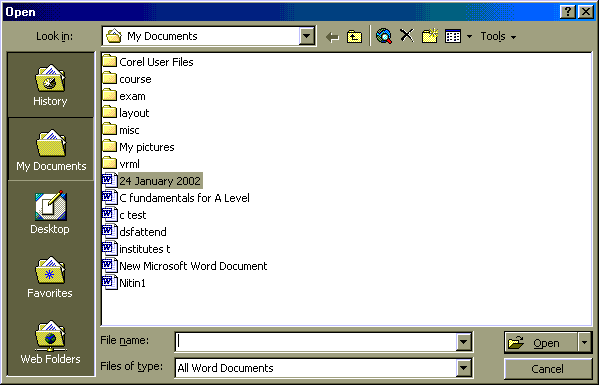
Click File Menu than Open. If we want to open a document that was saved in a different folder, locate and open the folder. Double-click the document we want to open. If we can’t find the document in the folder list, we can search for it. The open dialog box is displayed in the figure below
Exiting Word
The exit command in the File Menu is used to quit the Word program. Alternatively we can click the X close button in the application window title bar. If we attempt to close the application without first saving our document, word displays a warning asking if we want to save our work. If we do not save our work and we exit the application, all our changes are lost. The keyboard shortcut is Alt + F4
Moving in a document
Moving by mouse
Scroll through a document by using the mouse. After scrolling, click where we want to start typing.
| To | Do this |
| Scroll up one line | Click the up scroll arrow |
| Scroll down one line | Click the down scroll arrow |
| Scroll up one screen | Click above the scroll box |
| Scroll down one screen | Click below the scroll box |
| Scroll to a specific page | Drag the scroll box |
| Scroll left | Click the left scroll arrow |
| Scroll right | Click the right scroll arrow |
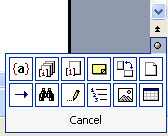
For a quick way to scroll up or down one page, click Select Browse Object on the vertical scroll bar, and then click Browse by Page. Then click Next Page or Previous Page.
Moving by keyboard
| Press (Keyboard key) | To move |
| LEFT ARROW | One character to the left |
| RIGHT ARROW | One character to the right |
| CTRL+LEFT ARROW | One word to the left |
| CTRL+RIGHT ARROW | One word to the right |
| CTRL+UP ARROW | One paragraph up |
| CTRL+DOWN ARROW | One paragraph down |
| UP ARROW | Up one line |
| DOWN ARROW | Down one line |
| END | To the end of a line |
| HOME | To the beginning of a line |
| ALT+CTRL+PAGE UP | To the top of the window |
| ALT+CTRL+PAGE DOWN | To the end of the window |
| PAGE UP | Up one screen (scrolling) |
| PAGE DOWN | Down one screen (scrolling) |
| CTRL+PAGE DOWN | To the top of the next page |
| CTRL+PAGE UP | To the top of the previous page |
| CTRL+END | To the end of a document |
| CTRL+HOME | To the beginning of a document |
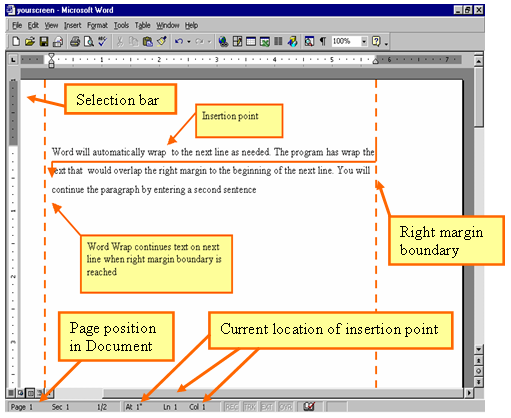
When the mouse pointer is positioned in an unmarked area to the left of a line (left margin). This area is called the selection bar. When the mouse is in this area, it can be used to highlight (select) text. To move the insertion point the I-beam at the location in the text where we want to be, then click the left mouse button or we can move it by using keyboard arrow keys.
Moving by Go To
The Go To feature quickly moves your cursor to a desired location. All you need to know is the page or section number.
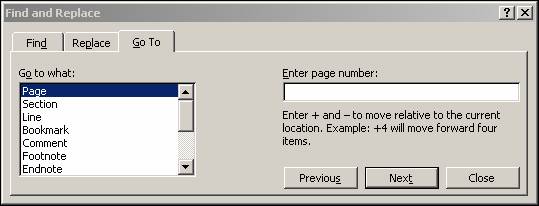
Activating Go To Using the Menu Bar
- Choose Edit from the Menu bar
- Choose Go To…
- Enter a page number
- Click Go To
Activating Go To Using a Shortcut Key
- Press [F5]
- Enter a page number
- Press Enter
Moving by Document Browser
The Document Browser helps in moving ion the document on basis of different elements of document like heading, section, etc. It is located in bottom of vertical scroll bar, in between the two arrows, click on the round circle.
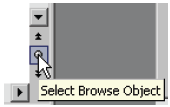
Document Browser
Browser different elements
Selecting Text
Select text by mouse
| To select | Do this |
| Any amount of text | Drag over the text. |
| A word | Double-click the word. |
| A graphic | Click the graphic. |
| A line of text | Move the pointer to left of the line until it changes to a right-pointing arrow, and then click. |
| A sentence | Hold down CTRL, and then click anywhere in the sentence till where the selection is to be made. |
| A paragraph | Move the pointer to the left of the paragraph until it changes to a right-pointing arrow, and then double-click. Or triple-click anywhere in the paragraph. |
| An entire document | Move the pointer to the left of any document text until it changes to a right-pointing arrow, and then triple-click. |
Select text by keyboard
Select text by holding down SHIFT and pressing the key that moves the insertion point.
| Press | To select |
| SHIFT+RIGHT ARROW | One character to the right |
| SHIFT+LEFT ARROW | One character to the left |
| CTRL+SHIFT+RIGHT ARROW | To the end of a word |
| CTRL+SHIFT+LEFT ARROW | To the beginning of a word |
| SHIFT+END | To the end of a line |
| SHIFT+HOME | To the beginning of a line |
| SHIFT+DOWN ARROW | One line down |
| SHIFT+UP ARROW | One line up |
| CTRL+SHIFT+DOWN ARROW | To the end of a paragraph |
| CTRL+SHIFT+UP ARROW | To the beginning of a paragraph |
| SHIFT+PAGE DOWN | One screen down |
| SHIFT+PAGE UP | One screen up |
| CTRL+SHIFT+HOME | To the beginning of a document |
| CTRL+SHIFT+END | To the end of a document |
| ALT+CTRL+SHIFT+PAGE DOWN | To the end of a window |
| CTRL+A | To include the entire document |
Manipulating Windows
Methods to manipulate Windows
When we create or open a document in Word, the document opens in a separate window. We can quickly switch from one document to another by clicking the document’s button on the taskbar or by pressing ALT+TAB. We can also view several open Word documents at the same time by using the Arrange All command (Window menu).
Arranging All Windows
All the open document windows can be arranged in MS-WORD by, Window menu then the Arrange All option. As shown in the figure below
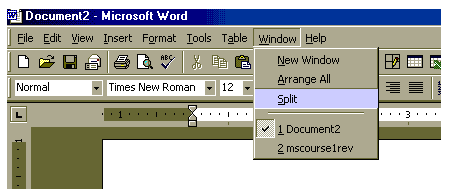
Splitting Window
The Active Window
The window in which we are working is called the active window. It has a tick mark on right in the window menu
Maximize a Word document window
Click the Maximize button on the menu bar or title bar of the active document to maximize the document window to a button on the Windows taskbar.
Switching between open files
MS-WORD gives the facility of working with multiple documents at a time by opening them and switching to each as per user need. Choose Window menu then click on the file you want to open.
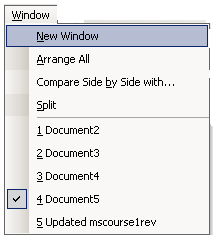
Multiple documents as windows
Comparing between open files
To compare the active document with another open document which is present as another window, choose Window menu then click on the “Compare Side by Side”. Then in the dialog box select the document you want to compare with.
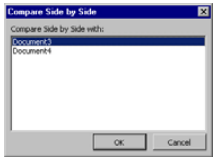
Select Document
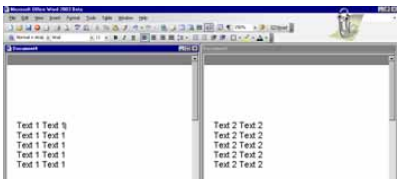
Compare screen
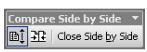
Compare toolbar
Opening a second view
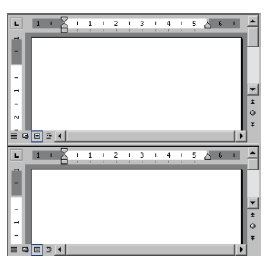
MS-WORD gives the facility of working in a document, but in two windows is opened of the same document. This is done by Window menu then the New Window option.
Splitting a Window
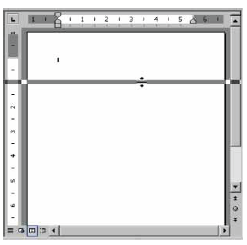
Two or more views of a document can be taken in the same document window by this facility. Point to the split box at the top of the vertical scroll bar. When the pointer changes to , drag the split bar to the position we want.
To return to a single window, double-click the split bar. To move or copy text between parts of a long document, split the window into two panes. Display the text or graphics we want to move or copy in one pane and the destination for the text or graphics in the other pane, and then select and drag the text or graphics across the split bar. As shown in the figure below

Split Option

Split box
Split resize bar
Split windows
Printing of documents
Document Printing
One can print the active document by clicking Print on the Standard toolbar. You can print graphics as well as text as you type. It is advisable to setup the Margins, Orientation, Paper size, Pages etc before printing the document. Once the entire document is set click on Print preview under File menu to view the active document.
For Normal printings go to File menu and Click on Print option and then select Ok.
You can print a particular page with different orientation; it depends upon your requirement. Once you click on the Print command you select properties in the dialogue box. Thereafter you can choose either of the two orientations (Portrait and Landscape).
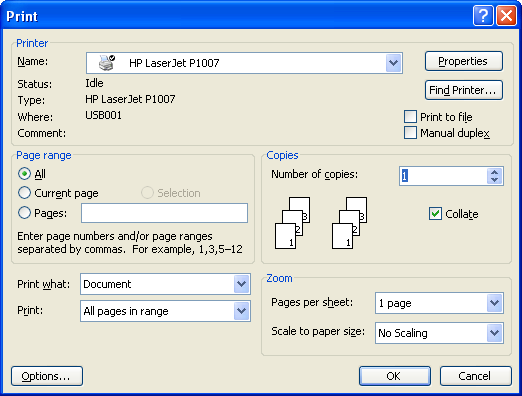
The print dialog box asks for few basic inputs i.e.
- Printer – Select the printer on which the active document will be printed
- Page Range – All or current page or specific page number to be printed
- Copies – number of copies to be printed and if more than one so, how to group or collate different pages.
- Pages per sheet- It is a zoom or scale option to shrink or stretch a single sheet’s content to how many pages. By default it is one page.
- Odd and Even Pages- For example you have a document with 5 pages and page numbers given. Now, you would like to print only odd numbers like 1, 3, 5 it is not necessary to mention that into page range box, it is very time consuming to mention every page like 1 to 100 or etc. In this position you have to select Print option from File menu and click on Print. Now, select Even/Odd (respectively) pages instead of “All pages in range” selection from print option and click Ok.
To print under page range, click pages and then use commands accordingly
- In case of noncontiguous pages, type the page numbers with commas between them. Type the range of pages with a hyphen between the starting and ending numbers in the range.
- In case of a range of pages within a section, type the page number & section number.
- In case of an entire section, type the section number.
- In case of noncontiguous sections, type the section numbers with commas between them.
- In case of a range of pages across sections, type a range of page numbers and the sections that contain them with a hyphen between the starting and ending numbers in the range.
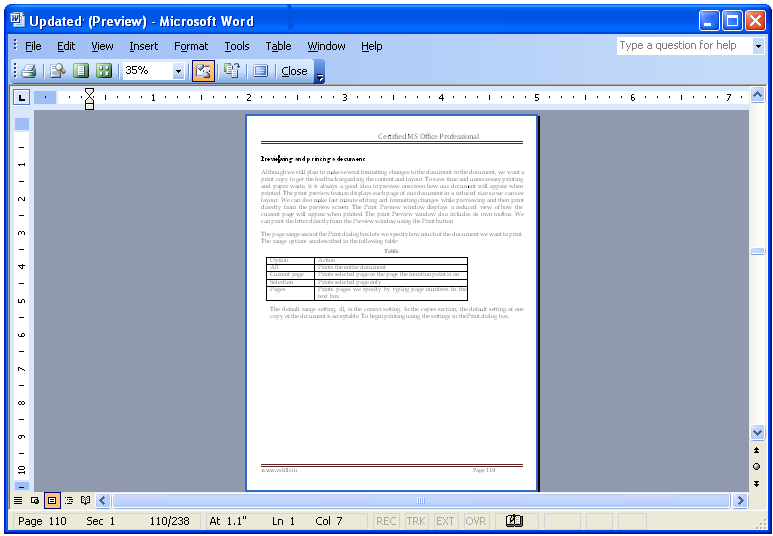
The page range area of the Print dialog box lets we specify how much of the document we want to print. The range options are described in the following table
| Option | Action |
| All | Prints the entire document |
| Current page | Prints selected page or the page the insertion point is on |
| Selection | Prints selected page only |
| Pages | Prints pages we specify by typing page numbers in the text box |
The default range setting, all is the correct setting. In the copies section, the default setting of one copy of the document is acceptable.
Print dialog box
Word window page margins
Printing document from Standard toolbar
The active document can be printed by clicking Print button on the Standard toolbar
Printing document from menu
Clicking File Menu then Print option can print the active document.
Scaling print of a document
On the File menu, click Print. Under Zoom, click the option we want in the Scale to paper size box. For example, we can specify that a B4-size document print on A4-size paper by decreasing the size of the font and the graphics. This feature is similar to the reduce/enlarge feature on a photocopy machine. This procedure scales our document for this printing session only. To scale our documents this way for all printing sessions, click Options on the Tools menu, and then click the Print tab. Select the Allow A4/Letter paper resizing check box.
Previewing a document
Although we still plan to make several formatting changes to the document, we want a print copy to get the feedback regarding the content and layout. To save time and unnecessary printing and paper waste, it is always a good idea to preview onscreen how our document will appear when printed. The print preview feature displays each page of our document in a reduced size so we can see layout. We can also make last minute editing and formatting changes while previewing and then print directly from the preview screen. The Print Preview window displays a reduced view of how the current page will appear when printed. The print Preview window also includes its own toolbar. We can print the letter directly from the Preview window using the Print button. In File menu click on Print Preview option to open active document in preview window or by clicking on print preview icon on standard toolbar.
Page Setup
This feature helps to define a paper size for the current document and customize its margin values and other page properties. In order to alter the Page Setup click on File menu and select Page Setup option. A dialog box will appear on your screen consisting of the following control tabs
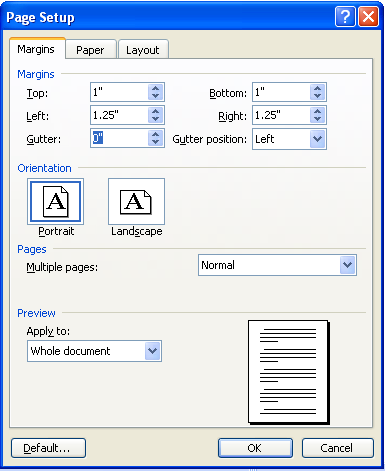
Margin Tab
Page margins are the blank space around the edges of the page. The standard margins for a Word document are 1 inch at the top and bottom of the page and 1 ¼ inch from the left and right hand sides of the page; each new document you open in Word will have these margins.
The following steps will help you change the margins in Word 2003-
- First select Page Setup… option from the File menu.
- Click on the Margins tab in the Page Setup dialog box.
- Page Setup offers various options as under
- Selecting the Top, Bottom, Left, and Right selection boxes under the Margins section
- Highlighting the entry accordingly and enter a new number for the distance in inches you want the text to be from the respective edges of the document page.
- Use arrows to increase or decrease the margins in increments predefined by Word.
- Changing the gutter, or space between columns and the gutter position.
- Applying the changes to the margins.
- When applying the heading in the Preview section of the dialog box, a drop-down box that says Whole document. If you click on the arrow, you will have the option to apply the changes only from the point of the current cursor location forward.
- In order to change only a portion of your document margins, simply highlight the portion you want to change; when you reopen the dialog box and click on the Apply to drop-down, this point forward will change to selected text.
- Once you have made your choices, click OK to apply them. The box will close automatically.
The Margin Tab allows you to select top, bottom, right, and left page margins; select page orientation (portrait or landscape); and apply the changes to the entire document or only to a specific section of the document.
- In Menu Bar, click File menu and select Margins Tab from the Page Setup option.
- Click Portrait or Landscape to change the page orientation.
- Click down arrow in Preview section to apply the margin changes to a specific section of the document.
- The Preview window allows you to view the changes prior to making the changes.
- Click “OK” to apply the changes.
Paper Tab
The Paper Tab allows you to select the size of the paper that you are going to use to create and print your document; select the source of the paper, which may be different for the cover page and content pages; and apply the paper sources to the entire document or to only a portion of the document.
- 1. Click File menu and choose Paper Tab option from Page Setup.
- 2. Click the down arrow to select the paper to change the paper size, (Example Letter, Legal, etc.).
- 3. Click the desired source located under First page to change the paper source for the front/cover page.
- 4. Click the desired source located under Other pages to change the paper source for the remaining pages.
- 5. Click OK.
Page Layouts Tab
The third tab on the Page Setup dialog box is the Page Layout tab. This section of page layout and setup using Microsoft Word offers several useful options for desktop publishing. The setting in the Page Layout tab allows formatting the sections of a publication considering the way in which headers and footers are to be printed on pages and the vertical alignment of the pages as well. You can also add line numbers to a publication or format page and paragraph borders.
Measurement Units
Word facilitates the modification of your work environment extensively by changing the default units of measurement used in dialog boxes and on the ruler. Word uses inches by default, but you can customize the program so it will use centimeters, millimeters, points, picas etc.
Steps undertaken to change the measurement units in Word 2003 are as under
- Open Microsoft Word and start a new blank document, or open an existing document from your files. When you change the measurement units, they will be applied to your current document, as well as any other documents that you use in the future.
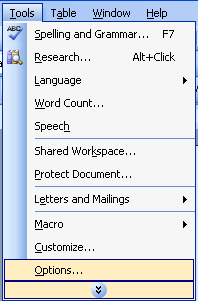
- Choose the Tools menu from the menu bar and click on “Options” to open the Options dialog box. The options dialog box contains several tabs that all allow you to change settings within Microsoft Word.\
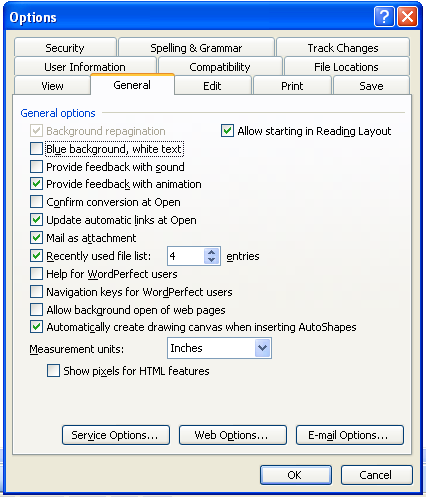
- Click on the General tab in the Options dialog box to view the general option settings in Microsoft Word.
- Locate the Measurement Units drop-down menu toward the bottom of the Options dialog box.
- Use the Measurement Units drop-down menu to choose what type of measurement units you would like to use in Word. You can choose from Inches, Centimeters, Millimeters, Points or Picas.”
- Select the OK button to close the “Options” dialog box and change the measurement units within Microsoft Word.
Notice that your rulers, as well as dialog boxes, will now use newly selected measurement units.
Margins Adjust by Ruler
Page margins are the blank space around the edges of the page. In general, we insert text and graphics in the printable area inside the margins. However, we can position some items in the margins — for example, headers, footers, and page numbers. Changing of margins can be done as
- Switch to print layout view.
- Point to a margin boundary on the horizontal ruler or vertical ruler. When the pointer changes to a double-headed arrow, drag the margin boundary.
To specify exact margin measurements, hold down ALT as we drag the margin boundary; the ruler displays the measurements of the margins. If we prefer to type the measurements, click Page Setup on the File menu, and then click the Margins tab. To change the margins for part of a document, select the text, click Page Setup on the File menu, click the Margins tab, and then set the margins we want. In the Apply to box, click Selected text. Word automatically inserts section breaks before and after the text with the new margin settings. If our document is already divided into sections, we can click in a section or select multiple sections, and then change the margins.
