Data-binding in Angular apps is the automatic synchronization of data between the Model and the View components. The way that Angular implements data-binding lets you treat the Model as the single-source-of-truth in your application. The View is a projection of the Model at all times. Data binding is the process that establishes a connection between the application UI and business logic. If the binding has correct settings and the data provides proper notifications, then whenever the data changes its value, the elements that are bound to the data reflect changes automatically.
Why Data Binding is required
In traditional web development, we need to develop a bridge between front-end, where the user performs their application data manipulation, and the back-end, where the data is stored. Now, in this development, the process is driven by consecutive networking calls and communicating changes between the server (i.e. back-end) and the client (i.e. front end). For the solution of this problem, Angular involved this data binding concept.
Most web framework platforms focus on one-way data binding. Basically, this involves reading the input from DOM, serializing the data, sending it to the back-end or server, waiting for the process to finish. After it, the process modifies the DOM to indicate errors occurred (if any) or reloads the DOM element if the call is successful. While this process provides a traditional web application all the time, it needs to perform data processing. This benefit is only really applicable to web apps with highly complex data structures. If your application has a simpler data structure format with relatively flat models, then the extra work can needlessly complicate the process and decrease the performance of your application. Furthermore, all models need to wait for server confirmation before their data can be updated, meaning that the related data, depending upon those models, won’t have the latest information.
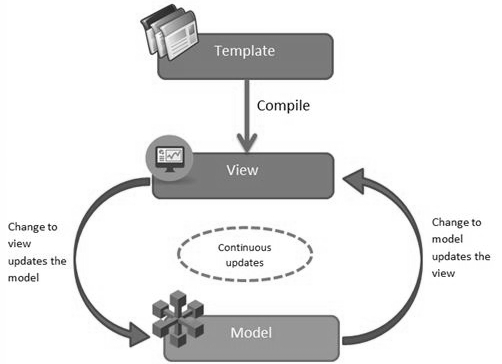
The Angular framework addresses this with data binding concept. With data binding, the user interface changes are immediately reflected in the underlying data model, and vice-versa. This allows the data model to serve as an atomic unit that the view of the application can always depend upon to be accurate. Many web frameworks implement this type of data binding with a complex series of event listeners and event handlers – an approach that can quickly become fragile. Angular, on the other hand, makes this approach to data a primary part of its architecture. Instead of creating a series of callbacks to handle the changing data, Angular does this automatically without any needed intervention by the programmer. Basically, this feature is a great relief for the programmer.
So, the primary benefit of data binding is that updates to (and retrievals from) the underlying data store happen more or less automatically. When the data store updates, the UI updates as well. This allows us to remove a lot of logic from the front-end display code, particularly when making effective use of Angular’s declarative approach to UI presentation. In essence, it allows for true data encapsulation on the front-end, reducing the need to do complex and destructive manipulation of the DOM.
While this solves a lot of problems with a website’s presentation architecture, there are some disadvantages to take into consideration. First, Angular uses a dirty-checking approach that can be slow in some browsers – not a problem for small presentation pages, but any page with heavy processing may run into problems in older browsers. Additionally, data binding is only truly beneficial for relatively simple objects. Any data that requires heavy parsing work, or extensive manipulation and processing, will simply not work well with two-way binding. Additionally, some uses of Angular – such as using the same binding directive more than once – can break the data binding process.
Dirty Checking
In Angular, Model and View are interconnected with the binding mechanism. So that any changes made in the view will update the model and vice versa. This update of model or view occurred due to the model change event which is called Digest Cycle and dirty check is one of the parts of Digest Cycle. Actually, when any event or model value manipulation is done, angular itself check the old value and new value and if the value does not match, then the digest cycle starts its work and update the view by checking the model value and find which object needs to be changed. Actually, the digest cycle informs the watchers about the model change and then watchers synchronize the view with the model data. Now while this updation process is going on, it is possible that the value of model again changed. So now, the dirty check comes into the picture and checks while the digest cycle(was going on) anything is changed in the model or not . If anything changed, it will call the digest cycle again and update the view accordingly, and this process will go on until dirty check finds no updates done while last Digest cycle.
Angular always creates a change detector object per component, which tracks the last value of each template binding, such as {{employee.name}}. In normal scenerio, after every asynchronous browser event execution (such as a response from a server, or a click event, or a timeout event), Angular change detection executes and dirty checks every binding using those change detector objects.
If a change is detected, the change is propagated. E.g.,
- If an input property value changed, the new value is propagated to the component’s input property.
- If a {{}} binding value changed, the new value is propagated to DOM property textContent.
- If the value of x changes in a style, attribute, or class binding – i.e., [style.x] or [attr.x]or [class.x] – the new value is propagated to the DOM to update the style, HTML attribute, or class.
Angular uses Zone.js to create its own zone (NgZone), which monkey-patches all asynchronous events (browser DOM events, timeouts, AJAX/XHR). This is how change detection is able to automatically run after each asynchronous event. I.e., after each asynchronous event handler (function) finishes, Angular change detection will execute.
Binding Syntax
Data binding is a mechanism for coordinating what users see, with application data values. While you could push values to and pull values from HTML, the application is easier to write, read, and maintain if you turn these chores over to a binding framework. You simply declare bindings between binding sources and target HTML elements and let the framework do the work.
Angular provides many kinds of data binding. This guide covers most of them, after a high-level view of Angular data binding and its syntax.
Binding types can be grouped into three categories distinguished by the direction of data flow: from the source-to-view, from view-to-source, and in the two-way sequence: view-to-source-to-view:
| Data direction | Syntax | Type |
| One-way from data source to view target | {{expression}}
[target]=”expression”
bind-target=”expression” |
Interpolation
Property Attribute Class Style |
| One-way from view target to data source | (target)=”statement”
on-target=”statement” |
Event |
| Two-way | [(target)]=”expression”
bindon-target=”expression” |
Two-way |
Binding types other than interpolation have a target name to the left of the equal sign, either surrounded by punctuation ([], ()) or preceded by a prefix (bind-, on-, bindon-).
The target name is the name of a property. It may look like the name of an attribute but it never is. To appreciate the difference, you must develop a new way to think about template HTML.
Binding targets
The target of a data binding is something in the DOM. Depending on the binding type, the target can be an (element | component | directive) property, an (element | component | directive) event, or (rarely) an attribute name. The following table summarizes:
| Type | Target | Examples |
| Property | Element property
Component property Directive property |
src/app/app.component.html
<img [src]=”heroImageUrl”> <hero-detail [hero]=”currentHero”></hero-detail> <div [ngClass]=”{‘special’: isSpecial}”></div> |
| Event | Element event
Component event Directive event |
src/app/app.component.html
<button (click)=”onSave()”>Save</button> <hero-detail (deleteRequest)=”deleteHero()”></hero-detail> <div (myClick)=”clicked=$event” clickable>click me</div> |
| Two-way | Event and property | src/app/app.component.html
<input [(ngModel)]=”name”> |
| Attribute | Attribute (the exception) | src/app/app.component.html
<button [attr.aria-label]=”help”>help</button> |
| Class | class property | src/app/app.component.html
<div [class.special]=”isSpecial”>Special</div> |
| Style | style property | src/app/app.component.html
<button [style.color]=”isSpecial ? ‘red’ : ‘green'”> |
Data Binding Types
In Angular 7, there are different types of data binding mechanism is available. There are,
- Interpolation
- Property Binding
- Two Way Binding
- Event Binding
Interpolation Data Binding
Interpolation data binding is the most popular and easiest way of data binding in Angular 7. This mechanism is also available in the earlier version of the angular framework. Actually context between the braces is the template expression that Angular first evaluates and then convert into strings. Interpolation use the braces expression i.e. {{ }} for render the bound value to the component template. It can be a static string or numeric value or an object of your data model. As per example, in angular we use it like below
{{model.firstName}}
Here model is the instance of the controller objects. But in Angular 7, it is now much simpler where controller instance name removed from the expression i.e.
{{firstName}}
Property Binding
In Angular 7.0, a new binding mechanism introduces which called property binding. But actually in nature is just same as interpolation. Some people also called this process as one way binding as like previous angularjs concept. Property binding used [] to send the data from the component to the html template. The most common way to use property binding is that assign any property of the html element tag into the [] with the component property value, i.e.
<input type=”text” [value]=”data.name”/>
In the previous version of angularjs, it can be done by using ng-bind directives. Basically property binding can be used to bind any property, component or a directive property. It can be used as
- Attribute binding
- Class binding
- Style binding
Example – Write a template property binding to set a property of a view element. The binding sets the property to the value of a template expression. The most common property binding sets an element property to a component property value. An example is binding the src property of an image element to a component’s heroImageUrl property:
src/app/app.component.html
<img [src]=”heroImageUrl”>
Another example is disabling a button when the component says that it isUnchanged:
src/app/app.component.html
<button [disabled]=”isUnchanged”>Cancel is disabled</button>
Another is setting a property of a directive:
src/app/app.component.html
<div [ngClass]=”classes”>[ngClass] binding to the classes property</div>
Yet another is setting the model property of a custom component (a great way for parent and child components to communicate):
src/app/app.component.html
<hero-detail [hero]=”currentHero”></hero-detail>
Attribute binding – You can set the value of an attribute directly with an attribute binding. This is the only exception to the rule that a binding sets a target property. This is the only binding that creates and sets an attribute.
This guide stresses repeatedly that setting an element property with a property binding is always preferred to setting the attribute with a string. Why does Angular offer attribute binding? You must use attribute binding when there is no element property to bind.
Consider the ARIA, SVG, and table span attributes. They are pure attributes. They do not correspond to element properties, and they do not set element properties. There are no property targets to bind to. This fact becomes painfully obvious when you write something like this.
<tr><td colspan=”{{1 + 1}}”>Three-Four</td></tr>
And you get this error:
Template parse errors:
Can’t bind to ‘colspan’ since it isn’t a known native property
As the message says, the <td> element does not have a colspan property. It has the “colspan” attribute, but interpolation and property binding can set only properties, not attributes. You need attribute bindings to create and bind to such attributes.
Attribute binding syntax resembles property binding. Instead of an element property between brackets, start with the prefix attr, followed by a dot (.) and the name of the attribute. You then set the attribute value, using an expression that resolves to a string.
Bind [attr.colspan] to a calculated value:
src/app/app.component.html
<table border=1>
<!– expression calculates colspan=2 –>
<tr><td [attr.colspan]=”1 + 1″>One-Two</td></tr>
<!– ERROR: There is no `colspan` property to set!
<tr><td colspan=”{{1 + 1}}”>Three-Four</td></tr>
–>
<tr><td>Five</td><td>Six</td></tr>
</table>
Class binding – You can add and remove CSS class names from an element’s class attribute with a class binding. Class binding syntax resembles property binding. Instead of an element property between brackets, start with the prefix class, optionally followed by a dot (.) and the name of a CSS class: [class.class-name].
The following examples show how to add and remove the application’s “special” class with class bindings. Here’s how to set the attribute without binding:
src/app/app.component.html
<!– standard class attribute setting –>
<div class=”bad curly special”>Bad curly special</div>
Style binding – You can set inline styles with a style binding. Style binding syntax resembles property binding. Instead of an element property between brackets, start with the prefix style, followed by a dot (.) and the name of a CSS style property: [style.style-property].
src/app/app.component.html
<button [style.color]=”isSpecial ? ‘red’: ‘green'”>Red</button>
<button [style.background-color]=”canSave ? ‘cyan’: ‘grey'” >Save</button>
Two Way Binding
The most popular and widely used data binding mechanism in two-way binding in the angular framework. Basically two-way binding mainly used in the input type field or any form element where user type or provide any value or change any control value in the one side, and on the other side, the same automatically updated in to the controller variables and vice versa. In the Angular 1.x, we use ng-model directives with the element for this purpose.
<input type=”text” ng-model =”firstName”/>
Similarly, in Angular 7.0, we have a directive called ngModel and it need to be used as below –
<input type=”text” [(ngModel)] =”firstName”/>

As we see, in Angular 7, the syntax is different because we use [] since it is actually a property binding and parentheses is used for the event binding concept.
Event Binding
Event Binding is one of the new mechanisms introduced by Angular 7.0. In the previous version of the Angular, we always used different types of directives like ng-click, ng-blur for binding any particular event action of an HTML control. But in Angular 7, we need to use the same property of the HTML element (like click, change etc) and use it within parenthesis. So, in Angular 7, with properties, we use square brackets and in events, we use parenthesis.
<button (click)=”showAlert();”>Click</button>
Example – The bindings directives you’ve met so far flow data in one direction: from a component to an element. Users don’t just stare at the screen. They enter text into input boxes. They pick items from lists. They click buttons. Such user actions may result in a flow of data in the opposite direction: from an element to a component.
The only way to know about a user action is to listen for certain events such as keystrokes, mouse movements, clicks, and touches. You declare your interest in user actions through Angular event binding.
Event binding syntax consists of a target event name within parentheses on the left of an equal sign, and a quoted template statement on the right. The following event binding listens for the button’s click events, calling the component’s onSave() method whenever a click occurs:
src/app/app.component.html
<button (click)=”onSave()”>Save</button>
A name between parentheses — for example, (click) — identifies the target event. In the following example, the target is the button’s click event.
src/app/app.component.html
<button (click)=”onSave()”>Save</button>
Some people prefer the on- prefix alternative, known as the canonical form:
src/app/app.component.html
<button on-click=”onSave()”>On Save</button>
Element events may be the more common targets, but Angular looks first to see if the name matches an event property of a known directive, as it does in the following example:
src/app/app.component.html
<!– `myClick` is an event on the custom `ClickDirective` –>
<div (myClick)=”clickMessage=$event” clickable>click with myClick</div>
If the name fails to match an element event or an output property of a known directive, Angular reports an “unknown directive” error.
Target event – A name between parentheses — for example, (click) — identifies the target event. In the following example, the target is the button’s click event.
src/app/app.component.html
<button (click)=”onSave()”>Save</button>
Some people prefer the on- prefix alternative, known as the canonical form:
src/app/app.component.html
<button on-click=”onSave()”>On Save</button>
Element events may be the more common targets, but Angular looks first to see if the name matches an event property of a known directive, as it does in the following example:
src/app/app.component.html
<!– `myClick` is an event on the custom `ClickDirective` –>
<div (myClick)=”clickMessage=$event” clickable>click with myClick</div>
If the name fails to match an element event or an output property of a known directive, Angular reports an “unknown directive” error.
Input and Output properties
An Input property is a settable property annotated with an @Input decorator. Values flow into the property when it is data bound with a property binding
An Output property is an observable property annotated with an @Output decorator. The property almost always returns an Angular EventEmitter. Values flow out of the component as events bound with an event binding.
You can only bind to another component or directive through its Input and Output properties. Input is used to receive data in whereas Output is used to send data out. Output sends data out by exposing event producers, usually EventEmitter objects.
