
You’ve learned the basics of using the template system; now let’s use this knowledge to create a view.
Recall the current_datetime view in mysite.views, which we started in the previous chapter. Here’s what it looks like:
from django.http import HttpResponse
import datetime
 def current_datetime(request):
    now = datetime.datetime.now()
    html = "<html><body>It is now %s.</body></html>" % now
    return HttpResponse(html)
Let’s change this view to use Django’s template system. At first, you might think to do something like this:
from django.template import Template, Context
from django.http import Http
Response
import datetime
def current_datetime(request):
    now = datetime.datetime.now()
    t = Template("<html><body>It is now {{ current_date
 }}.</body></html>")
    html = t.render(Context({'current_date': now}))
    return HttpResponse(html)
Sure, that uses the template system, but it doesn’t solve the problems we pointed out in the introduction of this chapter. Namely, the template is still embedded in the Python code. Let’s fix that by putting the template in a separate file, which this view will load.
You might first consider saving your template somewhere on your filesystem and using Python’s built-in file-opening functionality to read the contents of the template. Here’s what that might look like, assuming the template was saved as the file /home/djangouser/templates/mytemplate.html:
from django.template import Template,
Contextfrom django.http import HttpResponse
import datetime
def current_datetime(request):
    now = datetime.datetime.now()
    # Simple way of using templates from the filesystem.
    # This doesn't account for missing files!
    fp = open('/home/djangouser/templates/mytemplate.html')
    t = Template(fp.read())
    fp.close()
    html = t.render(Context({'current_date': now}))
    return HttpResponse(html)
This approach, however, is inelegant for these reasons:
- It doesn’t handle the case of a missing file. If the file html doesn’t exist or isn’t readable, the open() call will raise an IOError exception.
- It hard-codes your template location. If you were to use this technique for every view function, you’d be duplicating the template locations. Not to mention it involves a lot of typing!
- It includes a lot of boring boilerplate code. You’ve got better things to do than to write calls to open(), read(), and fp.close() each time you load a template.
To solve these issues, we’ll use template loading and template directories.
Template Loading
Django provides a convenient and powerful API for loading templates from the filesystem, with the goal of removing redundancy both in your template-loading calls and in your templates themselves. In order to use this template-loading API, first you’ll need to tell the framework where you store your templates. The place to do this is in your settings file – the settings.py file that I mentioned last chapter, when I introduced the ROOT_URLCONF setting. If you’re following along, open your settings.py and find the TEMPLATES setting. It’s a list of configurations, one for each engine:
TEMPLATES = [
{
'BACKEND': 'django.template.backends.django.DjangoTemplates',
'DIRS': [],
'APP_DIRS': True,
'OPTIONS': {
# ... some options here ...
},
},
]
BACKEND is a dotted Python path to a template engine class implementing Django’s template backend API. The built-in backends are django.template.backends.django.DjangoTemplates and django.template.backends.jinja2.Jinja2.
Since most engines load templates from files, the top-level configuration for each engine contains three common settings:
- DIRS defines a list of directories where the engine should look for template source files, in search order.
- APP_DIRS tells whether the engine should look for templates inside installed applications. By convention, when APPS_DIRS is set to True, DjangoTemplates looks for a \templates subdirectory in each of the INSTALLED_APPS. This allows the template engine to find application templates even if DIRS is empty.
- OPTIONS contains backend-specific settings.
Template Directories
DIRS, by default, is an empty list. To tell Django’s template-loading mechanism where to look for templates, pick a directory where you’d like to store your templates and add it to DIRS, like so:
    'DIRS': [

              '/home/html/templates/site',

              '/home/html/templates/default',       ],
There are a few things to note:
- Unless you are building a very simple program with no apps, you are better off leaving DIRS empty. The default settings file configures APP_DIRS to True, so you are better off having a “templates” subdirectory in your Django app.
- If you want to have a set of master templates at project root, e.g. mysite\templates, you do need to set DIRS, like so:
'DIRS': [os.path.join(BASE_DIR, 'templates')],
- Your templates directory does not have to be called templates – Django doesn’t put any restrictions on the names you use – but it makes your project structure much easier to understand if you stick to convention.If you don’t want to go with the default, or can’t for some reason, you can specify any directory you want, as long as the directory and templates within that directory are readable by the user account under which your web server runs.
- If you’re on Windows, include your drive letter and use Unix-style forward slashes rather than backslashes, as follows:
   'DIRS':
    [
    'C:/www/django/templates',
    ]
As we have not yet created a Django app, I am going to use a very simple configuration to demonstrate how template loading works. First, you will have to set DIRS to [os.path.join(BASE_DIR,’templates’)] as per the example above. Your settings file should now look like this:
TEMPLATES = [
    {
        'BACKEND': 'django.template.backends.django.DjangoTemplates',
        'DIRS': [os.path.join(BASE_DIR,'templates')],
        'APP_DIRS': True,
        'OPTIONS': {
With DIRS set, the next thing to do is create a \templates directory inside your root \mysite folder. When you are finished, your folder structure should look like this:
\mysite_project

        \mysite

            \mysite

             \templates

           manage.py
Next step is to change the view code to use Django’s template-loading functionality rather than hard-coding the template paths. Returning to our current_datetime view, let’s change it like so:
#mysite\mysite\views.py

from django.template.loader import get_template
from django.http import HttpResponse
import datetime

def current_datetime(request):
now = datetime.datetime.now()
t = get_template('current_datetime.html')
html = t.render({'current_date': now})
return HttpResponse(html)
Generally, you will use a Django template loader rather than using the low-level template API as in the previous examples. In this example, we’re using the function django.template.loader.get_template() rather than loading the template from the filesystem manually. The get_template() function takes a template name as its argument, figures out where the template lives on the filesystem, opens that file, and returns a compiled Template object.
Also note the difference between the render() method here and the previous examples. In the previous examples we are calling django.template.Template.render, which requires you to pass in a Context object. get_template() returns a backend-dependent Template from django.template.backends.base.Template, in which the render() method only accepts a dictionary object, not a Context object.
Our template in this example is current_datetime.html, but there’s nothing special about that .html extension. You can give your templates whatever extension makes sense for your application, or you can leave off extensions entirely.
To determine the location of the template on your filesystem, get_template() will look in order:
- If APP_DIRS is set to True, and assuming you are using the DTL, it will look for a /templates directory in the current app.
- If it does not find your template in the current app, get_template() combines your template directories from DIRS with the template name that you pass to get_template() and steps through each of them in order until it finds your template. For example, if the first entry in your DIRS is set to ‘/home/django/mysite/templates’, the above get_template() call would look for the template /home/django/mysite/templates/current_datetime.html.
- If get_template() cannot find the template with the given name, it raises a TemplateDoesNotExist exception.
To see what a template exception looks like, fire up the Django development server again by running python manage.py runserver within your Django project’s directory. Then, point your browser at the page that activates the current_datetime view (e.g., http://127.0.0.1:8000/time/). Assuming your DEBUG setting is set to True and you haven’t yet created a current_datetime.html template, you should see a Django error page highlighting the TemplateDoesNotExist error
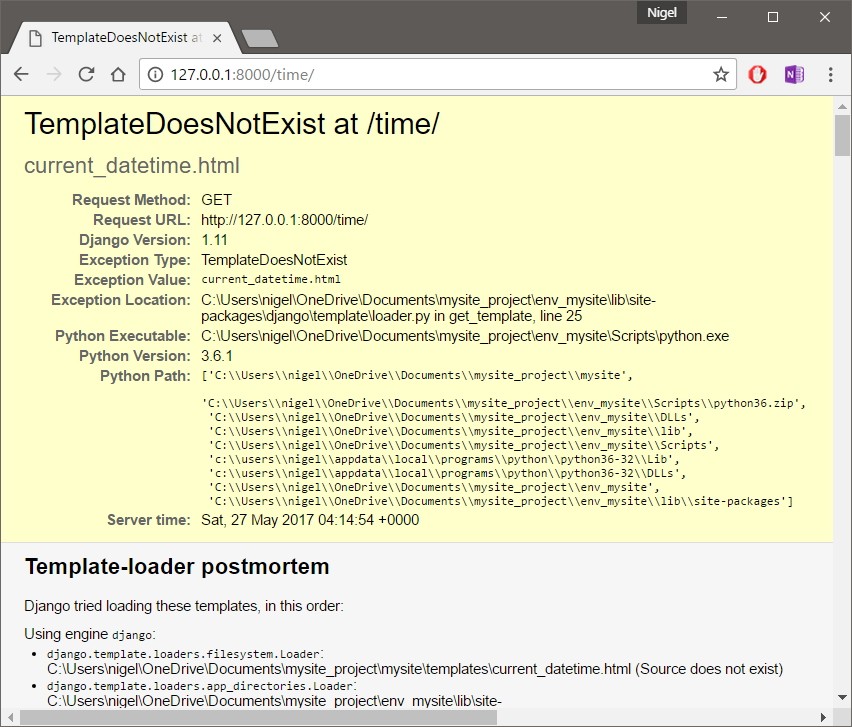

This error page is similar to the one explained earlier, with one additional piece of debugging information: a “Template-loader postmortem” section. This section tells you which templates Django tried to load, along with the reason each attempt failed (e.g., “File does not exist”). This information is invaluable when you’re trying to debug template-loading errors.
To solve our missing template problem, let’s create the current_datetime.html file using the following template code:
# \mysite_project\mysite\templates\current_datetime.html

<html>
<body>
It is now {{ current_date }}
</body>
</html>
It is now {{ current_date }}.
Save this file to the \mysite\templates directory you created previously. Refresh the page in your web browser, and you should see the fully rendered page
render()
So far, I’ve shown you how to load a template, fill a Context and return an HttpResponse object with the result of the rendered template. Next step was to optimize it to use get_template() instead of hard-coding templates and template paths.
Django’s developers recognized that, because this is such a common idiom, Django needed a shortcut that could do all this in one line of code. This shortcut is a function called render(), which lives in the module django.shortcuts. Most of the time, you’ll be using render() rather than loading templates and creating Context and HttpResponse objects manually – however, it’s useful to remember the complete process because it does come in handy for some non-standard use-cases.
Here’s the ongoing current_datetime example rewritten to use render():
from django.shortcuts import render
import datetime

def current_datetime(request):
now = datetime.datetime.now()
return render(request, 'current_datetime.html', {'current_date': now})
What a difference! Let’s step through the code changes:
- We no longer have to import get_template, Template, Context, or HttpResponse. Instead, we import django.shortcuts.render. The import datetime remains.
- Within the current_datetime function, we still calculate now, but the template loading, context creation, template rendering, and HttpResponse creation are all taken care of by the render() call. Because render() returns an HttpResponse object, we can simply return that value in the view.
The first argument to render() is the request, the second is the name of the template to use. The third argument, if given, should be a dictionary to use in creating a Context for that template. If you don’t provide a third argument, render() will use an empty dictionary.
Template Subdirectories
It can get unwieldy to store all of your templates in a single directory. You might like to store templates in subdirectories of your template directory, and that’s fine.
In fact, I recommend doing so; some more advanced Django features (such as the generic views system) expect this template layout as a default convention. It also gives your templates their own namespace, the utility of which we will explore later in the book when we start building Django apps.
Storing templates in subdirectories of your template directory is easy. In your calls to get_template(), just include the subdirectory name and a slash before the template name, like so:
t = get_template('dateapp/current_datetime.html')
Because render() is a small wrapper around get_template(), you can do the same thing with the second argument to render(), like this:
return render(request, 'dateapp/current_datetime.html', {'current_date': now})
There’s no limit to the depth of your subdirectory tree. Feel free to use as many subdirectories as you like. As with all other methods in this chapter, Windows users must remember to use forwardslashes (/) in path names, not backslashes (\).
The include Template Tag
Now that we’ve covered the template-loading mechanism, we can introduce a built-in template tag that takes advantage of it: {% include %}.
This tag allows you to include the contents of another template. The argument to the tag should be the name of the template to include, and the template name can be either a variable or a hard-coded (quoted) string, in either single or double quotes.
Anytime you have the same code in multiple templates, consider using an {% include %} to remove the duplication. These two examples include the contents of the template nav.html. The examples are equivalent and illustrate that either single or double quotes are allowed:
{% include 'nav.html' %}
{% include "nav.html" %}
This example includes the contents of the template includes/nav.html:
{% include 'includes/nav.html' %}
This example includes the contents of the template whose name is contained in the variable template_name:
{% include template_name %}
the {% include %} tag also allows relative paths:
{% include './nav.html' %}
{% include '../nav_base.html' %}
As in get_template(), the file name of the template is determined by either adding the path to the \templates directory in the current Django app (if APPS_DIR is True) or by adding the template directory from DIRS to the requested template name. Included templates are evaluated with the context of the template that’s including them.
For example, consider these two templates:
# mypage.html

<html>
<body>
{% include "includes/nav.html" %}
<h1>{{ title }}</h1>
</body>
</html>

# includes/nav.html

You are in: {{ current_section }}
If you render mypage.html with a context containing current_section, then the variable will be available in the “included” template, as you would expect.
If, in an {% include %} tag, a template with the given name isn’t found, Django will do one of two things:
- If DEBUG is set to True, you’ll see the TemplateDoesNotExist exception on a Django error page.
- If DEBUG is set to False, the tag will fail silently, displaying nothing in the place of the tag.
There is no shared state between included templates – each include is a completely independent rendering process. Blocks are evaluated before they are included. This means that a template that includes blocks from another will contain blocks that have already been evaluated and rendered – not blocks that can be overridden by, for example, an extending template.