Selenium is a set of different software tools each with a different approach to supporting test automation. Most Selenium QA Engineers focus on the one or two tools that most meet the needs of their project, however learning all the tools will give you many different options for approaching different test automation problems. The entire suite of tools results in a rich set of testing functions specifically geared to the needs of testing of web applications of all types. These operations are highly flexible, allowing many options for locating UI elements and comparing expected test results against actual application behavior. One of Selenium’s key features is the support for executing one’s tests on multiple browser platforms.
Selenium’s Tool Suite
Selenium is composed of multiple software tools. Each has a specific role.
Selenium 2 (aka. Selenium Webdriver): Selenium 2 is the future direction of the project and the newest addition to the Selenium toolkit. This brand new automation tool provides all sorts of awesome features, including a more cohesive and objects oriented API as well as an answer to the limitations of the old implementation.
As you can read in Brief History of The Selenium Project, both the Selenium and WebDriver developers agreed that both tools have advantages and that merging the two projects would make a much more robust automation tool.
Selenium 2.0 is the product of that effort. It supports the WebDriver API and underlying technology, along with the Selenium 1 technology underneath the WebDriver API for maximum flexibility in porting tests. In addition, Selenium 2 still runs Selenium 1’s Selenium RC interface for backwards compatibility.
Selenium 1 (aka. Selenium RC or Remote Control: As you can read in Brief History of The Selenium Project, Selenium RC was the main Selenium project for a long time, before the WebDriver/Selenium merge brought up Selenium 2, the newest and more powerful tool. Now Selenium 1 is deprecated and is not actively supported (mostly in maintenance mode).
Selenium IDE: Selenium IDE (Integrated Development Environment) is a prototyping tool for building test scripts. It is a Firefox plugin and provides an easy-to-use interface for developing automated tests. Selenium IDE has a recording feature, which records user actions as they are performed and then exports them as a reusable script in one of many programming languages that can be later executed.
Even though Selenium IDE has a “Save” feature that allows users to keep the tests in a table-based format for later import and execution, it is not designed to run test passes nor is it designed to build all the automated tests you will need. Specifically, Selenium IDE doesn’t provide iteration or conditional statements for test scripts. At the time of writing there is no plan to add such thing. The reasons are partly technical and partly based on the Selenium developers encouraging best practices in test automation which always requires some amount of programming. Selenium IDE is simply intended as a rapid prototyping tool. The Selenium developers recommend for serious, robust test automation either Selenium 2 or Selenium 1 to be used with one of the many supported programming languages.
Selenium-Grid: Selenium-Grid allows the Selenium RC solution to scale for large test suites and for test suites that must be run in multiple environments. Selenium Grid allows you to run tests in parallel, that is, different tests can be run at the same time on different remote machines. This has two advantages. First, if you have a large test suite, or a slow-running test suite, you can boost its performance substantially by using Selenium Grid to divide test suite to run different tests at the same time using those different machines. Also, if you must run test suite on multiple environments you can have different remote machines supporting and running tests in them at the same time. In each case Selenium Grid greatly improves the time it takes to run suite by making use of parallel processing.
Supported Browsers and Platforms
In Selenium 2.0, the supported browsers vary depending on whether you are using Selenium-WebDriver or Selenium-RC.
Selenium-WebDriver
Selenium-WebDriver supports the following browsers along with the operating systems these browsers are compatible with
Google Chrome
Internet Explorer 6, 7, 8, 9, 10 – 32 and 64-bit where applicable
Firefox: latest ESR, previous ESR, current release, one previous release
Safari
Opera
HtmlUnit
phantomjs
Android (with Selendroid or appium)
iOS (with ios-driver or appium)
Selenium 1.0 and Selenium-RC.
This is the old, support platform for Selenium 1.0. It should still apply to the Selenium 2.0 release of Selenium-RC.
| Browser | Selenium IDE | Selenium 1 (RC) | Operating Systems |
| Firefox 3.x | Record and playback tests | Start browser, run tests | Windows, Linux, Mac |
| Firefox 3 | Record and playback tests | Start browser, run tests | Windows, Linux, Mac |
| Firefox 2 | Record and playback tests | Start browser, run tests | Windows, Linux, Mac |
| IE 8 | Test execution only via Selenium RC* | Start browser, run tests | Windows |
| IE 7 | Test execution only via Selenium RC* | Start browser, run tests | Windows |
| IE 6 | Test execution only via Selenium RC* | Start browser, run tests | Windows |
| Safari 4 | Test execution only via Selenium RC | Start browser, run tests | Windows, Mac |
| Safari 3 | Test execution only via Selenium RC | Start browser, run tests | Windows, Mac |
| Safari 2 | Test execution only via Selenium RC | Start browser, run tests | Windows, Mac |
| Opera 10 | Test execution only via Selenium RC | Start browser, run tests | Windows, Linux, Mac |
| Opera 9 | Test execution only via Selenium RC | Start browser, run tests | Windows, Linux, Mac |
| Opera 8 | Test execution only via Selenium RC | Start browser, run tests | Windows, Linux, Mac |
| Google Chrome | Test execution only via Selenium RC | Start browser, run tests | Windows, Linux, Mac |
| Others | Test execution only via Selenium RC | Partial support possible** | As applicable |
* Tests developed on Firefox via Selenium IDE can be executed on any other supported browser via a simple Selenium RC command line.
** Selenium RC server can start any executable, but depending on browser security settings there may be technical limitations that would limit certain features.
Selenium Principles
The overarching themes or guiding principles of the architecture and development of the Selenium are
- Keep the costs down.
- Emulate the user.
- Prove the drivers work……but you shouldn’t need to understand how everything works.
- Lower the bus factor.
- Have sympathy for a Javascript implementation.
- Every method call is an RPC call.
- It is an Open Source project.
Keep the Costs Down
Supporting X browsers on Y platforms is inherently an expensive proposition, both in terms of initial development and maintenance. If we can find some way to keep the quality of the product high without violating too many of the other principles, then that’s the route we favor. This is most clearly seen in our adoption of Javascript where possible, as you’ll read about shortly.
Emulate the User
WebDriver is designed to accurately simulate the way that a user will interact with a web application. A common approach for simulating user input is to make use of Javascript to synthesize and fire the series of events that an app would see if a real user were to perform the same interaction. This “synthesized events” approach is fraught with difficulties as each browser, and sometimes different versions of the same browser, fire slightly different events with slightly different values. To complicate matters, most browsers won’t allow a user to interact in this way with form elements such as file input elements for security reasons.
Where possible WebDriver uses the alternative approach of firing events at the OS level. As these “native events” aren’t generated by the browser this approach circumvents the security restrictions placed on synthesized events and, because they are OS specific, once they are working for one browser on a particular platform reusing the code in another browser is relatively easy. Sadly, this approach is only possible where WebDriver can bind closely with the browser and where the development team have determined how best to send native events without requiring the browser window to be focused (as Selenium tests take a long time to run, and it’s useful to be able to use the machine for other tasks as they run). At the time of writing, this means that native events can be used on Linux and Windows, but not Mac OS X.
No matter how WebDriver is emulating user input, we try hard to mimic user behavior as closely as possible. This in contrast to RC, which provided APIs that operated at a level far lower than that which a user works at.
Prove the Drivers Work
It may be an idealistic, “motherhood and apple pie” thing, but I believe there’s no point in writing code if it doesn’t work. The way we prove the drivers work on the Selenium project is to have an extensive set of automated test cases. These are typically “integration tests”, requiring the code to be compiled and making use of a browser interacting with a web server, but where possible we write “unit tests”, which, unlike an integration test can be run without a full recompilation. At the time of writing, there are about 500 integration tests and about 250 unit tests that could be run across each and every browser. We add more as we fix issues and write new code, and our focus is shifting to writing more unit tests.
Not every test is run against every browser. Some test specific capabilities that some browsers don’t support, or which are handled in different ways on different browsers. Examples would include the tests for new HTML5 features which aren’t supported on all browsers. Despite this, each of the major desktop browsers has a significant subset of tests run against them. Understandably, finding a way to run 500+ tests per browser on multiple platforms is a significant challenge, and it’s one that the project continues to wrestle with.
You Shouldn’t Need to Understand How Everything Works
Very few developers are proficient and comfortable in every language and technology we use. Consequently, our architecture needs to allow developers to focus their talents where they can do the most good, without needing them to work on pieces of the codebase where they are uncomfortable.
Lower the Bus Factor
There’s a (not entirely serious) concept in software development called the “bus factor”. It refers to the number of key developers who would need to meet some grisly end—presumably by being hit by a bus—to leave the project in a state where it couldn’t continue. Something as complex as browser automation could be especially prone to this, so a lot of our architectural decisions are made to raise this number as high as possible.
Have Sympathy for a Javascript Implementation
WebDriver falls back to using pure Javascript to drive the browser if there is no other way of controlling it. This means that any API we add should be “sympathetic” to a Javascript implementation. As a concrete example, HTML5 introduces LocalStorage, an API for storing structured data on the client-side. This is typically implemented in the browser using SQLite. A natural implementation would have been to provide a database connection to the underlying data store, using something like JDBC. Eventually, we settled on an API that closely models the underlying Javascript implementation because something that modeled typical database access APIs wasn’t sympathetic to a Javascript implementation.
Every Call Is an RPC Call
WebDriver controls browsers that are running in other processes. Although it’s easy to overlook it, this means that every call that is made through its API is an RPC call and therefore the performance of the framework is at the mercy of network latency. In normal operation, this may not be terribly noticeable—most OSes optimize routing to localhost—but as the network latency between the browser and the test code increases, what may have seemed efficient becomes less so to both API designers and users of that API.
This introduces some tension into the design of APIs. A larger API, with coarser functions would help reduce latency by collapsing multiple calls, but this must be balanced by keeping the API expressive and easy to use. For example, there are several checks that need to be made to determine whether an element is visible to an end-user. Not only do we need to take into account various CSS properties, which may need to be inferred by looking at parent elements, but we should probably also check the dimensions of the element. A minimalist API would require each of these checks to be made individually. WebDriver collapses all of them into a single isDisplayed method.
This Is Open Source
Although it’s not strictly an architectural point, Selenium is an Open Source project. The theme that ties all the above points together is that we’d like to make it as easy as possible for a new developer to contribute. By keeping the depth of knowledge required as shallow as possible, using as few languages as necessary and by relying on automated tests to verify that nothing has broken, we hopefully enable this ease of contribution.
Originally the project was split into a series of modules, with each module representing a particular browser with additional modules for common code and for support and utility code. Source trees for each binding were stored under these modules. This approach made a lot of sense for languages such as Java and C#, but was painful to work with for Rubyists and Pythonistas. This translated almost directly into relative contributor numbers, with only a handful of people able and interested to work on the Python and Ruby bindings. To address this, in October and November of 2010 the source code was reorganized with the Ruby and Python code stored under a single top-level directory per language. This more closely matched the expectations of Open Source developers in those languages, and the effect on contributions from the community was noticeable almost immediately.
The WebDriver Design
The WebDriver’s API is referred as “object-based”. The interfaces are clearly defined and try to adhere to having only a single role or responsibility, but rather than modeling every single possible HTML tag as its own class we only have a single WebElement interface. By following this approach developers who are using an IDE which supports auto-completion can be led towards the next step to take. The result is that coding sessions may look like this (in Java):
WebDriver driver = new FirefoxDriver();
driver.<user hits space>
At this point, a relatively short list of 13 methods to pick from appears. The user selects one:
driver.findElement(<user hits space>)
Most IDEs will now drop a hint about the type of the argument expected, in this case a “By”. There are a number of preconfigured factory methods for “By” objects declared as static methods on the By itself. Our user will quickly end up with a line of code that looks like:
driver.findElement(By.id(“some_id”));
Selenium Layers
A browser automation tool is essentially built of three moving parts:
- A way of interrogating the DOM.
- A mechanism for executing Javascript.
- Some means of emulating user input.
The lingua franca of the browser is Javascript, and this seems like the ideal language to use when interrogating the DOM. Although this choice seems obvious, making it leads to some interesting challenges and competing requirements that need balancing when thinking about Javascript.
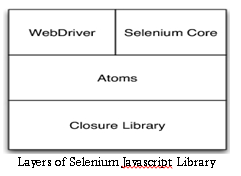
Like most large projects, Selenium makes use of a layered set of libraries. The bottom layer is Google’s Closure Library, which supplies primitives and a modularization mechanism allowing source files to be kept focused and as small as possible. Above this, there is a utility library providing functions that range from simple tasks such as getting the value of an attribute, through determining whether an element would be visible to an end user, to far more complex actions such as simulating a click using synthesized events. Within the project, these are viewed as offering the smallest units of browser automation, and so are called Browser Automation Atoms or atoms. Finally, there are adapter layers that compose atoms in order to meet the API contracts of both WebDriver and Core.
The Closure Library was chosen for several reasons. The main one was that the Closure Compiler understands the modularization technique the Library uses. The Closure Compiler is a compiler targeting Javascript as the output language. “Compilation” can be as simple as ordering input files in dependency order, concatenating and pretty printing them, or as complex as doing advanced minification and dead code removal. Another undeniable advantage was that several members of the team doing the work on the Javascript code were very familiar with Closure Library.
This “atomic” library of code is used pervasively throughout the project when there is a requirement to interrogate the DOM. For RC and those drivers largely composed of Javascript, the library is used directly, typically compiled as a monolithic script. For drivers written in Java, individual functions from the WebDriver adapter layer are compiled with full optimization enabled, and the generated Javascript included as resources in the JARs. For drivers written in C variants, such as the iPhone and IE drivers, not only are the individual functions compiled with full optimization, but the generated output is converted to a constant defined in a header which is executed via the driver’s normal Javascript execution mechanism on demand. Although this seems like a strange thing to do, it allows the Javascript to be pushed into the underlying driver without needing to expose the raw source in multiple places.
Because the atoms are used pervasively it’s possible to ensure consistent behavior between the different browsers, and because the library is written in Javascript and doesn’t require elevated privileges to execute the development cycle, is easy and fast. The Closure Library can load dependencies dynamically, so the Selenium developer need only write a test and load it in a browser, modifying code and hitting the refresh button as required. Once the test is passing in one browser, it’s easy to load it in another browser and confirm that it passes there. Because the Closure Library does a good job of abstracting away the differences between browsers, this is often enough, though it’s reassuring to know that there are continuous builds that will run the test suite in every supported browser.
Originally Core and WebDriver had many areas of congruent code—code that performed the same function in slightly different ways. When we started work on the atoms, this code was combed through to try and find the “best of breed” functionality. After all, both projects had been used extensively and their code was very robust so throwing away everything and starting from scratch would not only have been wasteful but foolish. As each atom was extracted, the sites at which it would be used were identified and switched to using the atom.
Role-based Interfaces
Think of a simplified Shop class. Every day, it needs to be restocked, and it collaborates with a Stockist to deliver this new stock. Every month, it needs to pay staff and taxes. For the sake of argument, let’s assume that it does this using an Accountant. One way of modeling this looks like:
public interface Shop {
void addStock(StockItem item, int quantity);
Money getSalesTotal(Date startDate, Date endDate);
}
Selenium team had two choices about where to draw the boundaries when defining the interface between the Shop, the Accountant and the Stockist. This would mean that both Accountant and Stockist would accept a Shop as an argument to their respective methods. The drawback here, though, is that it’s unlikely that the Accountant really wants to stack shelves, and it’s probably not a great idea for the Stockist to realize the vast mark-up on prices that the Shop is adding.
Two interfaces are needed, that the Shop needs to implement, but these interfaces clearly define the role that the Shop fulfills for both the Accountant and the Stockist. They are role-based interfaces:
public interface HasBalance { Money getSalesTotal(Date startDate, Date endDate); }
public interface Stockable { void addStock(StockItem item, int quantity); }
public interface Shop extends HasBalance, Stockable { }
Setting Up a Selenium-WebDriver Project
To install Selenium means to set up a project in a development so you can write a program using Selenium. How you do this depends on programming language and development environment.
Java
The easiest way to set up a Selenium 2.0 Java project is to use Maven. Maven will download the java bindings (the Selenium 2.0 java client library) and all its dependencies, and will create the project for you, using a maven pom.xml (project configuration) file. Once you’ve done this, you can import the maven project into preferred IDE, IntelliJ IDEA or Eclipse.
First, create a folder to contain Selenium project files. Then, to use Maven, you need a pom.xml file. This can be created with a text editor. We won’t teach the details of pom.xml files or for using Maven since there are already excellent references on this. pom.xml file will look something like this. Create this file in the folder you created for project.
<?xml version=”1.0″ encoding=”UTF-8″?>
<project xmlns=”http://maven.apache.org/POM/4.0.0″
xmlns:xsi=”http://www.w3.org/2001/XMLSchema-instance”
xsi:schemaLocation=”http://maven.apache.org/POM/4.0.0 http://maven.apache.org/xsd/maven-4.0.0.xsd”>
<modelVersion>4.0.0</modelVersion>
<groupId>MySel20Proj</groupId>
<artifactId>MySel20Proj</artifactId>
<version>1.0</version>
<dependencies>
<dependency>
<groupId>org.seleniumhq.selenium</groupId>
<artifactId>selenium-java</artifactId>
<version>2.45.0</version>
</dependency>
</dependencies>
</project>
Be sure you specify the most current version. At the time of writing, the version listed above was the most current, however there were frequent releases immediately after the release of Selenium 2.0. Check the Maven download page for the current release and edit the above dependency accordingly.
Now, from a command-line, CD into the project directory and run maven as follows.
mvn clean install
This will download Selenium and all its dependencies and will add them to the project. Finally, import the project into preferred development environment. For those not familiar with this, we’ve provided an appendix which shows this.
C#
As of Selenium 2.2.0, the C# bindings are distributed as a set of signed dlls along with other dependency dlls. Prior to 2.2.0, all Selenium dll’s were unsigned. To include Selenium in project, simply download the latest selenium-dotnet zip file from http://selenium-release.storage.googleapis.com/index.html. If you are using Windows Vista or above, you should unblock the zip file before unzipping it: Right click on the zip file, click “Properties”, click “Unblock” and click “OK”.
Unzip the contents of the zip file, and add a reference to each of the unzipped dlls to project in Visual Studio (or IDE of choice).
Python
If you are using Python for test automation then you probably are already familiar with developing in Python. To add Selenium to Python environment run the following command from a command-line.
pip install selenium
Pip requires pip to be installed, pip also has a dependency on setuptools.
Alternately, you can download the source distribution from PyPI (e.g. selenium-2.45.tar.gz), unarchive it, and run:
python setup.py install
Both of the methods described above install selenium as a system-wide package and will require administrative/root access to the machine. You may consider using virtualenv to create isolated Python environments. Python 3.4 has pyvenv which is almost same as virtualenv.
An example having the steps to open a new Firefox browserand load the page at the given URL
from selenium import webdriver
browser = webdriver.Firefox()
browser.get(‘http://seleniumhq.org/’)
Ruby
If you are using Ruby for test automation then you probably are already familiar with developing in Ruby. To add Selenium to Ruby environment run the following command from a command-line.
gem install selenium-webdriver
The Ruby bindings for Selenium/WebDriver are available as the selenium-webdriver gem. There are many other Selenium gems out there, but this is the only official, maintained gem. The bindings support Ruby 1.9.2 through 2.1.
- API docs
- Changelog
The gem also includes the older selenium-client gem for use with Selenium RC. When reading the docs, keep in mind that these two namespaces refer to different APIs:
- Selenium::WebDriver – the WebDriver API
- Selenium::Client – Selenium RC API (previously released as the selenium-client gem)
The WebDriver API is the successor to the Selenium RC API. For people who don’t have a significant investment in the legacy API, we recommend starting directly with Selenium::WebDriver, and focusing on the two main classes, Selenium::WebDriver::Driver and Selenium::WebDriver::Element. This is the entry point to the whole WebDriver API.
Perl
Perl bindings are provided by a third party. Perl modules that are needed to make it work are
- Selenium::Remote::Driver
- Test::More
Selenium::Remote::Driver – Perl Client for Selenium Remote Driver, it is used to connect to Selenium server (Hub/Node) remotely and send command to the WebDriver API. Install this module with CPAN a s
cpan -i Selenium::Remote::Driver Test::More
In Perl script, load this module at the beginning of the script with the other ones that you would normally use like so:
#!/usr/bin/perl
use strict;
use warnings;
use Test::More;
use Selenium::Remote::Driver;
Use the following in Perl script to connect to a Selenium hub or node by specifying the server’s IP address, the browser type and/or version you want to test with:
my $driver = Selenium::Remote::Driver->new(
‘remote_server_addr’ => ‘localhost’,
‘browser_name’ => ‘phantomjs’,
‘port’ => ‘5555’,
);
Test::More – Yet another framework for writing test scripts. It will generate TAP test results which can be integrated into Jenkins for CI (continues integration) or Nagios for monitoring test results.
PHP
PHP bindings are provided by a third party, please refer to any of their documentation on how to install / get started. There are three known bindings at this time
- By Chibimagic (https://github.com/chibimagic/WebDriver-PHP/) – These are the PHP bindings for the WebDriver API in Selenium 2. It’s designed to work with PHPUnit and includes some built-ins for running tests at Sauce Labs. An example test includes, starting up the Selenium 2 standalone server and run the test with “phpunit SampleTest.php” but, make sure phpunit is in path.
- By Lukasz Kolczynski (http://code.google.com/p/php-webdriver-bindings/) – This PHP library allows creating functional webdriver tests with PHP. Library comunicates with Selenium Server using JsonWireProtocol and requires curl in PHP.
- By the Facebook (https://github.com/facebook/php-webdriver) – This WebDriver client aims to be as close as possible to bindings in other languages. The concepts are very similar to the Java, .NET, Python and Ruby bindings for WebDriver.
Selenium-WebDriver API by Example
WebDriver is a tool for automating web application testing, and in particular to verify that they work as expected. It aims to provide a friendly API that’s easy to explore and understand, easier to use than the Selenium-RC (1.0) API, which will help to make tests easier to read and maintain. It’s not tied to any particular test framework, so it can be used equally well in a unit testing or from a plain old “main” method. This section introduces WebDriver’s API and helps get you started becoming familiar with it. Start by setting up a WebDriver project if you haven’t already.
Once project is set up, you can see that WebDriver acts just as any normal library: it is entirely self-contained, and you usually don’t need to remember to start any additional processes or run any installers before using it, as opposed to the proxy server with Selenium-RC.
Additional steps are required to use Chrome Driver, Opera Driver, Android Driver and iOS Driver
You’re now ready to write some code. An easy way to get started is this example, which searches for the term “Cheese” on Google and then outputs the result page’s title to the console.
An example in Java language, is
package org.openqa.selenium.example;
import org.openqa.selenium.By;
import org.openqa.selenium.WebDriver;
import org.openqa.selenium.WebElement;
import org.openqa.selenium.firefox.FirefoxDriver;
import org.openqa.selenium.support.ui.ExpectedCondition;
import org.openqa.selenium.support.ui.WebDriverWait;
public class Selenium2Example {
public static void main(String[] args) {
// Create a new instance of the Firefox driver
// Notice that the remainder of the code relies on the interface,
// not the implementation.
WebDriver driver = new FirefoxDriver();
// And now use this to visit Google
driver.get(“http://www.google.com”);
// Alternatively the same thing can be done like this
// driver.navigate().to(“http://www.google.com”);
// Find the text input element by its name
WebElement element = driver.findElement(By.name(“q”));
// Enter something to search for
element.sendKeys(“Cheese!”);
// Now submit the form. WebDriver will find the form for us from the element
element.submit();
// Check the title of the page
System.out.println(“Page title is: ” + driver.getTitle());
// Google’s search is rendered dynamically with JavaScript.
// Wait for the page to load, timeout after 10 seconds
(new WebDriverWait(driver, 10)).until(new ExpectedCondition<Boolean>() {
public Boolean apply(WebDriver d) {
return d.getTitle().toLowerCase().startsWith(“cheese!”);
}
});
// Should see: “cheese! – Google Search”
System.out.println(“Page title is: ” + driver.getTitle());
//Close the browser
driver.quit();
}
}
Selenium-WebDriver API Commands and Operations
To check what all we have in WebDriver, create a driver object from WebDriver and press dot key. This will list down all the methods of WebDriver. Methods followed by Object keyword are the generic methods gets from Object Class in Java. You will find these method for every object of java language.
Method
A Java method is a collection of statements that are grouped together to perform an operation.
- Method Name: To access any method of any class, we need to create an object of class and then all the public methods will appear for the object.
- Parameter: It is an argument which is passed to a method as a parameter to perform some operation. Every argument must pass with the same data type. For e.g. get(String arg0) : void. This is asking for a String type argument.
- Return Type: Method can return a value or returning nothing (void). If the void is mentioned after the method, it means the method is returning no value. And if it is returning any value, then it must display the type of the value for e.g. getTitle() : String.

Fetching a Page
The first thing you’re likely to want to do with WebDriver is navigate to a page. The normal way to do this is by calling “get”:
driver.get(“http://www.google.com”);
Dependent on several factors, including the OS/Browser combination, WebDriver may or may not wait for the page to load. In some circumstances, WebDriver may return control before the page has finished, or even started, loading. To ensure robustness, you need to wait for the element(s) to exist in the page using Explicit and Implicit Waits.
Getting UI Elements (WebElements)
It can be done as
| Method | Description |
| clear() | If this element is a text entry element, this will clear the value. |
| click() | Click this element. |
| findElement(By by) | Find the first WebElement using the given method. |
| findElements(By by) | Find all elements within the current context using the given mechanism. |
| getAttribute(java.lang.String name) | Get the value of a the given attribute of the element. |
| getCssValue(java.lang.String
propertyName) |
Get the value of a given CSS property. |
| getLocation() | Where on the page is the top left-hand corner of the rendered element? |
| getSize() | What is the width and height of the rendered element? |
| getTagName() | Get the tag name of this element. |
| getText() | Get the visible (i.e. |
| isDisplayed() | Is this element displayed or not? This method avoids the problem of having to parse an element’s “style” attribute. |
| isEnabled() | Is the element currently enabled or not? This will generally return true for everything but disabled input elements. |
| isSelected() | Determine whether or not this element is selected or not. |
| sendKeys(java.lang.CharSequence… keysToSend) | Use this method to simulate typing into an element, which may set its value. |
| submit() | If this current element is a form, or an element within a form, then this will be submitted to the remote server. |
