You can build forms by writing templates in the Angular template syntax with the form-specific directives and techniques described in this page.
You can also use a reactive (or model-driven) approach to build forms. However, this page focuses on template-driven forms.
You can build almost any form with an Angular template—login forms, contact forms, and pretty much any business form. You can lay out the controls creatively, bind them to data, specify validation rules and display validation errors, conditionally enable or disable specific controls, trigger built-in visual feedback, and much more.
Angular makes the process easy by handling many of the repetitive, boilerplate tasks you’d otherwise wrestle with yourself.
Features of template driven forms, are
- Easier to use
- Suitable for simple scenarios
- Uses Two way data binding(using [(NgModel)] syntax)
- Minimal component code
- Automatic track of the form and its data(handled by Angular)
- Unit testing is challenge
You’ll learn to build a template-driven form that looks like this:
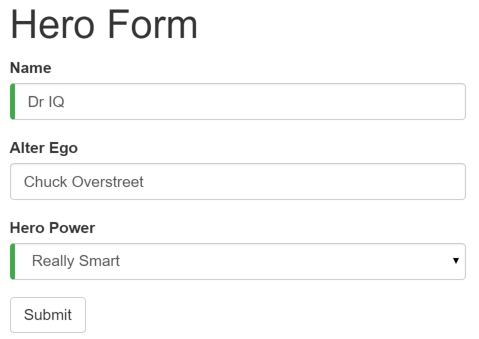
The Hero Employment Agency uses this form to maintain personal information about heroes. Every hero needs a job. It’s the company mission to match the right hero with the right crisis.
Two of the three fields on this form are required. Required fields have a green bar on the left to make them easy to spot. If you delete the hero name, the form displays a validation error in an attention-grabbing style:
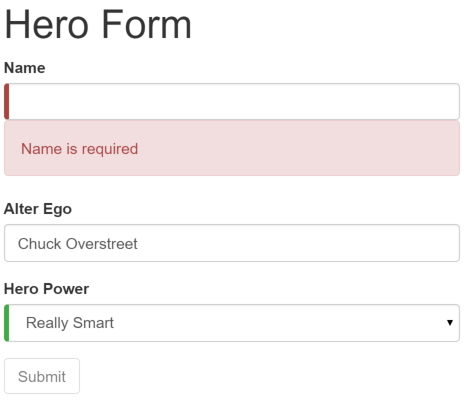
Note that the Submit button is disabled, and the “required” bar to the left of the input control changes from green to red. You can customize the colors and location of the “required” bar with standard CSS.
You’ll build this form in small steps:
- Create the Hero model class.
- Create the component that controls the form.
- Create a template with the initial form layout.
- Bind data properties to each form control using the ngModel two-way data-binding syntax.
- Add a name attribute to each form-input control.
- Add custom CSS to provide visual feedback.
- Show and hide validation-error messages.
- Handle form submission with ngSubmit.
- Disable the form’s Submit button until the form is valid.
Create the Hero model class
As users enter form data, you’ll capture their changes and update an instance of a model. You can’t lay out the form until you know what the model looks like.
A model can be as simple as a “property bag” that holds facts about a thing of application importance. That describes well the Hero class with its three required fields (id, name, power) and one optional field (alterEgo).
In the app directory, create the following file with the given content:
src/app/hero.ts
export class Hero {
constructor(
public id: number,
public name: string,
public power: string,
public alterEgo?: string
) { }
}
It’s an anemic model with few requirements and no behavior. Perfect for the demo. The TypeScript compiler generates a public field for each public constructor parameter and automatically assigns the parameter’s value to that field when you create heroes. The alterEgo is optional, so the constructor lets you omit it; note the question mark (?) in alterEgo?.
You can create a new hero like this:
src/app/hero-form.component.ts (SkyDog)
let myHero = new Hero(42, ‘SkyDog’,
‘Fetch any object at any distance’,
‘Leslie Rollover’);
console.log(‘My hero is called ‘ + myHero.name); // “My hero is called SkyDog”
Create a form component
An Angular form has two parts: an HTML-based template and a component class to handle data and user interactions programmatically. Begin with the class because it states, in brief, what the hero editor can do.
Create the following file with the given content:
src/app/hero-form.component.ts (v1)
import { Component } from ‘@angular/core’;
import { Hero } from ‘./hero’;
@Component({
selector: ‘hero-form’,
templateUrl: ‘./hero-form.component.html’
})
export class HeroFormComponent {
powers = [‘Really Smart’, ‘Super Flexible’,
‘Super Hot’, ‘Weather Changer’];
model = new Hero(18, ‘Dr IQ’, this.powers[0], ‘Chuck Overstreet’);
submitted = false;
onSubmit() { this.submitted = true; }
// TODO: Remove this when we’re done
get diagnostic() { return JSON.stringify(this.model); }
}
There’s nothing special about this component, nothing form-specific, nothing to distinguish it from any component you’ve written before.
Understanding this component requires only the Angular concepts covered in previous pages.
- The code imports the Angular core library and the Hero model you just created.
- The @Component selector value of “hero-form” means you can drop this form in a parent template with a <hero-form> tag.
- The templateUrl property points to a separate file for the template HTML.
- You defined dummy data for model and powers, as befits a demo.
Down the road, you can inject a data service to get and save real data or perhaps expose these properties as inputs and outputs for binding to a parent component. This is not a concern now and these future changes won’t affect the form.
- You added a diagnostic property to return a JSON representation of the model. It’ll help you see what you’re doing during development; you’ve left yourself a cleanup note to discard it later.
Why the separate template file?
Why don’t you write the template inline in the component file as you often do elsewhere?
There is no “right” answer for all occasions. Inline templates are useful when they are short. Most form templates aren’t short. TypeScript and JavaScript files generally aren’t the best place to write (or read) large stretches of HTML, and few editors help with files that have a mix of HTML and code.
Form templates tend to be large, even when displaying a small number of fields, so it’s usually best to put the HTML template in a separate file. You’ll write that template file in a moment. First, revise the app.module.ts and app.component.ts to make use of the new HeroFormComponent.
Revise app.module.ts
app.module.ts defines the application’s root module. In it you identify the external modules you’ll use in the application and declare the components that belong to this module, such as the HeroFormComponent.
Because template-driven forms are in their own module, you need to add the FormsModule to the array of imports for the application module before you can use forms.
Replace the contents of the “QuickStart” version with the following:
src/app/app.module.ts
import { NgModule } from ‘@angular/core’;
import { BrowserModule } from ‘@angular/platform-browser’;
import { FormsModule } from ‘@angular/forms’;
import { AppComponent } from ‘./app.component’;
import { HeroFormComponent } from ‘./hero-form.component’;
@NgModule({
imports: [
BrowserModule,
FormsModule
],
declarations: [
AppComponent,
HeroFormComponent
],
bootstrap: [ AppComponent ]
})
export class AppModule { }
There are three changes:
- You import FormsModule and the new HeroFormComponent.
- You add the FormsModule to the list of imports defined in the @NgModule decorator. This gives the application access to all of the template-driven forms features, including ngModel.
- You add the HeroFormComponent to the list of declarations defined in the @NgModule decorator. This makes the HeroFormComponent component visible throughout this module.
If a component, directive, or pipe belongs to a module in the imports array, don’t re-declare it in the declarations array. If you wrote it and it should belong to this module, do declare it in the declarations array.
Revise app.component.ts
AppComponent is the application’s root component. It will host the new HeroFormComponent.
Replace the contents of the “QuickStart” version with the following:
src/app/app.component.ts
import { Component } from ‘@angular/core’;
@Component({
selector: ‘my-app’,
template: ‘<hero-form></hero-form>’
})
export class AppComponent { }
There are only two changes. The template is simply the new element tag identified by the component’s selector property. This displays the hero form when the application component is loaded. You’ve also dropped the name field from the class body.
Create an initial HTML form template
Create the template file with the following contents:
src/app/hero-form.component.html
<div class=”container”>
<h1>Hero Form</h1>
<form>
<div class=”form-group”>
<label for=”name”>Name</label>
<input type=”text” class=”form-control” id=”name” required>
</div>
<div class=”form-group”>
<label for=”alterEgo”>Alter Ego</label>
<input type=”text” class=”form-control” id=”alterEgo”>
</div>
<button type=”submit” class=”btn btn-success”>Submit</button>
</form>
</div>
The language is simply HTML5. You’re presenting two of the Hero fields, name and alterEgo, and opening them up for user input in input boxes.
The Name <input> control has the HTML5 required attribute; the Alter Ego <input> control does not because alterEgo is optional. You added a Submit button at the bottom with some classes on it for styling. You’re not using Angular yet. There are no bindings or extra directives, just layout.
In template driven forms, if you’ve imported FormsModule, you don’t have to do anything to the <form> tag in order to make use of FormsModule. Continue on to see how this works.
The container, form-group, form-control, and btn classes come from Twitter Bootstrap. These classes are purely cosmetic. Bootstrap gives the form a little style. Angular forms don’t require a style library
Angular makes no use of the container, form-group, form-control, and btn classes or the styles of any external library. Angular apps can use any CSS library or none at all. To add the stylesheet, open index.html and add the following link to the <head>:
src/index.html (bootstrap)
<link rel=”stylesheet”
href=”https://unpkg.com/bootstrap@3.3.7/dist/css/bootstrap.min.css”>
Add powers with *ngFor
The hero must choose one superpower from a fixed list of agency-approved powers. You maintain that list internally (in HeroFormComponent).
You’ll add a select to the form and bind the options to the powers list using ngFor, a technique seen previously in the Displaying Data page.
Add the following HTML immediately below the Alter Ego group:
src/app/hero-form.component.html (powers)
<div class=”form-group”>
<label for=”power”>Hero Power</label>
<select class=”form-control” id=”power” required>
<option *ngFor=”let pow of powers” [value]=”pow”>{{pow}}</option>
</select>
</div>
This code repeats the <option> tag for each power in the list of powers. The pow template input variable is a different power in each iteration; you display its name using the interpolation syntax.
Two-way data binding with ngModel
Running the app right now would be disappointing.
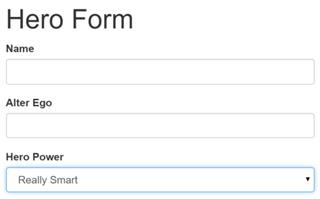
You don’t see hero data because you’re not binding to the Hero yet. You know how to do that from earlier pages. Displaying Data teaches property binding. User Input shows how to listen for DOM events with an event binding and how to update a component property with the displayed value.
Now you need to display, listen, and extract at the same time. You could use the techniques you already know, but instead you’ll use the new [(ngModel)] syntax, which makes binding the form to the model easy.
Find the <input> tag for Name and update it like this:
src/app/hero-form.component.html (excerpt)
<input type=”text” class=”form-control” id=”name”
required
[(ngModel)]=”model.name” name=”name”>TODO: remove this: {{model.name}}
You added a diagnostic interpolation after the input tag so you can see what you’re doing. You left yourself a note to throw it away when you’re done.
Focus on the binding syntax: [(ngModel)]=”…”.
You need one more addition to display the data. Declare a template variable for the form. Update the <form> tag with #heroForm=”ngForm” as follows:
src/app/hero-form.component.html (excerpt)
<form #heroForm=”ngForm”>
The variable heroForm is now a reference to the NgForm directive that governs the form as a whole.
The NgForm directive
What NgForm directive? You didn’t add an NgForm directive.
Angular did. Angular automatically creates and attaches an NgForm directive to the <form> tag.
The NgForm directive supplements the form element with additional features. It holds the controls you created for the elements with an ngModel directive and name attribute, and monitors their properties, including their validity. It also has its own valid property which is true only if every contained control is valid.
If you ran the app now and started typing in the Name input box, adding and deleting characters, you’d see them appear and disappear from the interpolated text. At some point it might look like this:

The diagnostic is evidence that values really are flowing from the input box to the model and back again. That’s two-way data binding.
Notice that you also added a name attribute to the <input> tag and set it to “name”, which makes sense for the hero’s name. Any unique value will do, but using a descriptive name is helpful. Defining a name attribute is a requirement when using [(ngModel)] in combination with a form.
Internally, Angular creates FormControl instances and registers them with an NgForm directive that Angular attached to the <form> tag. Each FormControl is registered under the name you assigned to the name attribute.
Add similar [(ngModel)] bindings and name attributes to Alter Ego and Hero Power. You’ll ditch the input box binding message and add a new binding (at the top) to the component’s diagnostic property. Then you can confirm that two-way data binding works for the entire hero model.
After revision, the core of the form should look like this:
src/app/hero-form.component.html (excerpt)
{{diagnostic}}
<div class=”form-group”>
<label for=”name”>Name</label>
<input type=”text” class=”form-control” id=”name”
required
[(ngModel)]=”model.name” name=”name”></div>
<div class=”form-group”>
<label for=”alterEgo”>Alter Ego</label>
<input type=”text” class=”form-control” id=”alterEgo”
[(ngModel)]=”model.alterEgo” name=”alterEgo”></div>
<div class=”form-group”>
<label for=”power”>Hero Power</label>
<select class=”form-control” id=”power”
required
[(ngModel)]=”model.power” name=”power”><option *ngFor=”let pow of powers” [value]=”pow”>{{pow}}</option>
</select>
</div>
- Each input element has an id property that is used by the label element’s for attribute to match the label to its input control.
- Each input element has a name property that is required by Angular forms to register the control with the form.
If you run the app now and change every hero model property, the form might display like this:
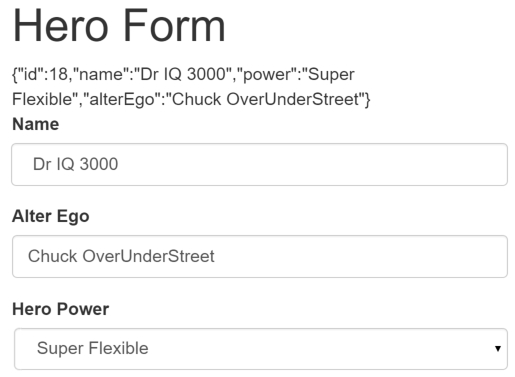
The diagnostic near the top of the form confirms that all of your changes are reflected in the model. Delete the {{diagnostic}} binding at the top as it has served its purpose.
Track control state and validity with ngModel
Using ngModel in a form gives you more than just two-way data binding. It also tells you if the user touched the control, if the value changed, or if the value became invalid.
The NgModel directive doesn’t just track state; it updates the control with special Angular CSS classes that reflect the state. You can leverage those class names to change the appearance of the control.
| State | Class if true | Class if false |
| The control has been visited. | ng-touched | ng-untouched |
| The control’s value has changed. | ng-dirty | ng-pristine |
| The control’s value is valid. | ng-valid | ng-invalid |
Temporarily add a template reference variable named spy to the Name <input> tag and use it to display the input’s CSS classes.
src/app/hero-form.component.html (excerpt)
<input type=”text” class=”form-control” id=”name”
required
[(ngModel)]=”model.name” name=”name”#spy>
<br>TODO: remove this: {{spy.className}}
Now run the app and look at the Name input box. Follow these steps precisely:
- Look but don’t touch.
- Click inside the name box, then click outside it.
- Add slashes to the end of the name.
- Erase the name.
You should see the following transitions and class names:
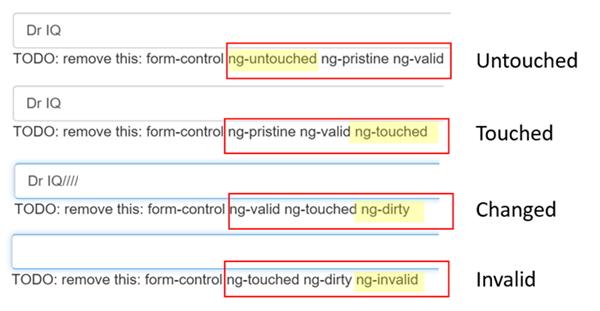
The ng-valid/ng-invalid pair is the most interesting, because you want to send a strong visual signal when the values are invalid. You also want to mark required fields. To create such visual feedback, add definitions for the ng-* CSS classes.
Delete the #spy template reference variable and the TODO as they have served their purpose.
