Creating a table
A table is used to organize information into an easy-to read format. A table displays information in horizontal rows and vertical columns. The insertion of an arrow and a column creates a cell in which we can enter data or other information.
| A | B | C | D | |
| 1 | Cell A1 | |||
| 2 | ||||
| 3 | ||||
| 4 | Cell C4 |
A letter and a number, called a table reference, identify cells in a table. Columns are identified from cells left to right beginning with the letter A, and rows are numbered from top to bottom beginning with the number 1. The table reference of the top most cell is A1. Tables are effective way of presenting information.
| Region | Annual sales (Rs.) | Average production (in units) |
| Dhanbad | 232325 | 32434 |
| Ranchi | 4334354 | 342423 |
Words include different methods we can use to create tables. One method (Table/Convert Text to Table) will quickly convert text that is arranged in columns into a table. Another method is Table Insert /Table commands to create a simple table consisting of the same number of rows and columns. Finally, Table/Draw Table is used to create any type of table but is most useful for creating complex tables that contain cells of different heights or varying number of columns per row. The insert Table drop-down menu displays a grid in which we specify the number of rows and columns for the table. Moving the mouse pointer over the grid highlights the boxes in the grid and defines the table size. The dimensions are reflected in the bottom of the grid.
In case we want to add some contents to the table we can modify the table by inserting rows above or below and columns to the left of the selected or to the right of the selected one. To enhance the appearance of the table, we can apply many different formats to the cells. This is similar to apply different formatting to the document.
Sorting a table
To quickly arrange the references in alphabetical order, we can sort the list. Word can quickly sort paragr4aphs in alphabetical, numeric, or date order based on the first characters in each paragraph. The sort order can be ascending (A to Z or 0-9). The rules used while sorting are
| Sort by | Rules |
| Text | First items beginning with punctuation marks or symbols (such as !@#&) are sorted. Second, items beginning with numbers are sorted Dates are treated as three digit numbers Third, items beginning with letters are sorted |
| Numbers | All characters except numbers are ignored. The numbers can be in any location in a paragraph |
| Date | Valid date separators include hyphens, forward slash (/), commas, and periods. Colons (:) are valid time separators. If unable to recognize a data or time. Word replaces the item at the beginning or end of the list depending on whether we are sorting in ascending or descending order. |
Inserting rows or columns to a table
The following steps have to be taken for adding a column or row in a table
- Select the same number of rows or columns as the number of rows or columns we want to insert.
- On the Tables and Borders toolbar, click the arrow next to Insert Table, and then click the Insert command we want.
There are other ways to do the above task like we can also use the Draw Table tool to draw the row or column where we want. For quickly add a row at the end of a table, click the last cell of the last row, and then press the TAB key and to add a column to the right of the last column in a table, click just outside the rightmost column. On the Table menu, point to Insert, and then click Columns to the Right.
Adding border to a table
- Do one of the following
- To add a border to a table, click anywhere in the table.
- To add borders to specific cells, select the cells, including the end-of-cell mark.
- On the Format menu, click Borders and Shading, and then click the Borders tab. When we insert a table, it has a black ½-pt solid single-line border by default. Use the Style, Color, and Width options to add a different border.
- Make sure the correct option Table or Cell is selected under Apply to. Select the other options we want.
- To specify that only particular sides get borders, click Custom under Setting. Under Preview, click the diagram’s sides, or use the buttons to apply and remove borders.
- To specify the exact position of the border relative to the text, click Paragraph under Apply to, click Options, and then select the options we want.
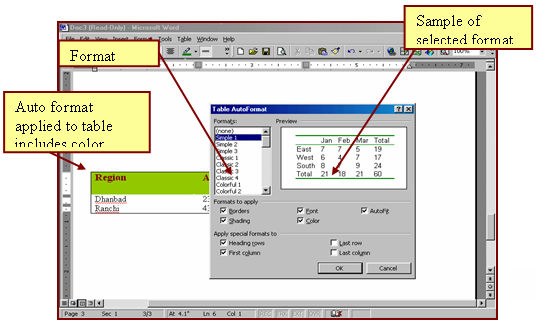
We can use the Table AutoFormat command to add borders and shading to a table automatically.
Adding shading to a table
We can use shading to fill in the background of a table, a paragraph, or selected text.
- To add shading to a table, click anywhere in the table. To add shading to specific cells, select the cells, including the end-of-cell marks. To add shading to a paragraph, click anywhere in the paragraph. To add shading to specific text, such as a word, select the text.
- On the Format menu, click Borders and Shading, and then click the Shading tab.
- Select the options we want.
- Under Apply to, click the part of the document we want to apply shading to. For example, if we clicked a cell without selecting it in step 1, click Cell. Otherwise, Word applies the shading to the entire table.
We can use the Table AutoFormat command to add borders and shading to a table automatically.
Format a table
- Click the table.
- On the Table menu, click Table AutoFormat.
- In the Formats box, click the format we want.
- Select the options we want.
Center text
- Select the text we want to center.
- On the Formatting toolbar, click Center
Perform calculations in a table
Calculations can be performed in an MS-WORD table by
- Click the cell in which we want the result to appear.
- On the Table menu, click Formula.
- If Word proposes a formula that we do not want to use, delete it from the Formula box.
- In the Paste function box, click a function. For instance, to add numbers, click SUM. To reference the contents of a table cell, type the cell references in the parentheses in the formula. For instance, to add the numbers in cells A1 and B4, the formula would read =SUM(a1,b4)
- In the Number format box, enter a format for the numbers. For example, to display the numbers as a decimal percentage, click 0.00%.
