Slide Management
To create a new slide
- Choose the slide after which a new slide has to be inserted.
- Click on Insert menu > New Slide or click the New Slide button “New Slide” on the Standard toolbar. In all views except Outline View, the New Slide dialog box appears.
- Select a layout and then click OK, in the Choose an Auto Layout list.
For changing the layout of the slide
- Select the slide to be changed, in Slide View.
- Select Slide Layout from the Format menu.
For deleting a slide, perform the following steps
- Select the slide or slides to be deleted from the Slide Sorter View. Use the Shift key to select the continuous range of slides or the Ctrl key for a non-continuous range or in Slide Sorter View, click and drag a box around the slides to be selected (marquee selection).
- From the Edit menu, select Delete Slide or press Delete key.
Slide Views
Various views in which the presentation and slide can be viewed are
- Normal View includes panes for presentation’s outline, current slide and notes for that slide.
- Slide Sorter View displays all the slides in presentation as thumbnails (small size pictures). Use it to rearrange the slides in presentation and add transition effects between them.
- Slide Show View displays presentation as an electronic slide show. Use Slide Show View to deliver presentation.
Slide animation
Few more changes can be made before the final presentation. The slide show can have a few more settings apart from the default ones in a slide show, the slides fill the screen and all the screen elements like menus and tools are hidden. The slides can advance manually or automatically according to the advance option set. For the manual advance option, you will need to click the mouse button or press the Arrow keys or Spacebar, or Page Up or Page Down keys on the keyboard.
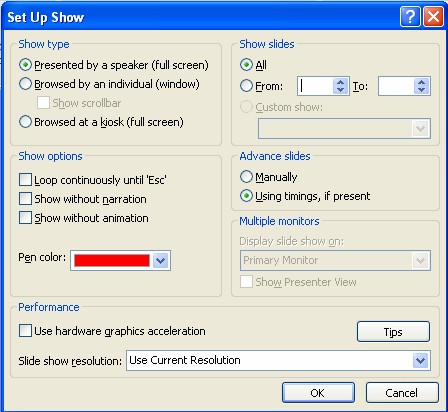
Setting a Slide Show
From the Slide Show menu, select Set up Show. A Set up Show dialog box appears as shown in the dialog box as under.
- Select all to show all slides in the presentation or select from and then enter a slide range.
- Under Advance, select Manual Advance option to make the slides advance at the mouse click.
- Using Timings, if present to run the slide show using the previously set timings.
- In the Show Type options, leave the first option selected for a typical presentation. Select the Loop Continuously until Esc, to run the slide show continuously until the Esc key is pressed.
- Click OK.
Setting Slide Timings
Separate timings can be set for all the slides in the presentation. Slides are displayed for the length of time set for it. You can have the first slide appear for 10 seconds, the second slide for 15 seconds, the third for 8 seconds, and so on. The slide timings can be set in two different ways using Advance in the Transition dialog box, or using the Rehearse New Timings option in the Slide Show dialog box.
Setting slide timings manually
- Choose the slide for which the timings are to be set.
Select the Slide Transition, from the Slide Show menu. The slide transition dialog box appears. - For Advance, select the automatically after option to advance to the next slide after preset time. Type the number of seconds that you want the slide to be on the screen before advancing to the next slide.
Controlling the Slide Show
While you view a slide show you can do more than just move from slide to slide. When you move the mouse, Arrow/Highlighter a box will appear at the bottom left corner of the slide show. Click that button, and MS-PowerPoint displays a pop-up menu that contains commands which you can use to give the presentation.
