Using Nessus
First, start the Nessus server:
[root]# nessusd &Before you can connect to the server, you need to add a Nessus user . Do this by executing the nessus-adduser executable. Note that Nessus is responsible for authenticating and authoring its users, so a Nessus user has no connection with a Unix or Linux user account. Next, run the nessus executable from the host on which you installed Nessus or on a remote host that will connect to the Nessus server.
Make sure you select the “Nessusd host” tab, as shown in Figure 1-1. Input the IP address or hostname of the host where the Nessus server is running, along with the login information as applicable to the Nessus user you created. Click the “Log in” button to connect to the Nessus server.
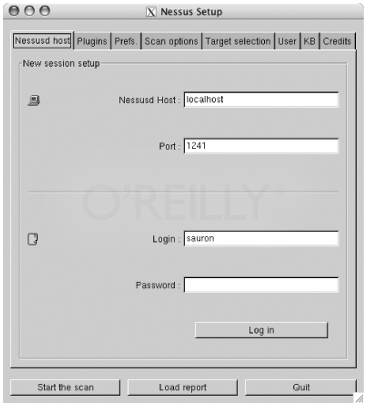
Figure 1-1. Logging in to the Nessus server using the GUI client
Next, select the Plugins tab to look at the different options available. For example, select “CGI abuses” from the “Plugin selection” list, and you should see a list of plug-ins available to you, as shown in Figure 1-2.
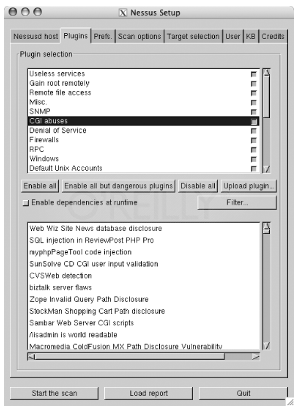
Figure 1-2. Selecting Nessus plug-ins
The “Enable all but dangerous plugins” button disables plug-ins known to crash remote services. Also take a look at the scans listed under the Denial of Service family. Because these plug-ins perform tests that can cause remote hosts or services to crash, it is a good idea to uncheck these boxes when scanning hosts that provide critical services.
Use the Filter… button to search for specific plug-ins. For example, you can search for vulnerability checks that have a certain word in their description, or you can search by the Common Vulnerabilities and Exposures (CVE) name of a specific vulnerability. The CVE database is available at http://www.cve.mitre.org/cve/index.html. It is up to the author of each specific vulnerability-check plug-in to make sure she provides all appropriate information and to ensure that the plug-in is placed under the proper category. As you might note by looking at the descriptions of some of the vulnerability checks, some plug-in authors do not do a good job of filling in this information.
Next, select the Prefs tab and you will be provided with a list of options, as presented in Figure 1-3.
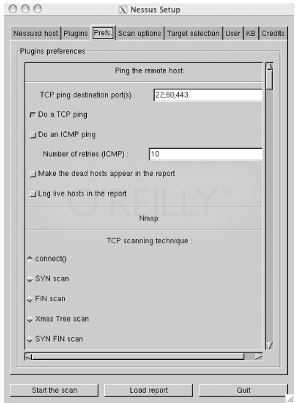
Figure 1-3. Nessus preferences
The Prefs tab contains a list of options that affect the way Nessus performs its scans. Most of the options are self-explanatory. One important preference is that of Nmap options. Nmap is one of the best port scanners available today, and Nessus can use it to port-scan target hosts (make sure to select Nmap in the “Scan options” tab). You can download Nmap from http://www.insecure.org/nmap/.
The “connect( )” TCP scanning option completes the three-way TCP handshake to identify open ports. This means services running on the ports scanned will likely log the connection attempts. A “SYN” scan does not complete the TCP handshake. It only sends a TCP packet with the SYN flag set and waits for a response. If an RST packet is received as a response, the target host is deemed alive but the port is closed. If a TCP packet with both the SYN and ACK flags enabled is received, the port on the target host is noted to be listening for incoming connections. Because this method does not complete the TCP handshake, it is stealthier, so services running on that port will not detect it. Note that a firewall on the target host or before the host can skew the results.
Select the “Scan options” tab and your Nessus client window should look similar to Figure 1-4. The “Port range” option allows you to specify what network ports to scan on the target hosts. TCP and UDP ports range from 1 to 65,535. Specify default to instruct Nessus to scan the common network ports listed in the nessus-services text file. If you know the target host is listening on a nonstandard port, specify it. If Nessus does not scan for a specific port, it will never realize it is open, and this might cause real vulnerabilities to go undiscovered.
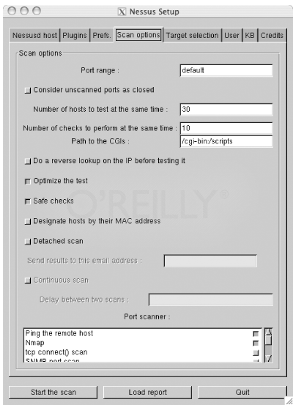
Figure 1-4. Nessus scan options
The “Safe checks” option causes Nessus to rely on version information from network service banners to determine if they are vulnerable. This can cause false positives, or it can cause specific vulnerabilities to go undiscovered, so use this option with care. Because enabling this option causes Nessus to perform less intrusive tests by relying on banners, this option is useful when scanning known hosts whose uptime is critical.
The “Port scanner” section is where you select the type of port scan you want Nessus to perform. If most of the target hosts are known to be behind a firewall or do not respond to ICMP echo requests, uncheck the “Ping the remote host” option.
In the “Target selection” tab, enter the IP address of the hosts you want to scan. Enter more than one IP address by separating each with a comma. You can also enter a range of IP addresses using a hyphen—for example, 192.168.1.1-10. Alternatively, you can place IP addresses in a text file and ask Nessus to read the file by clicking the “Read file…” button. Once you are done entering the target IP addresses and you are sure you are ready to go, click the “Start the scan” button to have Nessus begin scanning.
When Nessus completes scanning for vulnerabilities, it presents you with a report, as shown in Figure 1-5.

Figure 1-5. Nessus report
Click the “Save report…” button to save the report in one of various available formats (HTML, XML, LaTeX, ASCII, and Nessus BackEnd). The items with a lightbulb next to them are notes that provide information about a service or suggest best practices to help you better secure your hosts. The items with an exclamation mark beside them are findings that suggest a security warning when a mild security vulnerability is discovered. Items that have the no-entry symbol next to them suggest a severe security hole. The authors of individual security-check plug-ins decide if a given vulnerability is mild or severe. For more information, see the Section 1.12.4 later in this chapter.
Apply for Network Security Open Source Software Developer Certification Now!!
https://www.vskills.in/certification/network-security-open-source-software-developer-certification
