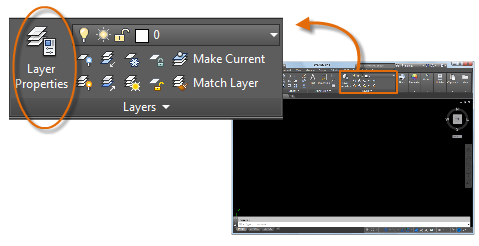
To see how a drawing is organized, use the LAYER command to open the Layer Properties Manager. You can either enter LAYER or LA in the Command window, or you can click the Layer Properties tool on the ribbon.
Here’s what the Layer Properties Manager displays in this drawing.
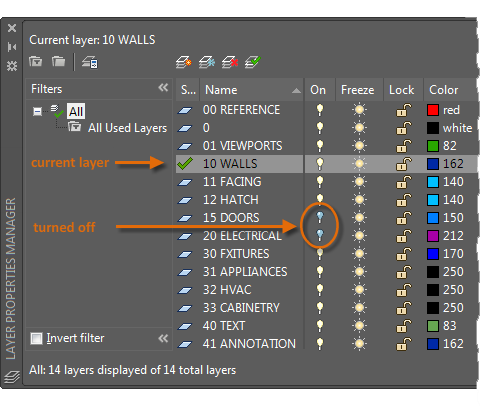
As indicated, layer 10 WALLS is the current layer. All new objects are automatically placed on that layer. In the list of layers, the green check next to layer 10 WALLS confirms that it is the current layer. In the column labeled On, notice that the light bulb icons for two layers are dark. These layers were turned off to hide the doors and electrical wiring in the floor plan.
Notice that each layer name starts with a two-digit number. This convention makes it easy to control the order of the layers because their order does not depend on the alphabet.
For complex drawings, you might want to consider a more elaborate layer naming standard. For example, layer names could begin with 3 digits followed by a naming code that accommodates multiple floors in a building, project numbers, sets of survey and property data, and so on.
Few Recommendations
- Layer 0 is the default layer that exists in all drawings and has some esoteric properties. Instead of using this layer, it’s best to create your own layers with meaningful names.
- Any drawing that contains at least one dimension object automatically includes a reserved layer named Defpoints.
- Create a layer for behind-the-scenes construction geometry, reference geometry, and notes that you usually do not need to see or print.
- Create a layer for layout viewports. Information about layout viewports is covered in the Layouts topic.
- Create a layer for all hatches and fills. This lets you to turn them all on or off in one action.
Layer Settings
The following are the most commonly used layer settings in the Layer Properties Manager. You click the icon to turn the setting on and off.
- Turn off layers. You turn off layers to reduce the visual complexity of your drawing while you work.

- Freeze layers. You freeze layers that you do not need to access for a while. Freezing layers is similar to turning them off, but improves performance in very large drawings.

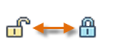
- Lock layers. You lock layers when you want to prevent accidental changes to the objects on those layers. Also, the objects on locked layers appear faded, which helps reduce the visual complexity of your drawing, but still lets you see the objects faintly.
- Set default properties. You set the default properties for each layer, including color, linetype, lineweight, and transparency. New objects that you create will use these properties unless you override them.
Controls in the Layer Properties Manager
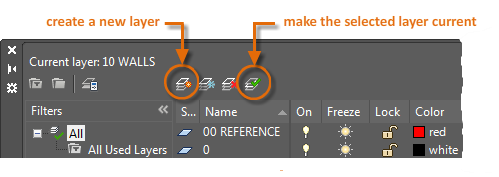
To create a new layer, click the button shown and enter the name of the new layer. To make a different layer the current one, click the layer and then click the indicated button.
Quick Access to Layer Settings
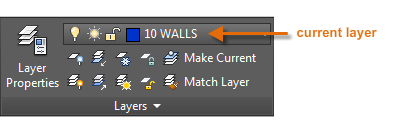
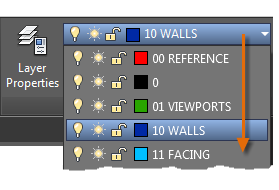
The Layer Properties Manager takes up a lot of space, and you don’t always need to access all the options. For quick access to the most common layer controls, use the controls on the ribbon. When no objects are selected, the Layers panel on the Home tab displays the name of the current layer as shown here. Occasionally, check to make sure that the objects you create will be on the correct layer. It’s easy to forget to do this, but it’s also easy to set. Click the drop-down arrow to display a list of layers, and then click a layer on the list to make it the current layer. You can also click on any icon in the list to change its setting.
Maintain Your Standards
It’s critically important either to establish or to conform to a company-wide layer standard. With a layer standard, drawing organization will be more logical, consistent, compatible, and maintainable over time and across departments. Layer standards are essential for team projects.
If you create a standard set of layers and save them in a drawing template file, those layers will be available when you start a new drawing, and you can start working immediately. Additional information about drawing template files is presented in the Basics topic.
The LAYER (Command)
It is used to manage layers and layer properties. It displays the Layer Properties Manager. If you enter -LAYER at the Command prompt, options are displayed.
Use layers to control the visibility of objects and to assign properties such as color and linetype. Objects on a layer normally assume the properties of that layer. However, you can override any layer property of an object. For example, if an object’s color property is set to BYLAYER, the object displays the color of that layer. If the object’s color is set to Red, the object displays as red, regardless of the color assigned to that layer.
Create a Layer
- In the Layer Properties Manager, click New Layer.
 A layer name is added to the layer list.
 - Enter a new layer name by typing over the highlighted layer name. Layer names can be up to 255 characters long (double-byte or alphanumeric), and include letters, numbers, spaces, and several special characters. Layer names cannot include the following characters: < > / \ “ : ; ? * | = ‘
- For complex drawings with many layers, enter descriptive text in the Description column.
- Specify the settings and default properties of the new layer by clicking in each column.
Rename a Layer
- In the Layer Properties Manager, click to select a layer.
- Click the layer name or press F2.
- Enter a new name.
Remove a Layer
- In the Layer Properties Manager, click to select a layer.
- Click Delete Layer.

The following layers cannot be deleted:
- Layers 0 and Defpoints
- Layers containing objects, including objects in block definitions
- The current layer
- Layers used in an external reference
Change the Properties Assigned to Layers
- If you want to change multiple layers, use one of the following methods in the Layer Properties Manager:
- Press and hold Ctrl, and choose several layer names.
- Press and hold Shift, and choose the first and last layers in a range.
- Right-click, and click Show Filters in Layer List. Choose a layer filter from the list of layers.
- Click the current setting in the column that you want to change. The dialog box for that property displays.
- Choose the setting that you want to use.
When changing layer properties
- If the linetype you want is not displayed, click Load and use one of the following methods:
- In the Load or Reload Linetypes dialog box, choose the linetypes to load.
- In the Load or Reload Linetypes dialog box, click File to open an additional linetype definition (LIN) file. Choose the linetypes to load and click OK.
- Lineweights are not displayed automatically. If you want to display or hide lineweights, click Show/Hide Lineweight on the status bar. If no change is visible, it’s probably due to a combination of the thickness of the line compared to the display resolution of your monitor.
- Transparency is not displayed automatically. If you want to display or hide the transparency of objects, click Show/Hide Transparency on the status bar.
