Redo and Undo
These tasks are used to undo or again repeat the recent operations. Important point to note is that in MS-EXCEL once we save the file then, we can not indo the previous operations but in MS-WORD this task is possible.
| Operation | Toolbar icon | Keyboard shortcut | Edit menu option |
| Undo | | Control key then, Z key | Undo |
| Redo | | Control key then, Y key | Redo |
Cut Copy and paste data
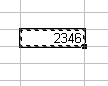
All these operations are similar to MS-Word 2003 where instead of text, we cut, copy and paste cells instead of paragraph or text. When a cell is cut or copied, a highlighted dash line surrounds it.
| Operation | Toolbar icon | Keyboard shortcut | Edit menu option |
| Cut | Control key then, X key | Cut | |
| Copy | Control key then, C key | Copy | |
| Paste | | Control key then, V key | Paste |
Highlighted cell
Clipboard Task Pane
The handy Clipboard task pane holds copied selections. Whenever you copy or cut one or more selections during your current Windows session, you can view the Clipboard task pane by choosing View, Task Pane.
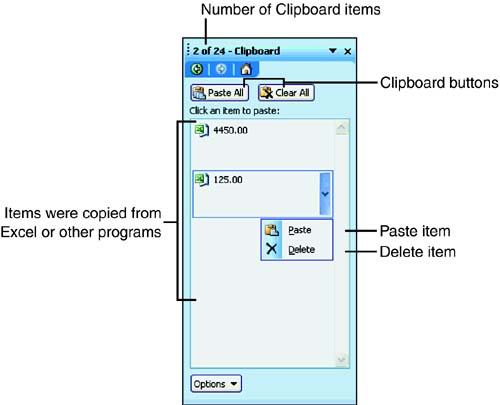
The title bar on the Clipboard task pane indicates the number of items you copied or cut and the maximum number of Clipboard items you can have, which is 24. An icon that represents the Office application from which the item was copied or cut displays at the top left of the item. The Clipboard buttons for pasting and clearing all items appear beneath the task pane toolbar.
The most recent copied or cut selection appears at the top of the Clipboard gallery. When you point to an item, a border displays with an arrow on the right border. When you click the arrow, a menu appears with the Paste and Delete commands. Choose Paste to insert the item in the current cell or choose Delete to remove the item from the Clipboard.
When you want to paste all the items on the Clipboard to the worksheet, click the Paste All button. To delete all the current Clipboard items, click the Clear All button.
The Clipboard task pane provides some wonderful advantages. Instead of having to paste the last data that you copied, you can pick and choose from previously copied data. The Clipboard task pane stores up to 24 items that you copied or cut during the current Windows session. When you close Windows, the Clipboard is automatically cleared.
Drag It and Drop
The drag-and-drop technique is a fast, easy way to copy or move data in the visible viewing area. First, select the cells you want to move or copy. When the cells appear highlighted, move the mouse pointer over the border of the selected cells. The mouse pointer takes the shape of an arrow.
If you want to copy the selected cells, press and hold the Ctrl key. (If you’re moving the cells, you don’t need to hold down any key.) Now click the mouse button and drag the border. As they’re being dragged, an outline of the selected cells appears. When the data is located in the spot in which you want it to appear, release the mouse button. The data appears in the new location as shown in
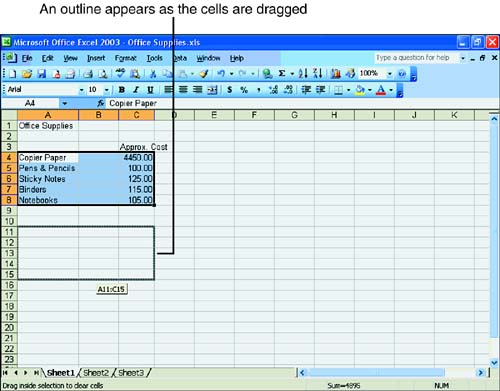
Drag-and-drop
Cell Paste Special
In edit menu this option provides the facility to paste all, formula, formats or values, which have been copied or cut. It also gives the facility to paste as transpose i.e. row and column data interchange to be pasted in column and row instead of row and column.
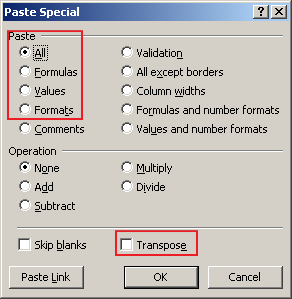
Paste special
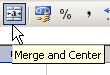
Merge Cells
Cells in Excel can be merged so that they span on more than one row and column. Steps to merge cells are given below
- Select the cells we want to merge.
- To merge cells in a row and center the cell contents, click Merge and Center on the Formatting toolbar.
To merge any selection of cells within a row or column, click Cells on the Format menu, click the Alignment tab, and then select the Merge cells check box.
Inserting cells
Insert blank cells
- Select a range of existing cells where we want to insert the new blank cells. Select the same number of cells, as we want to insert.
- On the Insert menu, click Cells.
- Click Shift cells right or Shift cells down.
Insert rows
- To insert a single row, click a cell in the row immediately below where we want the new row. For example, to insert a new row above Row 5, click a cell in Row 5.
- To insert multiple rows, select rows immediately below where we want the new rows. Select the same number of rows, as we want to insert.
- On the Insert menu, click Rows.
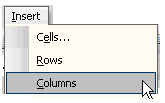
Insert columns
- To insert a single column, click a cell in the column immediately to the right of where we want to insert the new column. For example, to insert a new column to the left of Column B, click a cell in Column B.
- To insert multiple columns, select columns immediately to the right of where we want to insert the new columns. Select the same number of columns, as we want to insert.
- On the Insert menu, click Columns.
Insert moved or copied cells between existing cells
- Select the cells that contain the data we want to move or copy.
- To move the selection, click Cut. To copy the selection, click Copy.
- Select the upper-left cell where we want to place the cut or copied cells.
- On the Insert menu, click Cut Cells or Copied Cells.
- Click the direction we want to shift the surrounding cells.
Insert menu
Delete cells, rows, or columns
Following steps have to be taken
- Select the cells, rows, or columns you want to delete.
- On the Edit menu, click Delete.
- Surrounding cells shift to fill the space.
Clearing cells
This process requires following steps
- Select the cells, rows, or columns we want to clear.
- On the Edit menu, point to Clear, and then click All, Contents, Formats, or Comments.
Further, if we click a cell and then press DELETE or BACKSPACE, Microsoft Excel removes the cell contents but does not remove any comments or cell formats. If we clear a cell, Microsoft Excel removes the contents, formats, comments, or all three from a cell. The value of a cleared cell is 0 (zero), and a formula that refers to that cell will receive a value of 0.
Find, Replace and go to
Unlike MS-Word, Ms-EXCEL has different dialog boxes for go to and a combined for find and replace.
| Operation | Keyboard shortcut | Edit menu option |
| Find | Control key then, F key | Find |
| Replace | Control key then, H key | Replace |
| Go To | Control key then, G key | Go To |
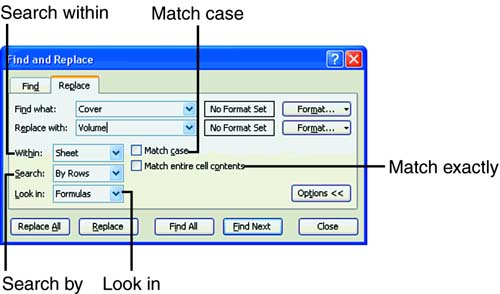
Find and Replace dialog box
Find and Replace
We can just find by clicking the find tab or if we want to replace also so we can click the replace tab. They give the option to search in the active worksheet or all worksheets of the active workbook. We can also match specific character case and search within formula also. Format specific text can also be searched or replaced.
Go To
It is used to jump to specific cell reference or via comments or formula by clicking on Special button.
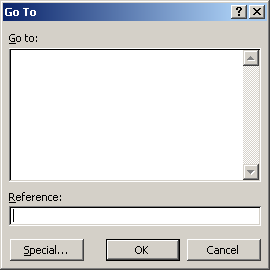
Go To dialog box
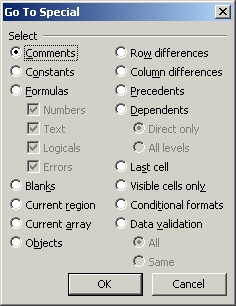
Go To Special dialog box
Working on a single worksheet
Move or copy sheets
Moving sheets within the current workbook, we can drag the selected sheets along the row of sheet tabs. To copy the sheets, hold down CTRL, and then drag the sheets; release the mouse button before we release the CTRL key.
Rename a sheet
- Double-click the sheet tab.
- Type a new name over the current name.
Delete sheets
- Select the sheets we want to delete.
- On the Edit menu, click Delete Sheet.
Adding a worksheet
To add a single worksheet, click Worksheet on the Insert menu. To add multiple worksheets, hold down SHIFT, and then click the number of worksheet tabs we want to add in the open workbook. Then click Worksheet on the Insert menu.
We can also move, copy, rename, insert and delete worksheet by right clicking the worksheet tab and selecting option in menu, as in the figure

Worksheet right click menu
Sheet Names
Each sheet in a workbook can be assigned a descriptive name to help identify the contents of the sheet. The following guidelines should be followed when naming a sheet. A sheet name
- Can be up to 31 characters
- Can be entered in uppercase or lowercase letters or a combination (it will appear as entered)
- Can contain any combination of letters, numbers and spaces.
- Cannot contain the characters:?*/ \
- Cannot be enclosed in square brackets. []
As more sheets are added to a workbook, remembering what information is in each sheet becomes more difficult. To help clarify the contents of the sheets, we can rename the sheets.
Double clicking the sheet tab activates the tab and highlights the existing sheet name. The existing name is cleared as soon as we begin to type the new name.
Working with multiple workbooks
Move or copy sheets between workbooks
Moving a sheet or copying a sheet within workbooks is performed in following manner –
- To move or copy sheets to another workbook, open the workbook that will receive sheets.
- Switch to workbook that contains sheets we want to move or copy, and then select sheets.
- On the Edit menu, click Move or Copy Sheet.
- In the To book box, click the workbook to receive the sheets.
- To move or copy the selected sheets to a new workbook, click New book.
- In the Before sheet box, click the sheet before which we want to insert the moved or copied sheets.
- To copy the sheets instead of move them, select the Create a copy check box.
Saving a workbook
When we save a workbook for the first time, we assign a file name and indicate where we want to store the file on our computer’s hard disk or in another location. Each time we subsequently save the workbook, Microsoft Excel updates the workbook file with our latest changes. For saving a workbook for the first time
- On the File menu, click Save As.
- In the Save in list, select the drive and folder where we want to save the workbook.
