Grouping worksheets to enter common data, formatting and formulas
Worksheets can be grouped by selecting all of them and then applying the changes of formatting and thus, it will be applied to all the worksheets of the workbook. Further, we can create a workbook template for new workbooks that contains the sheets, default text (such as page headers and column and row labels), formulas, macros, styles, and other formatting you want in new workbooks that you base on the template. Following steps are to be taken for it
- On the File menu, click Save As.
- In the Save as type box, click Template (*.xlt).
- In the Save in box, select the folder where you want to store the template.
- In the File name box, type book to create a default workbook template.
- To create a custom template, type any valid file name.
Inserting and formatting a Summary Worksheet
When data is in list form, Microsoft Excel can create an outline to let you hide or show levels of detail with a single mouse click. An outline lets you quickly display only the rows or columns that provide summaries or headings for sections of your worksheet, or display the areas of detail data adjacent to a summary row or column.
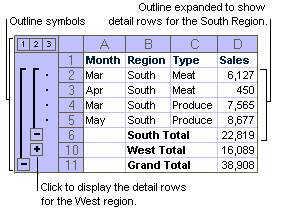
Displaying and hiding detail data – An outline can have up to eight levels of detail, with each inner level providing details for the preceding outer level. In the following example, the row containing the grand total of all the rows is level 1, the rows containing totals for the South and West regions are level 2, and the detail rows for the regions are level 3. To display only the rows for a particular level, you can click the number for the level you want to see. The detail rows for the West region are hidden, but you can click the + outline symbols to display the detail rows. As shown in the figure
Ways to outline data
Inserting automatic subtotals also creates an outline. If you use the Subtotal command (Data menu) to add subtotals to a list organized in rows, Excel outlines the worksheet so that you can show or hide as much detail as you need.
Outlining a worksheet automatically – If you have summarized data by using formulas that contain functions, such as SUM, Excel can automatically outline the data, as in the preceding example. The summary data must be adjacent to the detail data.
Outlining a worksheet manually – If the data is not organized so that Excel can outline it automatically, you can create an outline manually. For example, you’ll need to manually outline data if the rows or columns of summary data contain values instead of formulas, such as in the example below. If you want to hide the detail rows for April and May, you can do so by outlining the list manually.
Creating Linking Formulas
If you are linking to a new workbook, save the new workbook before creating the link. Then the following steps have to be taken
- In the workbook that will contain the formula, select the cell in which you want to enter the external reference.
- If you are creating a new formula, type = (an equal sign).
- If you are entering the external reference elsewhere in the formula, type the operator or function that you want to precede the external reference.
- If you want to create a link to another worksheet in the active workbook, click the worksheet that contains the cells you want to link to.
- If you want to create a link to a worksheet in another workbook, switch to the other workbook, and then click the worksheet that contains the cells you want to link to.
- Select the cells you want to link to.
- Complete the formula. When you finish entering the formula, press ENTER.
Printing multiple worksheets
If the worksheet has a defined print area, Microsoft Excel will print only the print area. If you select a range of cells to print and then click Selection, Microsoft Excel prints the selection and ignores any print area defined for the worksheet. Then following steps have to be taken
- On the File menu, click Print.
- Under Print what, select the option you want.
If you want to print more than one sheet at the same time, select the sheets before you print. We already have discussed earlier about how to select more than one worksheet.
Linking Workbooks
It can be done by creating hyperlinks and different types of hyperlinks are discussed below.
Creating a hyperlink
A hyperlink is a coloured and underlined text or a graphic that represents a link to a location in a file on a network, a local disk, or the Internet. When you click the hyperlink, the location that is specified by the hyperlink opens. We can create hyperlinks in workbooks, by using either text or graphics, which link to charts, workbooks, Web pages, or other files. Various hyperlinks can be created as
Create a hyperlink to a new file
Following steps have to be taken
- Right-click the text or graphic you want to represent the hyperlink, and then click Hyperlink on the shortcut menu.
- Under Link to, click Create new document.
- Type a name for the new file in the Name of new document box.
- To specify a location other than the one shown under Full Path, click Change and then select the location you want. Click OK.
- Under When to edit, click an option to specify whether to open the new file for editing now or later.
- To assign a tip to be displayed when you rest the pointer on the hyperlink, click ScreenTip and then type the text you want in the ScreenTip text box. Click OK.
If we do not specify a ScreenTip, the path of the new file becomes the ScreenTip.
Create a hyperlink to an existing file
Following steps have to be taken
- Right-click the text or graphic you want to represent the hyperlink, and then click Hyperlink on the shortcut menu.
- Under Link to, click Existing file or Web page.
- Do one of the following
- To select the file from a list of files you have recently used, click Recent Files and then click the file you want to link to.
- To select the file from a list of existing files, click the File button under Browse for, and then locate and double-click the file you want to link to.
- To assign a tip to be displayed when you rest the pointer on the hyperlink, click ScreenTip and then type the text you want in the ScreenTip text box. Click OK.
Create a hyperlink to a specific location in a workbook
Following steps have to be taken
To link to a location in the current workbook or another workbook, you can either define a name for the destination cells or use a cell reference
- To use a name, name the destination cells in the destination workbook.
- In the source workbook, right-click the text or graphic you want to represent the hyperlink, and then click Hyperlink on the shortcut menu.
- Do one of the following
- To link to a location in your current workbook, click Place in this document under Link to.
- To link to a location in another workbook, click Existing file or Web page under Link to.
- If you chose Existing file or Web page in step 3, locate and select the workbook you want to link to, and then click the Bookmark button under Browse for.
- Do one of the following
- In the list under Cell Reference, click the sheet you want to link to, and then type the cell reference in the Type in the cell reference box. Click OK.
- In the list under Defined Names, click the name that represents the cell or cells you want to link to. Click OK.
- To assign a tip to be displayed when you rest the pointer on the hyperlink, click ScreenTip and then type the text you want in the ScreenTip text box. Click OK.
