The various steps for adding a custom tab are
Step 1: Create the Content to Display Within Your Custom Tab
Think of your Facebook tab like an iFrame that loads inside Facebook. In other words, you can display pretty much whatever content you’d like inside your custom Facebook tab. You do this by creating a web page outside of Facebook. The contents of this page are what you’ll tell Facebook to display within your custom tab.
Important: Facebook requires you to provide a secure URL for your web page in order to set up your Facebook tab. A secure URL is a URL with “https://” instead of “http://” at the front. If the website you use to create your Facebook Page tab does not support https, Facebook will not allow you to set up a custom tab, and you’ll need to get an SSL certificate first.
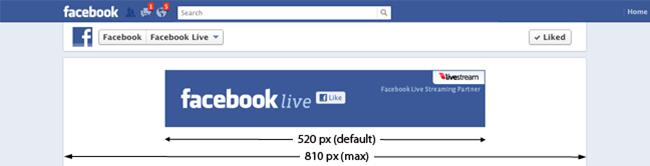
To ensure that your page’s content displays correctly on Facebook, make sure the width of your web page is either set to 100%, 520px,or 810px. Make sure all images, videos, etc. that you include on your page are also less than either 520px or 810px, depending on how wide you chose to make the content of your tab. You’ll also want to get rid of any margin or padding around the body of your content so it’s optimized for the space Facebook provides within the tab.
Since Facebook’s latest Business Page layout is wider than it used to be, I recommend making the content of your tab 810px. Facebook’s previous Business Page layout was much narrower at 520px.
Step 2: Log In to Facebook as a Facebook Developer
Visit https://developers.facebook.com/apps. You’ll be able to log in with your normal Facebook credentials.
Step 3: Create and Name Your New Tab
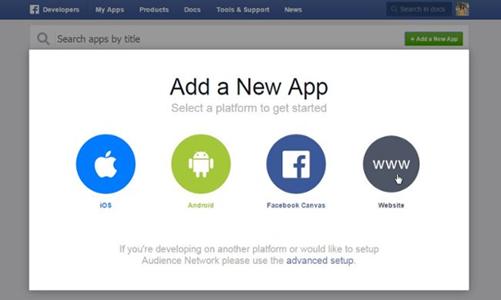
1) Click the green ‘+ Add a New App‘ button from the top right-hand corner. Then choose the ‘Website‘ button at the far right.
2) Instead of using the “Quick Start” wizard that Facebook launches (which gets confusing), click on the ‘Skip and Create App ID‘ button at the top right.

3) Here, you’ll need to provide a ‘Display Name,’ which is what your “app,” or tab, will be displayed as on your Facebook Page. You can also create a ‘namespace,’ which is basically just a unique ID for your app — although this is not required, and you’re welcome to leave it blank. Select ‘No‘ for the question about test versions — this is more applicable if you’re creating a Facebook app that you want others on Facebook to use, not if you’re just creating a custom tab for your own page. Lastly, choose ‘Apps for Pages‘ as the category, since you’re creating this app as a custom tab for your Facebook Page.
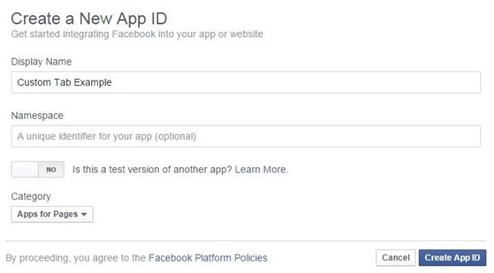
4) Click ‘Create App ID,’ and you’ll be taken to your App Dashboard for the next step. (Note: You may be required to enter a captcha first to prove you are indeed human 😉
Step 4: Configure Your Facebook Page Tab
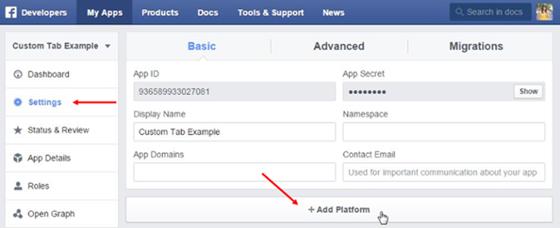
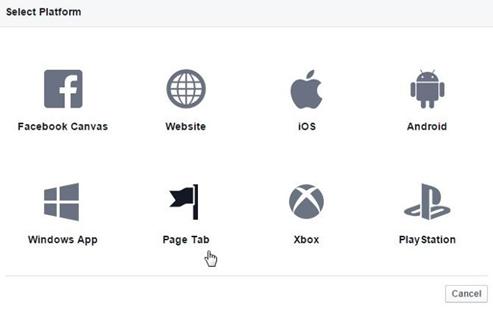
1) Once in your App Dashboard, click ‘Settings‘ in the left-hand navigation; then click the ‘+ Add Platform‘ button to start configuring your Facebook Page tab.
2) When prompted, select ‘Page Tab‘ as your platform.
3) Next, add the ‘Secure Page Tab URL‘ of the external web page you created in step 1. Remember, Facebook requires a secure URL (which starts with https://), otherwise it won’t work. Then specify whether you want a wide page tab (810px), which I recommend so your content fills the full width of the tab. This should also align with the width of the page you set up in step 1. You can leave ‘Page Tab Edit URL‘ field blank. You can also upload a ‘Page Tab Image‘ here (which must be 111 x 74 pixels), although to be honest, I’m not sure how Facebook uses this image since it no longer uses thumbnails in the Facebook tab navigation on your page.
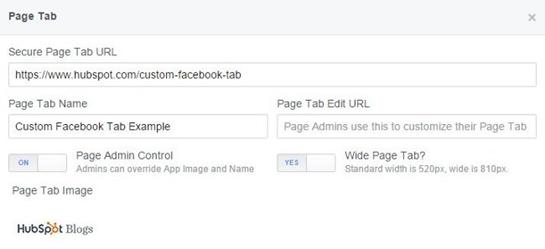
4) When you’re done editing the contents of this section, click the blue ‘Save Changes‘ button at the bottom right.
Step 5: Add Your New Custom Tab to Your Facebook Page
This step can be a bit tricky, so read carefully. In order to add your new tab to your Business Page, you’ll need to visit a link with several custom URL parameters. I know it sounds strange, but bear with me. Here’s the link you’ll need to modify:
1) First, replace the parts in red in the URL above — YOUR_APP_ID and YOUR_URL — with the ‘App ID‘ found in the basic settings for your app, and your ‘Secure Page Tab URL.’

So using my example, my new URL would be:
2) One you have your URL, visit it in your browser. When you do, this will pop up …
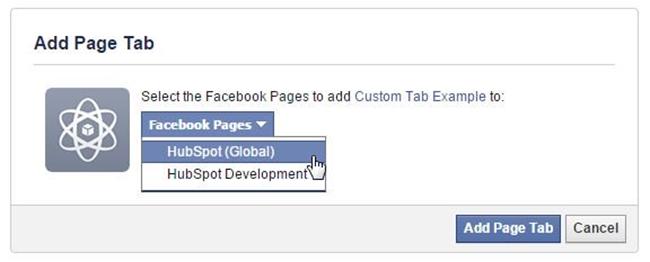
3) Last but not least, select the Facebook Page you want to add your tab to. Then click ‘Add Page Tab.’ Keep in mind that you’ll need to be an administrator of the Facebook Page in order to add the tab.
Voila! Your custom Facebook tab should now be added to your page. Go check and see!
We’ve heard rumblings of people getting 405 and 403 “Forbidden” errors within their page tabs once they’ve been set up. When a Facebook user clicks on your custom tab, their browser sends a HTTP POST request to your tab’s Secure Page Tab URL. They’ll see this error message if the page you’re using to host the content of your Facebook tab forbids HTTP POST requests. If you see these errors, your best course of action is to work with an experienced developer to help you set up your custom Facebook tab.
Step 6 (Optional): Rearrange Your Facebook Tabs
Because Facebook only allows you to display four tabs before the rest get bucketed under the ‘More’ dropdown, you can also rearrange the order of your tabs so your new custom tab appears more prominently in the main navigation of your page rather than in the ‘More’ dropdown. To rearrange your tabs, click ‘Manage Tabs‘ in the ‘More‘ drop-down menu on your Facebook Page, and then drag and drop your tabs in the order you want them to appear. Just note that ‘Timeline’ and ‘About’ must appear first no matter what.
