You can use AR studio to build stunning creative effects for the camera.
Combine your own textures and objects with AR Studio features to create a huge range of effects – from simple masks to interactive games.
Effect Lifecycle
Although your process may look a little different, this is the typical lifecycle of an effect built in AR Studio.
Research and Plan
- Get inspired
- Create a rough plan for your effect
- Find out what tools and features AR Studio has
- Create or prepare your assets in other design tools or 3D modeling programs
- Create your effect icon
Build and Test
- Create your project
- Import your assets
- Build your effect
- Preview and test it on AR Studio Player, the companion app
- Adjust the compression settings
- Export it
Maintain and Grow
- Submit your effect via Manage Effects
- Schedule and target it
- Familiarize yourself with the approval process
- Promote and share your effect
- Test and update your effect
- Resubmit it
Features
Tracking – Identify and follow multiple points on a face or track an infinite horizontal plane in your scene.
Workflow
- Use the Viewport to visualize your scene and lay out objects in 3D space accurately.
- Preview the output of a scene as it would appear on a mobile device with the Simulator.
- Use the Manipulator to adjust the position, scale and rotation of objects in the Viewport. Toggle between local and world manipulation.
- Download the AR Studio Player app to preview and test the effects you build in AR Studio on your own mobile device.
2D
- Lay 2D objects out and make them responsive to screen size.
- Group 2D objects and build layouts with contents that ‘flex’ based on the layout configuration and the space that the parent flex object takes up.
- Apply materials to flat surfaces at a fixed depth in your scene.
Text
- Add and edit both static and dynamic text, and make it responsive to screen size.
- Import and use custom fonts.
3D
- Import 3D objects created in 3D modeling programs, including those with bones and joints and group them with surface-less containers called null objects.
- Use the AR Studio face mesh to apply materials directly to tracked faces in your scene.
- Position flat 3D objects called planes at any depth in your scene.
- Transform objects in your scene using blend shapes created in 3D modeling programs.
Materials and texture maps
- Create textures in external design tools and import them into AR Studio to define the surfaces of objects in your scene.
- Use multiple texture inputs to apply a visual look to the surface of your objects.
- Import sprite sheets or sequences to add simple animations to your scene and reduce the size of your files.
- Link to textures hosted online and use them in your scene.
- Stream videos without audio into textures.
- Extract textures from nodes in the scene, like the camera or the face tracker.
- Retouch facial features like skin and teeth.
Lighting – Add realistic depth to the objects in your scene with the 4 types of lighting available in AR Studio.
Camera – Fix your objects to rotate with the camera or move them to a fixed position elsewhere in your scene. Pick which camera view objects in your scene appear in (front or back camera).
Audio – Add audio clips to your effect to create ambient and scripted sounds, or create distortion effects using the microphones in mobile devices.
Particles – Use particle systems to generate, display and move particles in your scene in great numbers.
Animation, logic and interactivity
- Add animation, logic and interactivity to your scene with or without the scripting.
- Build effects that access touch information from mobile devices.
- Pull data from your website, app or service into the scene.
- Create a link from your mobile app to your effect in the camera and pass data from your app to the effect.
Live – Use the LiveStreaming module to get information if somebody uses your effect when they go live on Facebook.
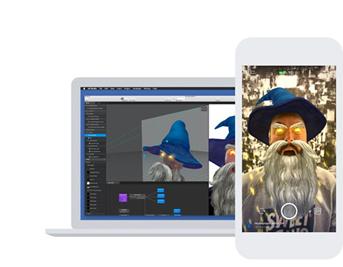
Tracking Faces
A basic mask is made up of a face tracker, a face mesh, a texture and a material. Everything except the texture can be created in AR Studio.
To get started, open AR Studio and create a new project. The face tracker is the foundation of the mask you’re creating. To insert one into your scene, click Insert, select Face Tracker and then click Insert.
You should now see axes on the face in the middle of AR Studio. This section is called the Viewport and you can use it to visualize and interact with your scene, together with the Simulator.
You should also see a face tracker listed in the Scene tab on the left. This tab lets you manage the hierarchy of objects in your scene.
Inserting Face Meshes
Next, you’ll need to insert a 3D object called a face mesh. To make the face mesh track your face, you’ll have to insert it as a child of the face tracker. To do this, right-click on the face tracker in the Scene tab, select Insert and then select Face Mesh. You should now see a face mesh in your scene. You can also create relationships between objects in the scene by dragging one on top of the other in the Scene tab.
As you can see, the face mesh doesn’t have a material yet, so we’ll take a look at this next.
Importing Texture Files
Textures and materials are inserted from the Assets panel. This panel lets you manage the files you’ve imported and the materials you’ve created using AR Studio.
Most textures need to be created in advance, but for this tutorial we’ve created a texture for you. Open the file in the sample folder you downloaded to have a quick look at the texture you’ll be using. AR Studio also supports JPG texture files.
To import your file, go to Assets, click + and select Import Assets…. Open the PNG from the sample content folder.
You should now see moustache.png in the Textures folder. You can also import assets by dragging and dropping files into the Assets panel from your computer.
Creating and Editing Materials
Now that your texture is in AR Studio, you’ll need to create a material to apply it to.
To create a material, go to Assets, click + and select Create New Material. You should now see the material you created in the Materials folder. The material’s properties should be displayed in the Inspector panel on the right. This panel lists the properties of the selected object, asset or layer, and gives you the tools to edit them.
By default, the Shader Type for materials is set to Standard, but the best type of shader to use for basic masks is the face paint material. To change it, click the dropdown menu next to Shader Type and select Face Paint.
The next step is to apply the texture to the material. To do this, click in the gray box next to Texture and select the texture you imported from the menu.
Now that you’ve applied your texture to the material, you can apply the material to the face mesh. So, go to the Scene tab, select your face mesh and go to Material in the Inspector panel. Click + next to Material and select the material you created from the menu. You should now see your material tracking your face.
Congratulations, you’ve built your first effect.
Previewing Effects
AR Studio also includes a few tools to help you preview what your effects will look like on other people and different mobile devices.
You can try different sample videos with a range of skin tones, facial hair, glasses and hair styles, so that you can be confident your effect works well for everybody. To change video or switch to live feed, click Video in the Toolbar and select the one you want to use from the menu. You can also add your own video. To do this, click Video, then click the plus sign and choose your video from your computer.
The Aspect Ratio menu in the Toolbar lets you resize both the Viewport outline and the Simulator to match the screen dimensions of common mobile devices. To resize the outlines, click Aspect Ratio and select the name of the mobile device you want to use from the menu.
